

by Diego Sanchez
January 10, 2018
Diego prevents carpal tunnel syndrome in designers worldwide by making incredible time-saving Photoshop actions and mock-ups.
How to Install & Use Brushes in Adobe Illustrator
Illustrator Tools
Illustrator brushes are a great way to speed up our workflow and enhance our designs with an endless variety of styles to use, from a single flat calligraphic one to more complex ones like inks and sparkles. Today, I would like to show you how to properly install Illustrator Brushes using 2 different methods and how you can use them as well to change the size and color once installed.
How to install an Illustrator Brush?
The first thing to do to install a Brush Library in Illustrator is to have one, and here at Medialoot you will find many Illustrator brushes to download. They come in the form of .AI files (like any normal Illustrator file) which can be confusing sometimes to differentiate which one is the Brush Library, but often all designers name the Illustrator brush files with ‘Brush Library’ in the file name so it is easy to find it. The first step to install the Brush Library is to have the file in your computer. I will use the ‘Distressed Ink Strokes’ that you can find here at Medialoot. There are a few different methods to install a Brush Library but the simpler and effective ones are those that we will take a closer look here.
Method 1
Step 1
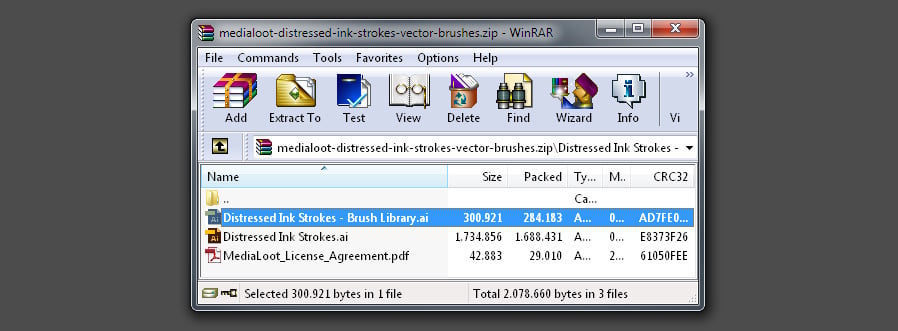
As the ‘Distressed Ink Strokes’ brush file is inside a .ZIP file, the first thing we need to do is to extract the .AI brush library file and place it anywhere on the computer.
Step 2
Go to Window > Brush Libraries > Other Library. Locate the file ‘Distressed Ink Strokes - Brush Library.ai’ in your computer and click ‘Open’.

Step 3
As you may see, now you have your new Brush Library available in Illustrator.

Step 4
As the new brush library panel will disappear as soon you quit Illustrator, the right thing to do is to make this panel persistent. To do that, just click on the top right icon of our new panel, and from the dropdown menu select ‘Persistent’.

Method 2
Step 1
First, extract the brush library .AI file anywhere on your computer.

Step 2
Go to File > New. Name this new file as ‘Brushes’, set any size you want for the document (in this case I am using a 900 x 650 px size) and click OK.

Step 3
Go to Window > Brushes. In the brush panel, click on the top right icon and from the dropdown menu select ‘Open Brush Library > Other Library’.

Step 4
Locate the file ‘Distressed Ink Strokes - Brush Library.ai’ in your computer and click ‘Open’.

Step 5
Now you have your new Brush Library available in Illustrator.

Step 6
Just like the previous method, the new brush library panel will disappear as soon you quit Illustrator, so we will make this new panel persistent by clicking on the top right icon of our new panel, and selecting ‘Persistent’ from the dropdown menu.

How to use an Illustrator Brush?
Using an Illustrator Brush is very simple and it does not requires that you have an advanced Illustrator knowledge. To better explain you how to use a brush in Illustrator, let’s see an example using our recently loaded ‘Distressed Ink Strokes‘ Brush Library.
As we already made our new brush library persistent, we have the ‘Distressed Ink Strokes‘ brush panel visible. If you do not have it visible, just follow the steps 2 to 4 from the Method 1 I just explained.
Using the Paintbrush Tool
Step 1
Go to File > New. Name this new file as ‘Brushes’, set any size you want for the document (in this case I am using a 900 x 650 px size) and click OK.

Step 2
In the ‘Distressed Ink Strokes‘ brush panel select any brush you want (I will be using the first one called ‘Distressed Ink Strokes 1’).

Step 3
In the Tools Panel, select the Paintbrush (B) and start painting anything you want over the canvas. As you may see, all the brush strokes that you do will have the ‘Distressed Ink Strokes 1’ style applied.

Using the Pen Tool
Step 1
In a new document (I will be using the same one we already did), select the Pen Tool (P) and draw any path (or paths) that you want.

Step 2
Go to Select > All.

Step 3
From the ‘Distressed Ink Strokes‘ brush panel click over any brush you want (I will be using the third one called ‘Distressed Ink Strokes 3’), and as you may see the brush style we choosed is immediately applied to all of our selected paths.

Using the Shape Tool
Step 1
In a new document (I will be using the same one we already did), select the Ellipse Tool (L) and draw a circle.

Step 2
With the Circle shape we just created selected, simply choose any of the available brushes inside the ‘Distressed Ink Strokes‘ brush panel and click on it. In this case, I will be using the one called ‘Distressed Ink Strokes 14’

Changing Brush Size and Color
Changing the size and color of a brush is a very simple task and will just require a few clicks to make it.
Step 1
Let’s say we have a star shape we just did, either using the Pen Tool, the Star Tool or even the Paintbrush Tool and we applied the ‘Distressed Ink Strokes 8’ from our recently loaded Brush Library to it using the default settings: 1 pt stroke and black color.

Step 2
With our star shape selected, go to Window > Stroke.

Step 3
In the Stroke Window, set the Stroke Weight that you wish to apply to the shape. I will set the Weight to 1,5 pt just to make it a bit bigger.

Step 4
With the shape still selected, go to Window > Color.

Step 5
Be sure to have the Stroke Color active, and set any color you wish.

Some Final Notes
As you may see, installing and using Illustrator Brushes is a very easy process and there are plenty of different brushes available to make your work easier. One of the biggest advantages of using brushes rather than drawing a complex shape (besides saving you a lot of time) is that you can test as many styles as you want with one single click to perfectly match your design.


Comments