
by Tony Thomas
February 28, 2017
Tony creates pixel-perfect UI kits & icons. His pug, Wednesday, is Medialoot's beloved mascot.

How to Create a Dramatic Portrait Scene with Smoke in Photoshop
Transform and intensify the atmosphere of an image
This tutorial will teach you how to use Select and Mask, Adjustment Layers and Dodge/Burn tools to manipulate a photograph and create a dark ambiance which really intensifies the scene and completely transforms the atmosphere of the original image.
This tutorial uses two resources which can be downloaded in advance here:
- Model by Nissor on Pixabay
- Smoke Texture Sample from 10+ High-Res Smoke Textures (Medialoot Premium)
Step 1
Open the portrait stock photo in Photoshop CC and draw a rough selection around the model using the Polygonal Lasso Tool.
Note: We are going to use Select and Mask in the next 2 steps to refine the selection. If your version of Photoshop doesn't haven't the Select and Mask feature then spend a little more time on this step and create an accurate selection instead.
Step 2
Click Select and Mask, choose your desired view mode (I like Overlay) then use the Quick Selection Tool to draw around the edges of the model.
Step 3
Use the Refine Edge Brush Tool on the trickier areas of hair. When you are happy with the selection click OK.
Step 4
Copy the selection to the clipboard and then create a new Photoshop document 3000 x 2000 pixels, 72 PPI, RGB Color and Black Background Contents.
Step 5
Paste the model selection into the new document, then transform (whilst holding down Shift to constrain proportions) and place it near the center of the canvas.
Step 6
Create a new bitmap layer, set the foreground color to black #000000 and use the Brush Tool with a soft round 125 pixel brush to carefully paint around the edges of the model.

Step 7
Create a new Gradient Fill Layer from the Layer > New Fill Layer menu. Choose the default Foreground (#000000) to Transparent gradient, and leave the other options as their defaults.
Step 8
Double click the gradient to modify it, and move the top right handle to Location: 50. Then click OK twice to confirm the new layer.
Step 9
Add a new Curves Adjustment Layer, create 3 new points on the curve and arrange them as shown in the screenshot below to darken the shadows and midstones.
Step 10
Place the Smoke Texture into the document and fill the canvas.
Step 11
Set the Blending Mode of the Smoke Texture to Screen and the Opacity to 80%.
Step 12
Add a new Layer Mask and use a soft round 125 pixel brush at 70% Opacity to paint over the models face.
Step 13
Grab the Gradient Fill layer from step 7 and move it above the smoke texture layer to fade out the bottom areas of the smoke.
Step 14
Add a new Black & White Adjustment Layer and select the Darker preset from the dropdown. Then set the opacity of the adjustment layer to 80%.

Step 15
Add a new Levels Adjustment Layer and set the middle value to 0.55.
Step 16
Go back to the original model layer, then choose the Burn Tool, set the Range to Highlights and Exposure to 50 and paint over some of the areas that are too bright, these will most likely be on top of the models head and the left side of her face and shoulder.
Step 17
Switch to the Dodge Tool, set the Range to Midtones and Exposure to 20 then paint over the models forehead, nose and lips/chin to emphasis the lighting.
Step 18
Create a new blank layer above all other layers, and fill it with black (#000000). Then go to Filter > Noise > Add Noise.., enter 50 for Amount, Gaussian for distribution and tick Monochromatic then click OK.
Step 19
Set the Blending Mode of the noise layer to Screen and the Opacity to 15%.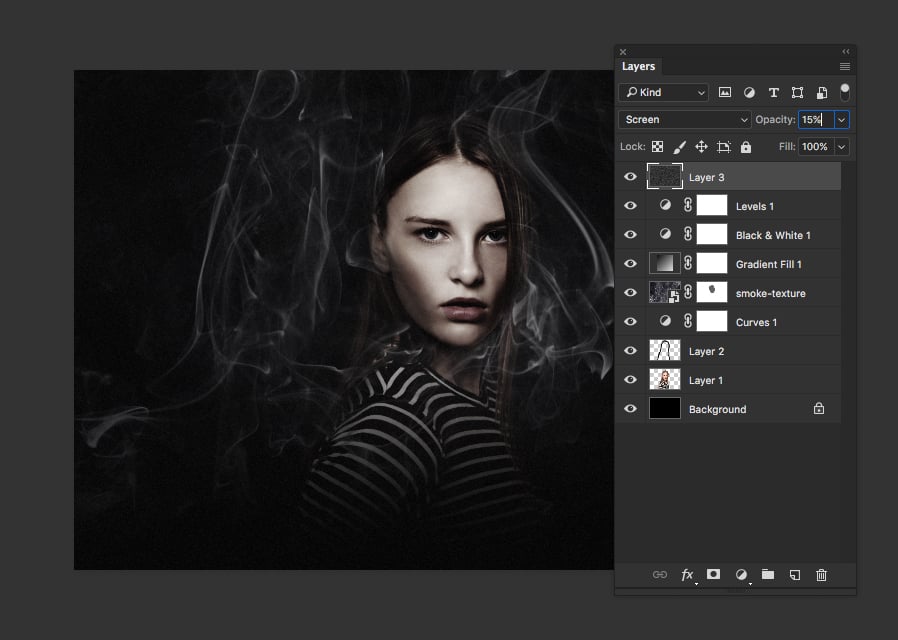
Step 19
Create another Levels Adjustment Layer and set the middle value to 1.28.
Step 20
Create another Curves Adjustment Layer and create one new point in the center of the curve then arrange the points as shown in the screenshot below.
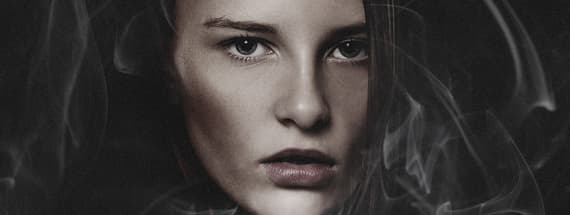
Result & Conclusion
Here is the final result:
Hopefully you have enjoyed following along with this tutorial and learned something new! We have covered how to use Select and Mask, Adjustment Layers and Dodge/Burn tools to manipulate a photograph and create a dark ambiance which really intensifies the scene and completely changes the atmosphere of the original image.


Comments