
by Tony Thomas
August 10, 2018
Tony creates pixel-perfect UI kits & icons. His pug, Wednesday, is Medialoot's beloved mascot.

How to Make a Torrential Rain Storm in Photoshop
Turn a light flurry into a torrential rain storm
This tutorial will teach you how to create a realistic rain effect in Photoshop that can be applied to any photo, to create a dramatic scene, whether it was raining at the time or not... Best to avoid trying it with sunny or indoor photos though.
Step 1
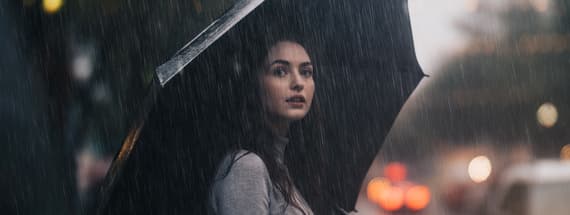
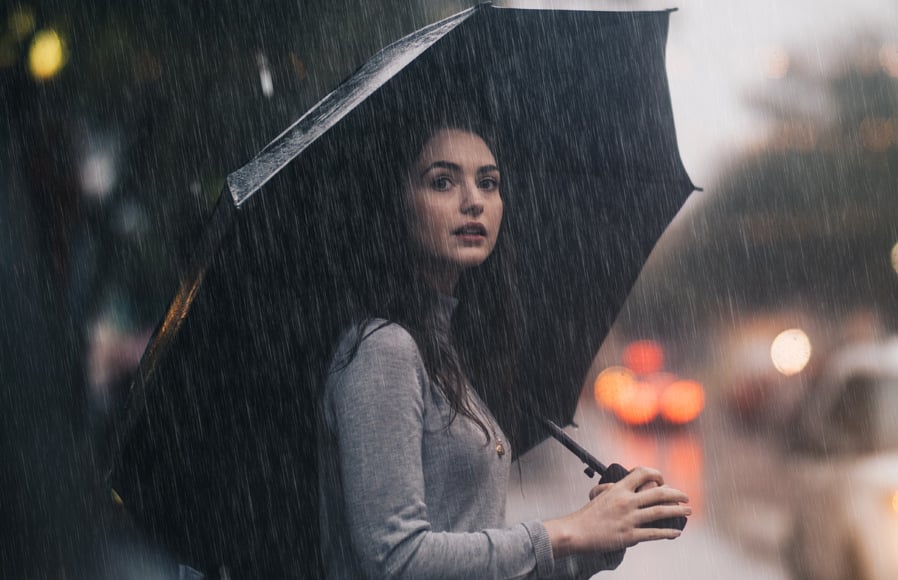
The first step is to open your photograph in Adobe Photoshop CS5 or newer. For this tutorial I am using this image from Unsplash. As you can see there is a little bit of rain in the original image, which will add to the realism. We are going to turn this light flurry into a torrential rain storm.

Step 2
Go to Layer > New > Layer... and create a new blank layer called 'Fine Rain'.

Step 3
Use the Paint Bucket Tool to fill the new layer with black #000000.

Step 4
Go to Filter > Pixelate > Mezzotint and select Medium Dots from the Type dropdown then click OK.

Step 5
Next go to Filter > Blur > Motion Blur... and set the Angle to -80 and 60 Pixels Distance. This create a base rain effect, you can use a different angle if desired (depending on the hypothetical wind speed in the storm).

Step 6
Motion Blur can create an undesirable effect around the edges, we can remedy this by simply using the Transform tool to enlarge the layer slightly and hide the edges off canvas.

Step 7
Go to Image > Adjustments > Levels... and enter 16 for the Shadow Input and 216 or the Highlight Input values. This will remove some of the finer details and make the rain look more realistic.

Step 8
Go to Layer > New > Layer... and create a new blank layer called 'Heavy Rain' this time.

Step 9
Use the Paint Bucket Tool to fill the new layer with black #000000 again.

Step 10
Go to Filter > Pixelate > Mezzotint and select Coarse Dots from the Type dropdown then click OK.

Step 11
Next go to Filter > Blur > Motion Blur... and set the same angle as the first time around -80 but 180 Pixels Distance this time. This creates a heavier rain effect due to using coarse dots and double the blur distance.

Step 12
Again, Motion Blur can create an undesirable effect around the edges, so use the Transform tool to enlarge the layer slightly and hide the edges off canvas.

Step 13
Go to Image > Adjustments > Levels... and enter 28 for the Shadow Input and 154 or the Highlight Input values. This will remove some of the finer details and make the rain look more realistic.

Step 14
Duplicate the 'Heavy Rain' layer and optionally rename it 'Heavy Rain (Specular Highlights).

Step 15
Go to Filter > Blur > Lens Blur... and set the following options:
- Shape: Hexagon
- Radius: 40
- Blade Curvature: 100
- Rotation: 0
- Specular Highlights: 100
- Threshold: 62*
*You will probably need to experiment with these settings, in particular the Threshold value, until you have a only few bright white highlights and a handful of semi transparent specs scattered around (don't worry about the edges).

Step 16
When you are happy with the Lens Blur effect, set the Blending Mode of both Heavy Rain layers to Screen.

Step 17
Go to Layer > New Fill Layer > Gradient... and click OK

Step 18
Select the default Black to White gradient, set the style to Radial, scaled to 200% and check the Reverse option. Then use the mouse cursor on the canvas to reposition the gradient roughly 50% higher.

Step 19
Set the Blending Mode of the new gradient layer to Soft Light and Opacity to 50%.

Step 20
Now it's finally time to apply our rain overlay to the image. Group all 4 of the rain layers and set the Blending Mode of the group to Screen.

Step 21
The image is looking a little washed out, so we can do some final tweaks using a Levels adjustment layer. Make sure the adjustment layer is above the group layer and set the Shadow Input to 10 and Highlight Input to 250.

Result & Conclusion
As you can see, that light flurry from the original photograph is now a full on torrential rain storm. This technique can be used on almost image, whether it was raining in the original or not. Although it does of course look better and more believable on night time images or images with light rain.


Comments