

by Diego Sanchez
May 29, 2019
Diego prevents carpal tunnel syndrome in designers worldwide by making incredible time-saving Photoshop actions and mock-ups.
Popular Photoshop Color Effects and How to Use Them
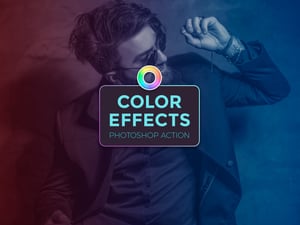
Photoshop Color Effects
You can really do anything to an image in Photoshop, but color effects are by far the most popular tools. Whenever you're editing an image, you will almost undoubtedly make some color adjustments, even if they're just slight ones.
Color also makes changing the mood of an image an easy task, either by adding cool or warm tones, black & white, sepia and even the trending Duotone effect, all of them can be used to enhance your picture.
Although there are many different color effects that we can use on our images, here are 6 of the most popular Photoshop color effects used everywhere which you can also find here at Medialoot.
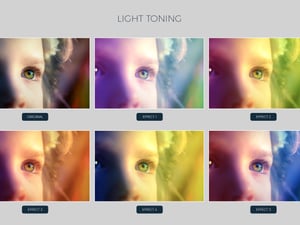
Photo Color Effects for Photoshop
Made for beginners or advanced users, with a single click of the mouse you can easily add 20 different color effects to any image at any size and resolution and combine 2 or more layers to achieve new effects and give your image the exact effect you are looking for.
Step 1
Open any image in Photoshop and be sure that is set as the background (if not, go to Layer > New > Background from Layer).

Step 2
In the Actions Panel (Window > Actions) expand the “Medialoot - Photo Color Effects” action container.

Step 3
Select the "Photo Color Effects" action and click the play button in the Actions Panel.

Step 4
When the action finish, simply turn on/off the different effect layers to choose the one you like the most. In this case the file was left with the default settings.

Step 5
You may also combine different layers from different layer groups to achieve new effects. Turn off the “Light Toning” layer group, and turn on the “Duotone” one. You may pick any effect you want inside any of the layer groups, in this case the “Duotone 3” is the active one.

Step 6
Now simply turn on the “Hue” layer group, choose the “HSL 1” layer inside the layer group and decrease the opacity of this layer to around 65%.

Instagram Filter Effects for Photoshop
By using a single Smart Object, the Instagram Filter Effects will give you a total of 25 different effects with a unique look for your pictures and the possibility to freely combine 2 or more of them to achieve even more effects.
Step 1
Open any of the included PSD files depending if you will use a horizontal or vertical image orientation.

Step 2
Double click on the thumbnail of the Smart Object layer named “Your Image”.

Step 3
In the new document, place your image either by dragging it to the canvas or using the File > Place menu command.

Step 4
Make your image cover the whole canvas size and go to File > Save and close the new opened document.

Step 5
Back in the original PSD file and with your image already placed, simply turn on the effect you like the most for that particular image. In this case I will use the effect 9.

Step 6
Turn on the “Extra Warming” layer inside the “Extras” layer group.

Step 7
To achieve a different effect, turn on the effect 14 and also the effect 19 (or any other combination you want).

Duotone Photoshop Action
Compatible with CMYK and RGB color mode images, the Duotone Photoshop Action will give your image 20 different color combinations of duotone effects. It is a very simple action to use and is available for free here at Medialoot.
Step 1
Open any image in Photoshop and be sure that is set as the background (if not, go to Layer > New > Background from Layer).

Step 2
In the Actions Panel (Window > Actions) expand the “Medialoot - Duotone” action container.

Step 3
Select the "Duotone - RGB" or the “"Duotone - CMYK" action (depending on your image color mode) and click the play button in the Actions Panel.

Step 4
When the action finish, expand the “Duotones” layer group.

Step 5
Turn on any of the different duotone layers to choose the one you like the most. In this case I will pick the effect #10.

Step 6
Additionally, you can adjust the overall contrast simply by decreasing/increasing the “Adjust Contrast” layer opacity. In this case, I will decrease the opacity just a bit to 70%.

Vintage Image Photoshop Template
An easy way to start making your picture look like a vintage one is by using this Photoshop template. Made for both vertical and horizontal pictures you can easily achieve a wide range of effects by combining 2 or more of the 20 different available effects.
Step 1
Open any of the included PSD files depending if you will use a horizontal or vertical image orientation.

Step 2
Double click on the thumbnail of the Smart Object layer named “Your Image”.

Step 3
In the new document, place your image either by dragging it to the canvas or using the File > Place menu command.

Step 4
Make your image cover the whole canvas size and go to File > Save and close the new opened document.

Step 5
Back in the original PSD file and with your image already placed, simply turn on the effect you like the most for that particular image. In this case I will use the effect 9.

Step 6
Turn on the “Overall Adjustment” layer group and inside it, turn on the “Gradient Map” layer.

Step 7
To achieve a different effect, turn on the effect 14 (or any other you want) and decrease the opacity of the 14 layer group to 40%.

Spring Photoshop Actions
This set of Photoshop Actions includes 15 standalone actions to give your images a fresh look by combining different effects, adjustments layers and colors.
Step 1
Open any image in Photoshop and be sure that is set as the background (if not, go to Layer > New > Background from Layer).

Step 2
In the Actions Panel (Window > Actions) expand the “Medialoot - Spring” action container.

Step 3
Select any of the 15 included action and click the play button in the Actions Panel. In this case, I will run the Action 3.

Step 4
When the action finish, expand the “3” layer group.

Step 5
At this point, you can turn on/off any of the layers containing the different settings to achieve different looks. Let’s start by turning off the “Lighten” and “Contrast” layers.

Step 6
Double click on the thumbnail of the “Color Fill” layer. In the Color Picker window, set the color to #a75eac and click OK.

Step 7
Select the “Color Fill 2” layer and set the blend mode to “Color Burn”.

Color Halftone Template
With this Photoshop Template, you can instantly emulate the halftone effect used on newspapers and old press machines but with the extra color feature. It is a perfect template to transform your pictures and designs into an authentic vintage and retro press style easily by replacing one single Smart Object.
Step 1
Open the “Color Halftone Template.psd” file in Photoshop.

Step 2
Double click on the thumbnail of the Smart Object layer named “Your Image Here”.

Step 3
In the new document, place your image either by dragging it to the canvas or using the File > Place menu command.

Step 4
Make your image cover the whole canvas size and go to File > Save and close the new opened document.

Step 5
Back in the original PSD file and with your image already placed, expand the “Adjustments” layer group to make a few modifications to the file.

Step 6
Double click on the thumbnail of the “Change Gradient Colors” layer.

Step 7
In the Gradient Fill window, click over the gradient thumbnail.

Step 8
In the Gradient Editor, pick any of the default Photoshop Gradients, edit the current one or create your own. In this case, I will setup the Gradient from #391c52 to #fe8374. Click OK in the Gradient Editor and Gradient Fill windows.

Step 9
Additionally, you can also change the default Vibrance, Curves, Exposure, Levels or even the Halftone Size. To do that, expand the Layer Effects Panel of the “Your Image Here” layer by clicking on the down arrow in the layer’s name.

Step 10
Double click on the “Color Halftone” Smart filter name. In the Color Halftone window, set the “Max. Radius” to any value between 4 and 127 and click OK. In this case, I will make it smaller and set the Radius to 8.


Comments