

by Diego Sanchez
November 08, 2024
Diego prevents carpal tunnel syndrome in designers worldwide by making incredible time-saving Photoshop actions and mock-ups.
How to Create a Custom Halftone Lines Text Effect in Photoshop
Photoshop Text Effects
When you want to create a custom halftone effect in Photoshop, there are many different ways to do it, but one of the simplest and most versatile methods is by using the Filter Gallery. Today, I will show you how to create a stunning halftone lines text effect that’s perfect for posters, vintage designs, comic-style artwork, and even bold branding. With just a few steps, you can transform your text into a striking visual element using a halftone texture that adds both depth and style. By leveraging the Filter Gallery, this effect is quick and easy to achieve with no complex techniques required, and you can still edit your text even after applying the effect.
Step 1
Open Photoshop and make a new file at any size you want. In this case I will make mine at 1800 x 1200 px.

Step 2
Select the Horizontal Type Tool (T) and type your text using any font you wish. Today, I will be using "Boldfinger" at 370 pt with a black color.

Step 3
Go to Layer > New > Layer. Name this layer as "Halftone Lines" and click OK.

Step 4
Select the Paint Bucket Tool (G), be sure to have your Foreground color set to white and click once over the artboard to fill it with a white color.

Step 5
Go to Filter > Filter Gallery.

Step 6
Expand the "Sketch" folder, select the "Halftone Pattern" effect, apply the following settings and click OK.

Step 7
Next, change the "Halftone Lines" blending mode to "Vivid Light".

Step 8
Select your text layer and go to Layer > Smart Objects > Convert to Smart Object.

Step 9
Lastly, go to Filter > Blur > Gaussian Blur. Set the Radius to about 8 pixels and click OK.

Some Final Notes:
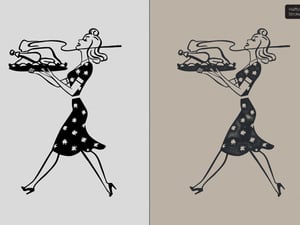
Now that you know how to easily create a custom halftone lines text effect in Photoshop, you can edit the text via the Smart Object, scale the halftone lines, and adjust the Gaussian Blur values to achieve a different effect, as shown in the following example.


Comments