
by Diego Sanchez
April 25, 2017
Diego prevents carpal tunnel syndrome in designers worldwide by making incredible time-saving Photoshop actions and mock-ups.


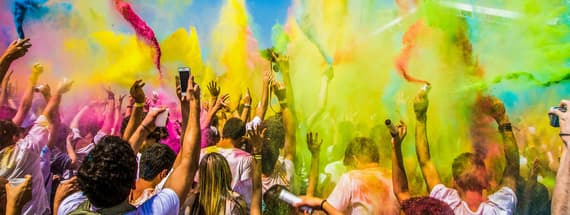
Make Colors Pop in Lightroom or Photoshop
Make those colors sing
There are many ways to make colors pop — sometimes too many, and many of them are specific and image-dependent. Here is a simple, easy to follow solution to make your colors stand out in any image. Lightroom steps are shown first, and Photoshop methods are below.
The Lightroom Method
Step 1
Open your image in Lightroom and go to the Develop Panel (Window > Develop).

Step 2
Let´s start by focusing on the Basic Panel, where we will set up a few of the overall adjustments for all of our images. First we will increase the Exposure and the Contrast a bit. Set the Exposure to +0,20 and the Contrast to +20.

Step 3
The next step is to decrease all the Highlights and increase our Shadows. Set the Highlights to -100 and the Shadows to +75.

Step 4
We now need to handle the Whites and Blacks of our image, and we will decrease both of these values. Set the Whites to -75 and the Blacks to -20.

Step 5
The next thing to do is to increase a bit the Clarity, Vibrance and Saturation of our image. Set the Clarity to +15, the Vibrance to +30 and the Saturation to +5.

As you may see, the image colors started to look much more prominent than the original one, but we still have to make a few adjustments so we can use it on any image.

Step 6
Here, we will make just a small adjustment on our Tone Curve. Click on the tone curve in order to add 2 curve control points to make a small “S”. Drag one of the points as near as you can to 70,2/74,5% for the top one and 26,7/22,4% for the bottom one.

Step 7
Now, we will make some adjustments on our HSL Panel. Under the HSL Panel, click over the Saturation tab and set the Red to -15, the Green to +15, the Blue to +15 and the Magenta to -5

Step 8
Finally, we will add some details to our image. Here, you will have to make some minor adjustments depending on your image, because we will be touching the Sharpening and Noise Reduction settings as well the Color; but the settings I am using here are a good start point.
Under Sharpening, set the Amount to 50 and the Masking to 20. Then, under Noise Reduction, set the Luminance to 20 and Color to 25.

Step 9
In order to use these settings an unlimited number of times just by clicking 1 button, let´s save them as a Lightroom Preset.
In the Presets Panel, click over the “+” sign. Give the Preset a name, and be sure to check all of the following settings, then click on “Create”. Now, under your User Presets folder, you will find your recently create Preset to be used on any image you want.

The Photoshop Method
Step 1
Open your image in Photoshop and go to Layer > Smart Objects > Convert to Smart Object.

Step 2
With your image converted to an Smart Object, go to Filter > Camera Raw Filter. Just like we did on Lightroom we will start by focusing on the Basic Panel, where we will set up a few of the overall adjustments for all of our images. In the “Basic” tab, set the following values:

Step 3
Click on the “Tone Curve” tab and select the “Point” tab. Click on the tone curve in order to add 2 curve control points to make a small “S”. Set the top point to Input: 190 – Output: 195. Set the bottom point to Input: 68 - Output: 60

Step 4
Click on the “Detail” tab and Under Sharpening, set the Amount to 50 and the Masking to 20. Then, under Noise Reduction, set the Luminance to 20 and Color to 25.

Step 5
Click on the “HSL/Grayscale” tab and select the “Saturation” tab. Just like we did in Lightroom, set the Reds to -15, the Greens to +15, the Blues to +15 and the Magentas to -5.

Step 6
In order to use these settings an unlimited number of times just by clicking 1 button, let´s save them as a Preset.
Click on the “Presets” tab and then on the “New” icon. In the New Preset Window, give the Preset a name, and be sure to check all of the following settings, then click OK. Now, under your Presets tab, you will find the recently create Preset to be used on any image you want.


Take a look at some before/after images that have been improved using this Preset:


Comments