

by Diego Sanchez
November 07, 2025
Diego prevents carpal tunnel syndrome in designers worldwide by making incredible time-saving Photoshop actions and mock-ups.


How to Give your Photos a Moody Black Style in Lightroom
Lightroom Post Processing
Creating a moody black style in Lightroom is all about enhancing depth, contrast, and emotion while keeping a refined monochromatic look. By carefully adjusting tones, shadows, and highlights, you can transform an ordinary image into something cinematic and expressive. In this tutorial, we’ll use only a few simple Lightroom adjustments to achieve that signature dark and atmospheric feel, perfect for portraits, street photography, or any image that benefits from a dramatic touch.
Step 1
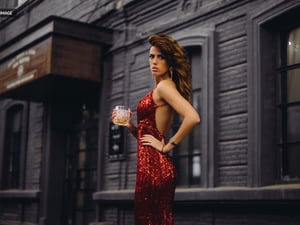
Open your image in Lightroom.

Step 2
Go to the Develop tab.

Step 3
Expand the "Basic" tab and apply the following settings.

Step 4
Next, expand the "Tone Curve" tab, be sure to have the "Point Curve" selected and click 3 times anywhere on the curve to add 3 new control points.

Step 5
Set each control point to the following Input/Output values:
- 0 - 10
- 70 - 55
- 135 - 115
- 190 - 170
- 255 - 240

Step 6
Expand the "Color Mixer" tab and apply the following settings.

Step 7
If you plan to use this effect on more images, a good idea is to save all of these settings as a new Preset. To do that, on the left panel, click on the "Add New Preset" icon and from the dropdown menu select "Create Preset".

Step 8
In the "New Develop Preset" window, give your preset a name and click the "Create" button. This will create a new preset that you can later use over any other image you want.

Conclusion
Now that you’ve learned how to create a moody black style in Lightroom, you can easily bring a cinematic depth and emotional tone to your photos. Try experimenting with the exposure, contrast, and tone curve settings to refine the mood even further. This editing approach works beautifully across different photography styles, helping you achieve a timeless, sophisticated look with just a few subtle adjustments.


Comments