
by Tony Thomas
August 17, 2017
Tony creates pixel-perfect UI kits & icons. His pug, Wednesday, is Medialoot's beloved mascot.


How to Add Your Logo to a Grunge Texture
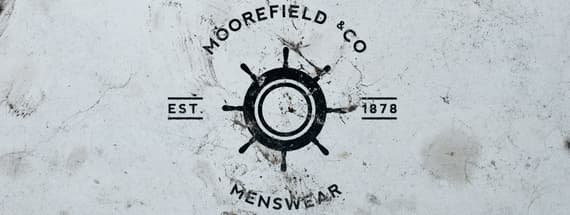
Mockup your logo on any grunge texture
This tutorial will show you how convincingly to add your logo to any grunge texture or background. The techniques we will use include using displacement maps, layer styles and manipulating textures.
What You'll Need
If you want to follow along with this tutorial you can download the free samples of the logo and texture we have used:
Step 1
Start by launching Adobe Photoshop and opening the texture in a new document.

Step 2
Save a copy of your document as a Photoshop file called Displacement Map.psd. Then save it again with another name so that you don't make any further changes to Displacement Map.psd (just keep it handy for later).

Step 3
Open the logo file in Illustrator and copy it to the clipboard.

Step 4
Paste the logo into your photoshop document as a Smart Object.

Step 5
Transform and position your logo as required and then click Enter to confirm placement.

Step 6
Now we want to add some distortion to the logo so that it fits in with grunge texture. First we can add some subtle waves to the edges of the logo by going to Filter > Distort > Ripple and entering 12% for the Amount, and using the size Large.

Step 7
Next we can use the actual background texture to distort the logo further. Go to Filter > Distort > Displace and enter 5 for both Horizontal and Vertical Scale. Then click OK.

Step 8
You will be prompted to open a file. Locate the Displacement Map.psd file that you saved in step 2.

Step 9
The effect of the displacement can be a little too rough around the edges to look realistic. But we can apply an extremely subtle blur to fix this. Go to Filter > Blur > Gaussian Blur and enter 0.25 Pixels.

Step 10
The shape of the logo is looking pretty good now, but it also needs some surface texture. Duplicate the background layer and place the new copy above the logo layer. The layers panel should look like the screenshot below

Step 11
Press CMD+i or CTRL+i to invert the colors of the texture.

Step 12
Then use Hue/Saturation to desaturate the texture, or press the shortcut CMD+SHIFT+U or CTRL+SHIFT+U.

Step 13
Right click on the top texture layer and choose Create Clipping Mask then set the Blending Mode to Screen. This will add the inverted texture to the logo, which works surprisingly well because the grunge appears to line up perfectly with the background texture.

Step 14
Finally, we can smooth out the edges a bit more by adding a thin layer of noise around the logo. Double click on the logo layer to open the Layer Style window and add an Outer Glow using these settings:
- Blend Mode: Normal
- Opacity: 25%
- Noise: 100%
- Color: Black
- Size: 1px

Result & Conclusion
Here is the final result. Some will textures and logos will work better than others but this technique can pretty much be used with any light texture and black logo, shape or text layer. Thanks for following along with this tutorial, hopefully you have found it informative and learned something new!


Comments