
by Diego Sanchez
March 19, 2024
Diego prevents carpal tunnel syndrome in designers worldwide by making incredible time-saving Photoshop actions and mock-ups.


How to Easily Make a Textile Mockup in Photoshop
Photoshop Mockups
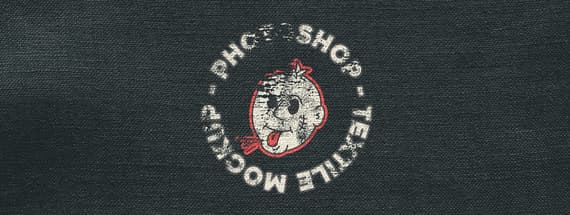
Mockups are a very useful tool for designers, as they allow you to visualize what a design will look like in a real context. In the case of textile mockups, they are ideal for showing how a printed/stamped design will look on a t-shirt, sweatshirt or any other type of garment. So today, I will show you how easily you can make your own textile mockup in Photoshop.
But before we begin you will need a few assets: the design you want to use on your mockup, any fabric texture you like and if you want to make it look a bit more grungy, you can download the Rolled Ink Textures pack from the WeGraphics site: Download
Step 1
Open Photoshop and make a new file at any size you want. In this case I will make mine at 1800 x 1200 px.

Step 2
Go to Layer > New Fill Layer > Solid Color. Name this layer as "Fabric Color" and click OK.

Step 3
Set any color you like for your fabric in the Color Picker window and click OK. In this case, I will set mine to #2a3435.

Step 4
Go to File > Place Embedded. Locate your design file on your computer and click the Place button.

Step 5
Scale the design if needed and hit the Enter key on your keyboard to commit the changes.

Step 6
Go to Layer > New > Group from Layers. Name this layer group as "Stamp" and click OK.

Step 7
Select the "Design" layer and again, go to File > Place Embedded. Locate the Rolled Ink Texture (or any other grunge texture you want to use) on your computer and click the Place button. In this case, I will use the Texture 09 from the Rolled Ink Set.

Step 8
Scale the texture to cover your design and hit the Enter key on your keyboard to commit the changes.

Step 9
Go to Layer > Layer Style > Blending Options. Apply the following settings and click OK.

Step 10
Select the "Stamp" layer group and once again go to File > Place Embedded. Locate the fabric texture you want to use on your computer and click the Place button.

Step 11
Scale the fabric texture to cover the whole artboard and hit the Enter key on your keyboard to commit the changes.

Step 12
Lastly, set the fabric texture blend mode to "Linear Light" and decrease the opacity to your liking. In this case, a 30% opacity seems to work just fine.

Some Final Tips:
Now that you know how to easily make a textile mockup in Photoshop, you can change the fabric color, try different fabric textures, change the design at anytime and test different grunge textures (like wood, dust, etc) to make your design looks aged and with more character.


Comments