
by Diego Sanchez
March 19, 2018
Diego prevents carpal tunnel syndrome in designers worldwide by making incredible time-saving Photoshop actions and mock-ups.
Flawless Portrait Photo Retouching In Adobe Photoshop
Manual Retouch vs Photoshop Actions
There are many different techniques for retouching a portrait in Photoshop, and many details to take care to make it look just perfect. Of course this will use a huge amount of time, especially if the portrait has too many things that we have to fix, like the skin, eyes, lips, etc. Today I will show you the manual process of retouching a portrait (using the quicker methods), and then show you how Photoshop Actions made for retouching purposes can save you a lot of time with more control and better end results.
The Manual Process
Skin
Step 1
With the portrait already opened in Photoshop, locate the skin areas with any kind of imperfections that you want to retouch.

Step 2
Duplicate the Background layer and name this new layer as ‘Surface Blur’. Go to Filter > Blur > Surface Blur

Step 3
In the Surface Blur window set the Radius to 55, the Threshold to 30 and click OK. Note that you may need to adjust a bit these values according to your own image.

Step 4
Again, duplicate the Background layer, but this time name it ‘High Pass’. Go to Filter > Other > High Pass.

Step 5
In the High Pass window set the Radius to 1,8 pixels and click OK. Note that you may need to adjust a bit this value according to your own image.

Step 6
With the ‘High Pass’ layer selected, set the Blend Mode to ‘Linear Light’ and bring down the Opacity to 65%.

Step 7
With the ‘High Pass’ layer still selected, hold Shift on your keyboard and click over the ‘Surface Blur’ layer to have both layers selected.

Step 8
Drag both layers to the folder icon in the layers panel to create a new layer group. Rename this group to ‘Skin’.

Step 9
Hold the ‘Alt’ key and click over the layer mask icon in the layers panel to add a full mask to the ‘Skin’ layer group.

Step 10
With a soft white brush, paint over the skin areas that you want to fix and bring down the opacity of the ‘Surface Blur’ layer group to 60%.

Eyes
Step 1
Click over the folder icon in the layers panel to create a new layer group, and name this group as ‘Eyes’.

Step 2
Click over the adjustment layer icon in the layers panel, and select Brightness/Contrast.

Step 3
In the Brightness/Contrast window, set the Brightness to 45 and the Contrast to 95.

Step 4
Select the ‘Eyes’ layer group.

Step 5
Hold the ‘Alt’ key and click over the layer mask icon in the layers panel to add a full mask to the ‘Eyes’ layer group.

Step 6
With a soft white brush, paint only over the eyes and bring down the opacity of the ‘Eyes’ layer group to 60%.

Lips
Step 1
Duplicate the Background layer and drag it to the top of your layers panel so it become the top layer.

Step 2
Name this layer as ‘Lips Details’ and go to Filter > Other > High Pass. In the High Pass window set the Radius to 30 pixels and click OK. Note that you may need to adjust a bit this value according to your own image.

Step 3
With the ‘Lips Details’ layer selected, set the blend mode to ‘Vivid Light’.

Step 4
Hold the ‘Alt’ key and click over the layer mask icon in the layers panel to add a full mask to the ‘Lips Details’ layer.

Step 5
With a soft white brush, paint only over the lips and bring down the opacity of the ‘Lips Details’ layer to 60%.

Teeths
Step 1
Click over the folder icon in the layers panel to create a new layer group, and name this group as ‘Teeths’.

Step 2
Click over the adjustment layer icon in the layers panel, and select Brightness/Contrast.

Step 3
In the Brightness/Contrast window, set the Brightness to 45.

Step 4
Select the ‘Teeths’ layer group.

Step 5
Hold the ‘Alt’ key and click over the layer mask icon in the layers panel to add a full mask to the ‘Teeths’ layer group.

Step 6
With a soft white brush, paint only over the eyes and bring down the opacity of the ‘Teeths’ layer group to 60%.

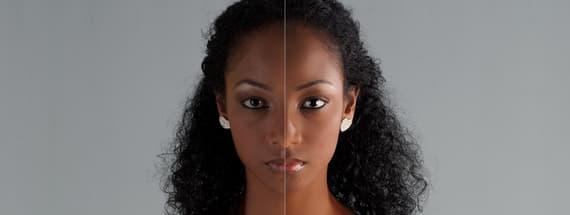
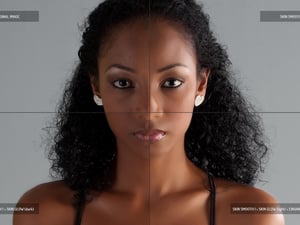
Result
By doind the work manually we can achieve a good result, but we spend a lot of time in the process and if we forget to fix some area, we have to start over again (or at least the part we missed). But after all the work, here is our final result.

With Photoshop Actions
Now that we saw how to make some basic retouch on our portrait, let´s see how Photoshop Actions can save us precious time and give us better end results. To show you how powerful actions are, I will first use a basic retouch action set for those portraits that do not require too many modifications. You can find the ‘Photoshop Portrait Enhancing Action’ right here at Medialoot.
Photoshop Portrait Enhancing Action
Installing the Action
Step 1
Unzip the ‘Portrait Enhancer.atn’ file that you will find in the downloaded .zip file. Open Photoshop and go to Window > Actions.

Step 2
In the Action panel, click on the top right icon and select ‘Load Actions’. Locate the .atn file you just downloaded and click Load. The action set now is shown in the Actions Panel.

Fixing Skin
Step 1
Open your image in Photoshop.

Step 2
Select the ‘Skin’ action and hit the play button in the actions panel.

Step 3
After a few seconds, the action will finish, and all you have to do is to select a soft white brush and paint on those areas where you want to apply the effect. Additionally, you can bring up or down the layer group opacity to increase or decrease the effect.

Fixing Eyes
Step 1
Select the ‘Eyes’ action and hit the play button in the actions panel.

Step 2
After a few seconds, the action will finish, and all you have to do is to select a soft white brush and paint only over the eyes to reveal the effect. Additionally, you can bring up or down the layer group opacity to increase or decrease the effect.

Fixing Lips
Step 1
Select the ‘Lips’ action and hit the play button in the actions panel.

Step 2
After a few seconds, the action will finish, and all you have to do is to select a soft white brush and paint over the lips to reveal the effect. Additionally, you can bring up or down the layer group opacity to increase or decrease the effect.

Fixing Teeths
Step 1
Select the ‘Teeths’ action and hit the play button in the actions panel.

Step 2
After a few seconds, the action will finish, and all you have to do is to select a soft white brush and paint over the teeths to reveal the effect. Additionally, you can bring up or down the layer group opacity to increase or decrease the effect.

Reducing Redness
Step 1
Select the ‘Red reducer’ action and hit the play button in the actions panel.

Step 2
After a few seconds, the action will finish, and all you have to do is to select a soft white brush and paint on those areas where you want to apply the effect. Additionally, you can bring up or down the layer group opacity to increase or decrease the effect.

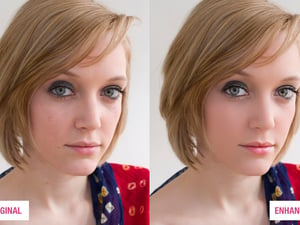
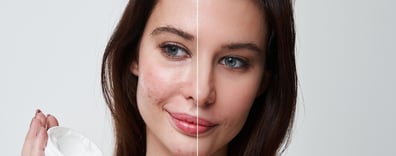
Result
As you may see, after just a few minutes and with almost no effort, we have improved the portrait with excellent results. Here is the before/after image.

Retouch Photoshop Actions
As we saw in the previous action, fixing the portrait becomes an easy task, is quick and the end results are good. But that is not the only available action for retouching portraits. Also here at Medialoot, you will find the ‘Retouch Photoshop Actions’ which gives you even more control over the picture and more options to play with. This action is recommended for both photographers and occasional users with a very basic Photoshop knowledge.
Installing the Action
Step 1
Unzip the ‘Medialoot - Retouch Addon.atn’ file that you will find in the downloaded .zip file. Open Photoshop and go to Window > Actions.

Step 2
In the Action panel, click on the top right icon and select ‘Load Actions’. Locate the .atn file you just downloaded and click Load. The action set now is shown in the Actions Panel.

Preparing the Image
Step 1
Open your image in Photoshop.

Step 2
Select the ‘Run me first’ action and hit the play button in the actions panel.

Step 3
After a few seconds, the action will finish, and now you can play any action inside the action pack according to your needs.

Fixing Skin
Step 1
Select any of the skin actions that better describes the effect you want to apply to your subject inside the SKIN list and hit the play button in the actions panel. In this case, I will use the ‘Skin Smooth 1 - Semi’ action.

Step 2
After a few seconds, the action will finish, and all you have to do is to select a soft white brush and paint on those areas where you want to apply the effect.

Step 3
Depending on your subject, you can (if you wish) add a Dark or Light Glow to the skin. In this case, I will select the ‘Skin Glow – Dark’ action and hit the play button in the actions panel.

Step 4
After a few seconds, the action will finish, and all you have to do is to select a soft white brush and paint on those areas where you want to apply the effect.

Step 5
Still working on our subject skin, we can now use a Skin Airbrushing effect. To do that, simply select the ‘Skin Airbrushing’ action and hit the play button in the actions panel.

Step 6
After a few seconds, the action will finish, and all you have to do is to select a soft white brush and paint on those areas where you want to apply the effect.

If the portrait you are working on requires to reduce the redness, the skin shine or even if you want to add some ‘Healthy Cheeks’ to your subject, just select the corresponding action, click the play button and paint over the area that you want to apply the effect.
Enhancing Lips
Step 1
Select any of the 2 available lips actions that better describes the effect you want to apply to your subject inside the LIPS list and hit the play button in the actions panel. In this case, I will use the ‘Enhance Lips - Basic’ action.

Step 2
After a few seconds, the action will finish, and all you have to do is to select a soft white brush and paint on those areas where you want to apply the effect.

Note: by default the action applies a color to the lips, but you can simply turn off the ‘Change Lips Color’ layer inside the Lips layer group, or you can adjust the lips color in that same layer.
Fixing Eyes
Step 1
First, select the ‘Whiten Eye Whites’ action and hit the play button in the actions panel.

Step 2
After a few seconds, the action will finish, and all you have to do is to select a soft white brush and paint only over the white areas of your subject eyes to reveal the effect. Additionally, you can bring up or down the layer group opacity to increase or decrease the effect.

Step 3
If you want to keep working on the eyes, you can also enhance the lights and bright. In this case, I will select the ‘Iris Lights’ action and hit the play button in the actions panel.

Step 4
After a few seconds, the action will finish, and all you have to do is to select a soft white brush and paint only over the eye iris of your subject to reveal the effect. Additionally, you can bring up or down the layer group opacity to increase or decrease the effect.

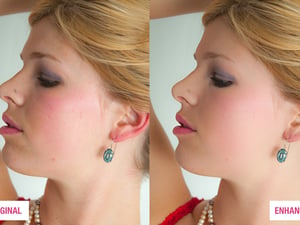
Result
Just like in the previous action, we have enhanced our portrait with almost no effort and in a short time. If needed, you can keep applying more actions (like ‘Whiten Teeths’, ‘Iris Bright’, ‘Localized Sharpen’ etc) using the same procedure we have used in the previous steps: select the action, click play and paint over the area that you want to reveal the effect.

Some Final Words
Doing a manual retouching to a portrait can give you a perfect control over every single step you take, but it is a very time consuming task and you probably will miss some detail here and there; but using Photoshop Actions will give you more time to spend on the details rather than doing every single step by hand, saving you a lot of time and giving you the exact same control you have if you do the work by hand.


Comments