
by Diego Sanchez
March 05, 2021
Diego prevents carpal tunnel syndrome in designers worldwide by making incredible time-saving Photoshop actions and mock-ups.
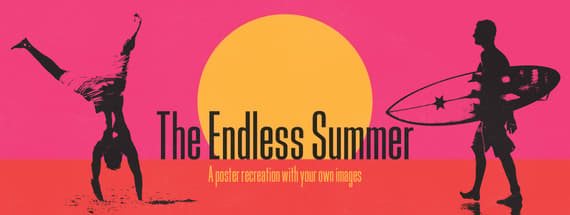
Make Your Own Endless Summer Poster in Photoshop
Photoshop Design Techniques
Back in 1964 Van Hamersveld designed a film poster for his friend Bruce Brown, while he was a student at Art Center College of Design and the art director of Surfer magazine. He arranged a photo shoot with the film’s stars, crafted the image, screen-printed the poster, and hand-lettered the title to complete the work. The poster he did that day has become a mythical surfing image and replicated hundreds of times for different purposes.
Today, I will show you how easily you can recreate this poster style from any of your photos, and the only requirement is to have a good contrasting image. But before we start, and if you want to follow this tutorial exactly as described, please download the following free image from Pexels: Download.
Step 1
Open Photoshop and make a new file using any size you want. In this case, I will setup mine to 1200 x 1600 px.

Step 2
In the Layers Panel, click on the "Create new fill or adjustment layer" icon and from the dopdown menu select "Solid Color".

Step 3
Set the color to #f03a77 in the Color Picker window and click OK.

Step 4
Select the Ellipse Tool (U) and click once over the artboard. Set the Width and Height to 700 px and click OK.

Step 5
Double click the Ellipse layer thumbnail. In the Color Picker window set the color to #feb13b and click OK.

Step 6
Select the Rectangle Tool (U) and and click once over the artboard. Set the Width to 1200 px, the Height to 890 px and click OK.

Step 7
Double click the Rectangle layer thumbnail. In the Color Picker window set the color to #ef3f3f and click OK.

Step 8
Go to File > Place. Locate the image you want to use on your computer and click the Place button.

Step 9
Arrange the image to your liking in the artboard and hit the Enter key on your keyboard to commit the changes.

Step 10
Go to Window > Channels and select the channel with the highest contrast (in this case, the Blue channel).

Step 11
Go to Select > All and then to Edit > Copy.

Step 12
Select the RGB Channel and go to Edit > Paste.

Step 13
With the pasted image layer selected, go to Image > Adjustments > Threshold. Adjust the Threshold level to your liking and click OK.

Step 14
Using a white colored brush, paint over the areas you do not want that appear on your final poster.

Step 15
Hold the Ctrl key on your keyboard and click over the RGB layer in the Channels Panel.

Step 16
Go to Select > Inverse.

Step 17
In the Layers Panel, hide the photo and pasted images layers by clicking on the eye icon next to the layer's name.

Step 18
Click on the "Create new fill or adjustment layer" icon and from the dopdown menu select "Solid Color".

Step 19
In the Color Picker window set the color to #241e20 and click OK.

Step 20
Lastly, select the Type Tool and using any font you wish type a text for your recently created poster.


Comments