

by Diego Sanchez
December 08, 2017
Diego prevents carpal tunnel syndrome in designers worldwide by making incredible time-saving Photoshop actions and mock-ups.

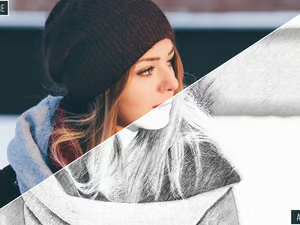

How to Turn Any Photo Into a Sketch
From photos to drawings
As most of us know, there are many different ways to achieve a desired effect in Photoshop. Today, I would like to show you a fairly simple way to turn a photo into a sketch. Spoiler, it's fun and easy. By using a few adjustment layers, the filter gallery, layer blend modes, some basic filters and a few more tools, you'll have a pencil-drawn look any artist would covet.
Before you begin
If you want to follow this tutorial exactly, you can download the image (1920px x 1280px) and the paper texture (free) I am using from here.
Image Texture
Step 1
Open your image in Photoshop. Be sure that it is in RGB mode, if not, go to Image > Mode > RGB to set the image mode to RGB.

Step 2
Go to Layer > Duplicate. Set the Layer name as “Inverted” and click OK.

Step 3
Go to Image > Adjustments > Invert.

Step 4
Go to Layer > New Adjustment Layer > Hue/Saturation. Set the name of this layer to “Desaturate” and click OK.

Step 5
In the Hue/Saturation Properties panel, set the Saturation to -100.

Step 6
Select the “Inverted” layer and set the layer blend mode to “Color Dodge”. At this point, you should have a white canvas.

Step 7
With the “Inverted” layer still selected got to Filter > Blur > Gaussian Blur. Set the Radius to your liking (I will be using 40 due the image size) and click OK. Please note that you may need to change these values a bit according to your image type, size and resolution.

Step 8
Go to Layer > New Adjustment Layer > Levels. Set the name of this layer to “Levels” and click OK. In the Levels Properties panel, set the shadow adjustment level of the RGB channel to 65.

Step 9
Select the Background layer and go to Layer > Duplicate. Set the layer name to “Details” and click OK.

Step 10
Go to Layer > Arrange > Bring to Front (this will bring our layer to the top).

Step 11
Go to Filter > Other > High Pass. Set the Radius to 1,0 and click OK.

Step 12
With the “Details” layer still selected, set the layer blend mode to “Linear Light” and bring down the layer Opacity to 30%.

Now that we've finished a basic sketch effect (which is a very decent effect to use on your designs), we will take it a bit further and add some other effects to produce a better result. At this point, we have a very decent sketch effect applied to our image, but we can go a bit further and add a few more details to it.

Step 13
With the “Details” layer still selected, press Control+Alt+Shift+E (Command+Option+Shift+E if you are on a Mac) on your keyboard in order to create a new merged copy of the visible layers. Name this layer as “Black Crosshatch” and click OK.

Step 14
Go to Filter > Filter Gallery. Inside the Brush Strokes folder, select the Crosshatch effect and set the Stroke Length to 10, the Sharpness to 10, the Strength to 1 and click OK. Please note that you may need to change these values a bit according to your image size.

Step 15
With the “Black Crosshatch” layer still active, set the layer blend mode to “Multiply” and bring down the layer Opacity to 45%.

Step 16
Again, press Control+Alt+Shift+E (Command+Option+Shift+E if you are on a Mac) on your keyboard in order to create a new merged copy of the visible layers. Name this layer as “White Crosshatch” and click OK. Please note that you may need to change these values a bit according to your image size.

Step 17
One more time, go to Filter > Filter Gallery. Inside the Brush Strokes folder, select the Crosshatch effect and set the Stroke Length to 20, the Sharpness to 5, the Strength to 3 and click OK.

Step 18
With the “White Crosshatch” layer selected Go to Image > Adjustments > Invert.

Step 19
Set the layer blend mode to “Overlay” and bring down the layer Opacity to 40%.

Step 20
To add a bit more of realism to our sketch, let’s add a paper texture to it. Go ahead and download our Free Grunge Stained Paper Textures. Go to File > Place. Locate the “stained-paper-2” texture file and click OK.

Step 21
Adjust the texture to cover the whole canvas and hit the Enter key on your keyboard to commit the transformation.

Step 22
To finish our sketch effect, set the layer blend mode of the texture layer to “Multiply” and bring down the opacity to 45%.


Comments