

by Diego Sanchez
May 08, 2019
Diego prevents carpal tunnel syndrome in designers worldwide by making incredible time-saving Photoshop actions and mock-ups.
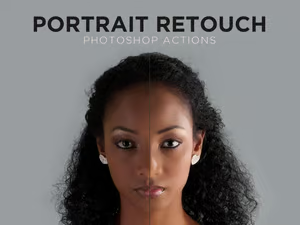


How to Perfectly Smooth Skin in Photoshop
Photoshop Post-Processing Techniques
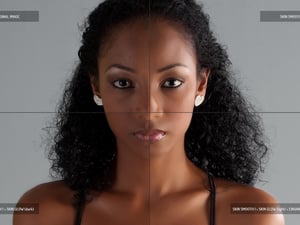
When retouching a person portrait, there are many different things to considerate to make the picture looks just perfect. Eyes, lips and hair are just some of those aspects, but the biggest one is skin. Most of the time people want their skin to look natural and soft, not airbrushed to oblivion. Here's a tutorial for achieving that soft, glowing look, without blitzing all realism. Please keep in mind that this tutorial is about softening the skin, not removing blemishes, redness and noticeable imperfections. What we try to achieve is a natural and soft skin texture.
There are many different ways to achieve this, but the method I will show you here is simple, ideal for beginners, and can be made in less than 5 minutes. But before we start, and if you want to follow this tutorial exactly as described, please download the following image from Pexels: Download.
Step 1
Open the portrait photo in Photoshop.

Step 2
Go to Layer > Duplicate Layer. Name this layer as “Smooth” and click OK.

Step 3
Go to Image > Adjustments > Invert.

Step 4
In the Layers Panel, set the blending mode of the “Smooth” layer to Vivid Light.

Step 5
Go to Filter > Other > High Pass. Set the Radius between 20 and 26 depending on the size and resolution of your image and click OK.

Step 6
Go to Filter > Blur > Gaussian Blur. Set the Radius between 2 and 4 and click OK.

Step 7
Hold the “Alt” key in your keyboard and click on the “Add layer mask” icon in the Layers Panel.

Step 8
Select the Brush Tool (B) and be sure to have white as your Foreground color. In the top toolbar, pick any brush size you feel comfortable to work with, set the Hardness to 45%, the Mode to Normal, the Opacity to 50% and the Flow to 100%.

Step 9
Be sure to have your layer mask selected and using the brush paint over the areas where you want to smooth the skin.

Step 10
If you feel that you need a bit more texture over your skin, simply decrease the “Smooth” layer opacity in the Layers Panel.

Some Final Notes:
The skin softening is just one of the many different aspects to considerate when retouching a portrait, but for sure this technique will help you speed up your workflow and to have a better skin base to work with when retouching portraits making your work easier.


Comments