

by Diego Sanchez
December 28, 2020
Diego prevents carpal tunnel syndrome in designers worldwide by making incredible time-saving Photoshop actions and mock-ups.
How to Make a Smoke Brush in Illustrator
Illustrator Brushes
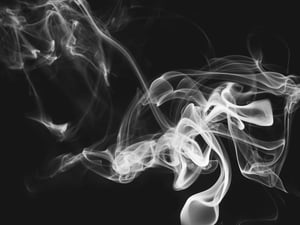
Using smoke on your compositions can add a nice atmosphere and ambience. Unfortunately, taking pictures of smoke is a total pain, and going through the whole ordeal of making them transparent to be able to use it over any background (or convert it to a brush if you want more versatility)? forget about it. Add to that, if you want to use those smoke brushes you have made in Photoshop in Illustrator, you won't be able to. Don't worry! There's a way to make your own smoke brushes in Illustrator using only the default tools and in less than 10 minutes.
Step 1
Open Illustrator and make a new file at any size you want. In this case i will make mine at 1200 x 800 px.

Step 2
Select the Rectangle Tool (M) and draw a rectangle covering the whole artboard using a dark color. In this case, i will set my color to black.

Step 3
Select the Line Segment Tool (\). Be sure to have the stroke set to white, the fill to none and draw a vertical line.

Step 4
With the line selected, set the stroke weight to 0,5 pt in the top toolbar.

Step 5
Go to Window > Transparency. Set the Blending Mode to "Screen" and the Opacity to around 10%.

Step 6
With the line still selected, pick the Selection Tool (V) and hit the "Enter" key on your keyboard.

Step 7
In the Move window apply the following settings and click "Copy".

Step 8
Press Ctrl+D on your keyboard (and keep the "D" pressed) to get multiple copies of the lines. When you are happy with the amount of lines, release the keyboard keys.

Step 9
Select all the lines and go to Object > Group.

Step 10
Using the Pen Tool (P) draw any kind of random smoke shape.

Step 11
Select all objects and go to Object > Envelope Distort > Make with Top Object.

Step 12
Go to Effect > Blur > Gaussian Blur. Set the Radius to 8 px and click OK.
Note: you may need to adjust this value a bit according to your shape and line lenght.

Step 13
With the object selected, go to Window > Brushes and click on the "New Brush" icon. Select the Art Brush option and click OK.

Step 14
In the Art Brush Options window apply the following settings and click OK. Now the brush is available in the Brush Panel.

Step 15
To test the brush, select the Paintbrush Tool (B). Pick the Smoke Brush from the Brush Panel and start painting your own smoke shapes.


Comments