

by Tony Thomas
August 04, 2015
Tony creates pixel-perfect UI kits & icons. His pug, Wednesday, is Medialoot's beloved mascot.
How to Create a Textured Geometric Image Mask with Photoshop & Illustrator
Learn how to use image masks in Photoshop with this trendy/hipster photo effect
This tutorial will teach you how to draw a geometric vector shape with Illustrator and then use layer masks in Photoshop to create a trendy/geometric geometric photo mask.
Step 1
Lets start by drawing a geometric shape to use as the focal point of the mask. It's best to do this with a vector drawing application such as Illustrator or Sketch. I will show you how to do it with Illustrator CC, launch the application and create a new document 800 x 800 pixels. Note: you can download one of our pre-made geometric vector shapes and skip to step 6 if you just want to know how to mask the image.
Step 2
First set the fill color to transparent and the stroke to black, then select the Polygon tool and left click once in the center of your artboard. A dialog window should pop up and ask in a very confusing way what kind of polygon to create. Enter 250 pixels for the radius and 8 sides to draw an octagon. When you have the octagon, change the stroke weight to 5 points.

Step 3
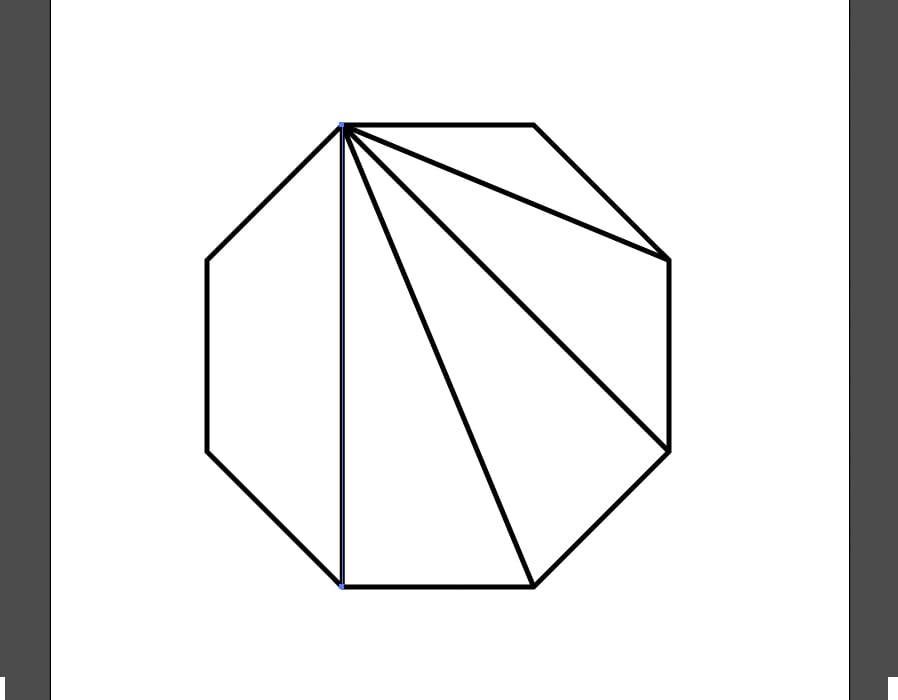
The shape that we are going to draw may look complex, but it is actually very simple to create. Grab the Line tool a draw a line from one of the corners to the next nearest corner which isn't already connected directly to it.
Step 4
Repeat this process by drawing another line from the same corner to the next nearest corner which again isn't already connected directly to it. And continue until the corner is now directly connect by a single line segment to every other corner in the shape.


Step 5
Repeat again, this time using the next corner along. From this point on, each corner that you do will require one less line than the last, until finally all of the corners are connected to all of the other corners via a single line segment.


Step 6
Now that we have the shape drawn, copy it to the clipboard and move over to Photoshop. Create a new document 800 x 800 pixels in Photoshop.
Step 7
Paste the octagon shape into your Photoshop document as a Smart Object and align it to the center of the artboard if necessary.

Step 8
Create a new fill layer by selecting Layer > New Fill Layer > Solid Color. Set the fill color to black when prompted to choose a color.
Step 9
Create a new 600 x 600 pixel circle using the Ellipse tool and align it to the center of the artboard.

Step 10
Move the new fill layer and circle layer below the octagon Smart Object and place all 3 layers in a group called 'Mask'.
Step 11
Grab a grunge texture from this set, and drop it into your Photoshop document. Or you can download this free sample. Resize the grunge texture layer whilst holding the shift key so that it fills the artboard.
Step 12
Rasterize the grunge texture, place it above the octagon Smart Object and create a clipping mask.
Step 13
Duplicate the grunge texture, invert the colors by pressing CMD+I or CTRL+I, and place it above the circle shape layer. Then create a clipping mask again. Before moving on to the next step, use the Rectangular Marquee tool to select all and Copy Merged (CMD+SHIFT+C or CTRL+SHIFT+C).
Step 14
Now lets choose a photograph to use this mask on. I recommend heading over to Unsplash for tonnes of awesome free photos, like this one. When you have a photo, drop it into your Photoshop document and resize or move as necessary.
Step 15
Hide the 'Mask' group temporarily and place your image layer below it in a new group called 'Image'.
Step 16
With the 'Image' group layer selected, go to Layer > Layer Mask > Reveal All.
Step 17
Open the Channels panel (Window > Channels) and click the eye icon next to the channel called Image Mask to make it visible. Then paste the artwork that you copied to the clipboard in step 13. If it has worked, you should see a red overlay indicating the areas of the photo that will be hidden by the mask.
Step 18
Finally, turn off visibility for the Image Mask channel to see the results.
Result & Conclusion
Not only does this effect look really cool, it's a great way to practice using layer masks in Photoshop and also drawing geometric shapes in Illustrator. If you want to have some more fun with this effect you can place different photos inside the 'Image' group layer, and also experiment with different shapes by downloading our geometric vector shapes collection.


Comments