
by Tony Thomas
July 18, 2017
Tony creates pixel-perfect UI kits & icons. His pug, Wednesday, is Medialoot's beloved mascot.


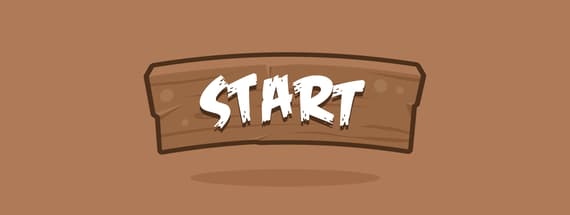
How to Create a Cartoon Style Wood Button for Games
Game ui design with Adobe Illustrator
Creating graphics for games is a little complex than other types of apps, because they have more character and usually fit in with the theme of the particular game. But this tutorial will show you that it may not be as difficult as you think.
Step 1
Launch Illustrator and create a new document, 680 x 460 pixels.


Step 2
Use the Rectangle Tool (M) to draw two rectangles as shown below. The bottom and top edges where the two rectangles meet should be touching.

Step 3
Use the Direct Selection Tool (A) to select and the arrow keys to nudge the top left and right points on the smaller rectangle inwards 5 pixels.

Step 4
Use the Pen Tool (P) to add 2-4 new points on each side of the bottom rectangle and move them around randomly to create some 'cracks'.

Step 5
Make sure View > Smart Guides are on and using the Pen Tool (P) again, set the fill color to Black (#000000) and Opacity to 10% then draw some shadows on the cracks.

Step 6
Using the Pen Tool (P) again, set the fill color to White (#FFFFFF) and Opacity to 10% then also draw some highlights on the cracks. 
Step 7
Select the original two rectangles and duplicate them. Use the Pathfinder to Unite the two shapes then move the new shape below the other layers and give it a 3 pt #4C301C stroke aligned to the outside with round corners.

Step 8
Use the Ellipse Tool (L) to draw 4 circular highlights onto the main surface. Set the fill color to White (#FFFFFF) and Opacity to 10%. Avoid overlapping the cracks.

Step 9
Use the Pen Tool (P) to roughly draw some wood grain lines. They don't need to be super detailed or realistic, just try to keep them a consistent width and don't overlap any other elements. It is okay if they go over the edges.

Step 10
Group all of the wood grain lines, then copy the base shape and paste it in top of all other layers. Select both the wood grain grain lines group and the shape layer then press CMD+7 or CTRL+7 to create a clipping mask.

Step 11
Set the Blending Mode of the clipping mask group to Soft Light and the Opacity to 25%.

Step 12
Go to Object > Envelope Distort > Make with Warp... and choose Arc style, then set the bend to 12% and click OK.

Step 13
Create a new text layer, set the color to White (#FFFFFF) and type out the word 'Start' using Feast of Flesh font at 56 pt.

Step 14
Apply the same Warp effect to the text layer.

Step 15
Duplicate the text layer and change the fill color to #4C301C then move it below the white text layer and use the arrow keys to nudge it down 4 pixels.

Step 16
Set the fill color to #AF7B58 and draw a rectangle that fills the entire canvas, below all other layers.

Step 17
For a finishing touch use the Ellipse Tool (L) to draw a shadow below the below. Set the fill color to Black (#000000) and Soft Light 25%.

Result & Conclusion
And here is the final result. Although creating graphics for games is a little more complex than UI elements for other types of apps, it certainly isn't impossible.


Comments