

by Diego Sanchez
April 22, 2019
Diego prevents carpal tunnel syndrome in designers worldwide by making incredible time-saving Photoshop actions and mock-ups.


Get Loud — How to Add a Noise Texture to Images
Add noise in Photoshop
Most of the time we do everything we can to avoid the noise in our photos — but that doesn't mean there's no place for it. If you want to make an image look old fashioned, or to replicate the effect of an old camera, or just because is a style you're going for. Whatever the reason, there's more than 1 way to add a noise texture to an image. In this post I will show you 4 different methods, so you can evaluate the one that is best for you.
Method 1
This method is the most known and easy one to make, but once you add the noise to your image, and if you later decide that you want more or less noise you must do it again.
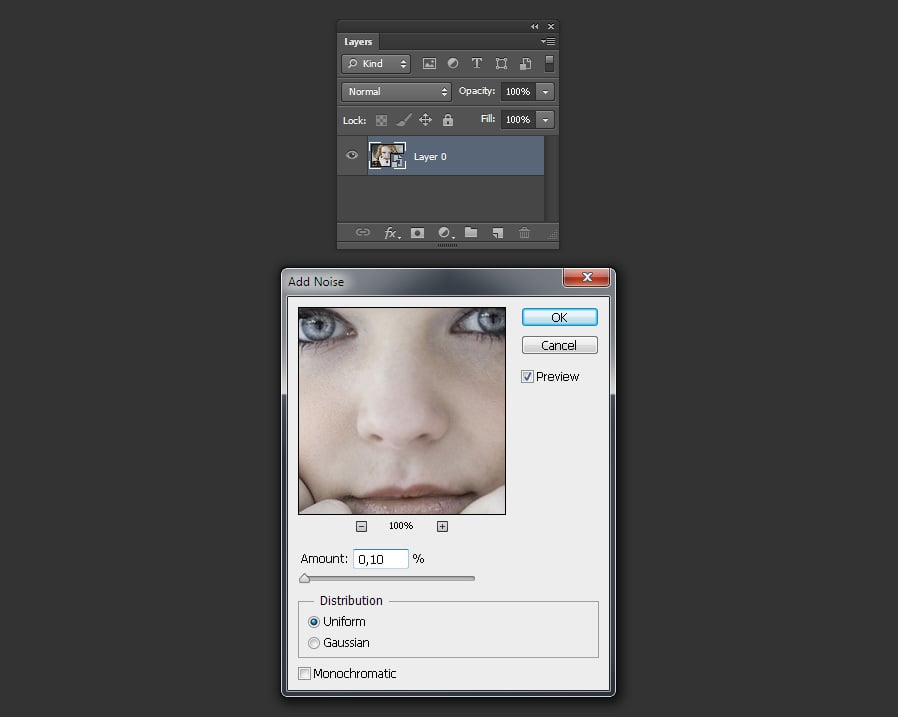
Step 1
Open the image in Photoshop.

Step 2
With the Background layer selected, go to Filter > Noise > Add Noise.

Step 3
In the Add Noise window simply select the Amount of noise you want for your image, the Distribution and if you want to add a Monochromatic Noise. When finished, simply click the OK button.

Method 2
This Method is based on the previous one but with a simple tweak. Once you add the noise to your image, and if you later decide that you want more or less noise on it you still can change it without making the process again.
Step 1
Open the image in Photoshop.

Step 2
Go to Layer > Smart Objects > Convert to Smart Object.

Step 3
Go to Filter > Noise > Add Noise.
Step 4
In the Add Noise window simply select the Amount of noise you want for your image, the Distribution and if you want to add a Monochromatic Noise. When finished, simply click the OK button.

Step 5
If you want to edit the Amount or Distribution of the Noise, simply click on the arrow next to the layer’s name to expand the Smart Filters and double click on the “Add Noise” settings icon effect. Edit the noise and click the OK button.

Method 3
The following method is a good one to use if you do not want to apply the noise directly over your image and use the same one over another image with the same (or smaller) dimensions.
Step 1
Open the image in Photoshop.

Step 2
Make a new layer named “Noise” and fill it with white.

Step 3
Go to Filter > Noise > Add Noise.

Step 4
In the Add Noise window simply select the Amount of noise you want for your image, the Distribution and if you want to add a Monochromatic Noise. When finished, simply click the OK button.

Step 5
In the Layers Panel, set the blending mode of the “Noise” layer to Multiply.

Method 4
The following method makes use of pre-made noise textures and it is just perfect for a quick and professional end result with no filters involved. You can download the texture I will use in the following example which is included in the “Seamless Noise Textures” pack that you can find here at Medialoot.
Step 1
Open the image in Photoshop.

Step 2
Go to File > Place. Locate the noise texture in your computer and click the Place button. In this case, I am using the “noise-medium-2-white” texture.

Step 3
Adjust the texture to cover your whole image and hit the Enter key on your keyboard to commit the changes.

Step 4
Now simply change the texture layer Opacity to around 65% for a less intense effect.


Comments