

by Tony Thomas
November 04, 2014
Tony creates pixel-perfect UI kits & icons. His pug, Wednesday, is Medialoot's beloved mascot.

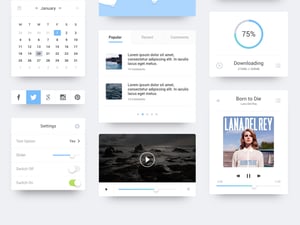
Ocean - Flat UI Kit
Free
Tips for Creating Icons with Multiple Style Variations
Icon sets with multiple styles included are becoming more popular. They are a great way of utilising multiple icon styles within a project, whilst still maintaining a consistent overall visual style. This tutorial will show how the process of creating solid, outlined and color versions of the same icons can be made simple and easy.
The Basic Icon Shape
Step 1
The first step is to know what your icon is going to be, you may want to sketch it out on paper to help visualise it, or just have something in your mind ready.
Step 2
In your vector graphics application of choice (I'm using Illustrator) draw the basic building blocks of your icon. Avoid using any strokes at this stage and try to stick to whole pixel measurements. These shapes will be the base of all 3 icon styles so it is important to get them just right.
The Outlined Style
Step 3
The outlined style will rely quite heavily on strokes, in order avoid altering the overall dimensions of the icon, align all strokes to the inside.
Step 4
Elements that don't need to have strokes applied can just be filled with black.
Step 5
Some shapes will need to be combined with the pathfinder/boolean operations.

Step 5
If you need to retain the original shapes and also combine them, copy the original shapes first, and then paste them back into place afterwards.

The Solid Style
Step 6
Starting again with just the base shapes, fill areas that are going to be solid with black.

Step 7
Areas that are going to be subtracted from the final shape can be filled white, or cut out with the pathfinder/boolean operations.
Step 8
To visually separate two overlapping objects, apply a white stroke aligned to the outside of the top shape.

Step 9
The same technique of using a white stroke can be used to divide shapes into sections.

The Color Style
Step 10
The color version is the most fun to create, start again with the basic shapes from step 2 and begin to apply color fills to each section:


The Result
Here are the resulting outlined, solid and color variations of the same basic icon. With the right technique it is very simple to create different icon styles for a project whilst retaining an overall visual consistency.


Comments