
by Diego Sanchez
May 15, 2019
Diego prevents carpal tunnel syndrome in designers worldwide by making incredible time-saving Photoshop actions and mock-ups.


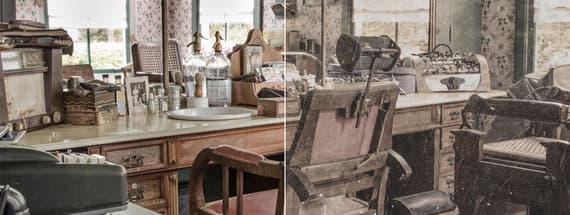
Make Images Vintage with Texture
How to apply Textures in Photoshop
There are many different ways to make an image look vintage in Photoshop. One of those methods makes use of textures and some adjustment layers, which is the one we will use for this tutorial. Besides giving us a lot of variations in the final result by changing the blend mode or the opacity of a texture layer, we can use almost any kind of texture. And to show you how effective this method is we will be using different textures types from different texture packs available here at Medialoot.
You are free to use any kind of texture you want for this tutorial, but you may need to make some adjustments first on your particular texture. But if you want to follow this tutorial exactly as described, please download the following texture packs available here at Medialoot:
- Organic Specs And Noise
- Gritty Grunge Textures
- Stained Concrete Floor Textures
- Paint Stained Concrete Textures
- Dust and Dirt Overlay Textures
Step 1
Open you image in Photoshop.

Step 2
Go to Layer > New Adjustment Layer > Photo Filter. Set the Filter to “Sepia”, the Density to 80% and check the “Preserve Luminosity” option.

Step 3
Go to File > Place. Locate the “paint-stained-concrete-7.jpg” texture from the “Paint Stained Concrete” pack on your computer and click Place.

Step 4
Resize the texture to fill the entire image and hit the Enter key on your keyboard to commit the changes.

Step 5
Set the blend mode of this layer to Hard Light and decrease the opacity to 10%.

Step 6
Again, go to File > Place. This time locate the “stained-floor-7.jpg” texture from the “Stained Concrete Floor Textures” pack. Place it and resize it to fill the entire canvas.

Step 7
Set the blend mode of this layer to Soft Light.

Step 8
Now, place the “Organic Specs And Noise 4.jpg” texture from the “Organic Specs And Noise“ pack and resize it to fill the entire canvas.

Step 9
Set the blend mode of this layer to Screen and decrease the opacity to 40%.

Step 10
Now, place the “Organic Specs And Noise 7.jpg” texture and resize it to fill the entire canvas.

Step 11
Set the blend mode of this layer to Screen and decrease the opacity to 90%.

Step 12
Again, go to File > Place. But this time locate the “grunge-2.jpg” texture from the “Gritty Grunge Textures” pack. Place it and resize it to fill the entire canvas.

Step 13
Set the blend mode of this layer to Multiply and decrease the opacity to 15%.

Step 14
Lastly, place the “1.jpg” texture from the “Dust and Dirt Overlay Textures” pack and resize it to fill the entire canvas.

Step 15
Set the blend mode of this layer to Screen.

Step 16
Now that we placed all the textures, let’s make a few adjustments. Go to Layer > New Adjustment Layer > Black & White. As we will use the default settings we just have to decrease the layer opacity to 30%.

Step 17
Go to Layer > New Adjustment Layer > Exposure. Set the Exposure to -0,45, the Offset to + 0,0250 and the Gamma Correction to 0,80.

Step 18
To finish our vintage image, go to Layer > New Adjustment Layer > Levels. Set the Shadow Input Level to 10 and the Midtone Input Level to 1,15.


Comments