
by Diego Sanchez
June 21, 2021
Diego prevents carpal tunnel syndrome in designers worldwide by making incredible time-saving Photoshop actions and mock-ups.


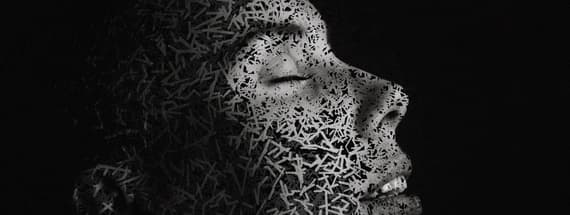
Make an Eye Catching Stylized Effect Using Brushes in Photoshop
Photoshop Photo Effects
There are times when you see an intricate effect on a photo and you think — "cool, but that looks like it took forever." Although sometimes this is obviously the truth, most of the times those "complex" effects are not really that complex, and today I will show you how you can make a "complex" stylized effect in Photoshop using nothing but a single brush (which we will make) combined with the power of the Content Aware filter and a few layer settings.
Before we begin, please take note that this tutorial is divided into 2 parts, the first one is about how to make and setup a brush and the second part is how to use that brush to make the effect. Keep in mind that to work with this technique, your main subject must be over a simple background with not too many elements on it so the Content Aware filter can make a decent job. And if you want to follow this tutorial exactly as described, please download the following free image from Pexels: Download
Part 1 - Making the Brush
Step 1
Open Photoshop and make a new file at any size you want. In this case, I will make mine at 900 x 600 px.

Step 2
Select the Brush Tool (B) and with a Hard Round brush set to 16 px paint a few random strokes in a new layer using a black color as shown.

Step 3
Hold the Ctrl key on your keyboard and click over the layer thumbnail where you painted the brush strokes to select them.

Step 4
With the selection active, go to Edit > Define Brush Preset. Give the new brush a name and click OK.

Step 5
Go to Window > Brush Settings and apply the following values.

Step 6
Click on the menu icon at the top right corner and from the dropdown menu select "New Brush Preset". Give the brush a name and click OK.

Part 2 - Making the Effect
Step 1
Open your image in Photoshop.

Step 2
With the Background layer selected, click on the padlock icon to unlock the layer and rename this layer to "Background".

Step 3
Press Ctrl+J on your keyboard to duplicate the layer and hide it by clicking on the eye icon next to the layer name. Rename this layer to "Subject".

Step 4
Instead of separating the subject from the background, we will make use of the Content Aware filter. Select the Background layer and then select the Lasso Tool (L).

Step 5
Make a selection around your subject.

Step 6
Go to Edit > Fill. Apply the following settings and click OK.

Step 7
Press Ctrl+D on your keyboard.

Step 8
Select the "Subject" layer and make it visible again by clicking on the eye icon next to the layer name.

Step 9
With the "Subject" layer selected, hold the Alt key on your keyboard and click over the "Add Layer Mask" icon.

Step 10
Select the Brush Tool (B). The brush we created must be selected by default, if not, pick the recently created brush from the Brush Preset Picker in the top toolbar.

Step 11
Be sure to have the Layer Mask selected and simply start painting over the layer mask with a white color to reveal the effect changing the brush size and opacity from time to time to make the effect more interesting.


Comments