
by Diego Sanchez
February 11, 2020
Diego prevents carpal tunnel syndrome in designers worldwide by making incredible time-saving Photoshop actions and mock-ups.


How to Make a Pattern Brush in Illustrator
Illustrator Brushes
It's a little harder to find Illustrator brushes compared to Photoshop brushes. But don't be fooled — when used properly they're a great design resource for hand drawn effects, shadings, and intricate designs. Pattern Brushes are one of the even more rare Illustrator brushes, but today you will learn how to create your own easily using the automatic corner generation for the pattern brushes available in Illustrator.
Step 1
Open Illustrator and make a new file at any size you want. In this case, I will setup mine at 1800 x 1200 px.

Step 2
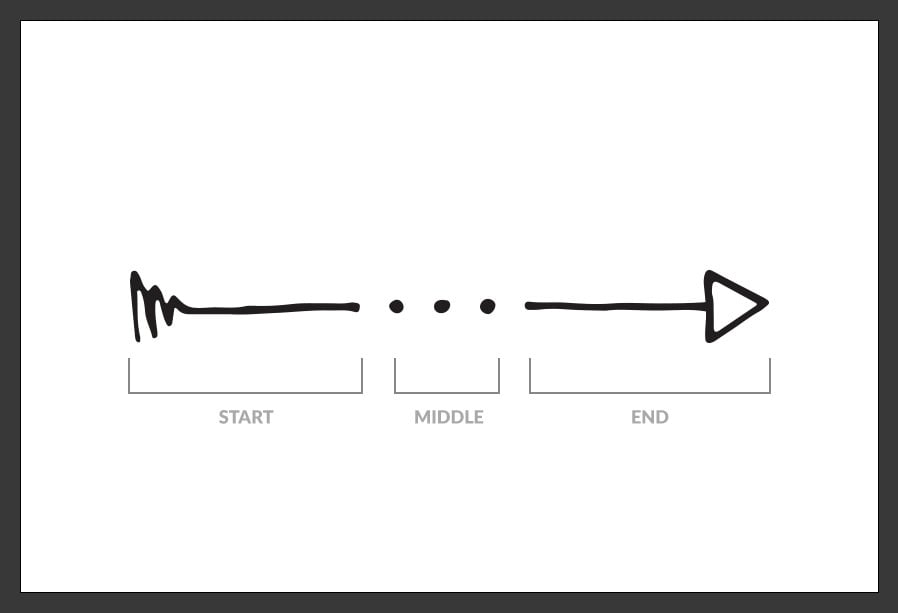
To make the process even easier than it is, using your favorite method draw any shape you want for your pattern brush considering the 3 parts of it: start, middle and end shapes.
Step 3
Before converting this shape to a pattern brush, let's add some space between the start and the middle and between the middle and the end (this is optional and will depend on how you want your pattern brush set). To to that, select the Rectangle Tool (M) and draw a rectangle between the start and the middle part as shown.

Step 4
With the Rectangle Tool selected, draw another rectangle between the middle and the end as shown.

Step 5
Select both rectangles and set the fill to "none".

Step 6
If you do not have the Swatches Panel visible, go to Window > Swatches. Select the start part of what will be our pattern brush and drag it to the Swatches Panel.

Step 7
Now select the middle part (including the 2 empty rectangles) and drag it to the Swatches Panel.

Step 8
Select the end part of what will be the pattern brush and again drag it to the Swatches Panel.

Step 9
Deselect all and go to Window > Brushes.

Step 10
Click on the "New Brush" icon at the bottom of the Brushes Panel. In the New Brush window select "Pattern Brush" and click OK.

Step 11
In the Pattern Brush Options window, click on the dropdown arrow of the "Start Tile" and select the start tile of our pattern brush.

Step 12
Click on the dropdown arrow of the "End Tile" and select the end tile of our pattern brush.

Step 13
Click on the dropdown arrow of the "Side Tile" and select the middle tile of our pattern brush.

Step 14
With all the 3 main parts assigned, let's work on the corners. Click on the dropdown arrow of the "Outer Corner Tile" and select the "Auto Centered" option.

Step 15
Click on the dropdown arrow of the "Inner Corner Tile" and also select the "Auto Centered" option.

Step 16
Lastly, in the dropdown menu of the Colorization Method select "Tints" and click OK. As you can see, our new pattern brush was added to the Brush Panel.

Step 17
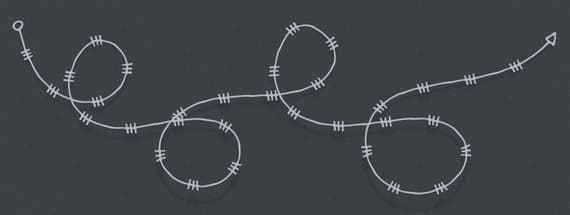
Using the Pen Tool (P) draw any kind of shape you want.

Step 18
Now simply click on our new pattern brush in the Brushes Panel to apply it to our shape.

Step 19
If you wish to change the brush color, go to the Swatches Panel, and pick any color you want for the Stroke Color.


Comments