
by Diego Sanchez
September 07, 2021
Diego prevents carpal tunnel syndrome in designers worldwide by making incredible time-saving Photoshop actions and mock-ups.

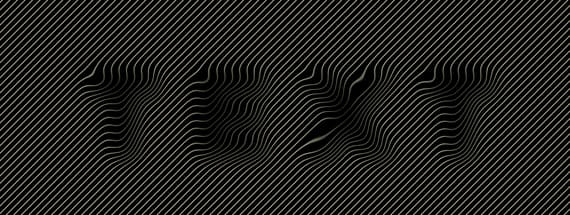
How to Make a OpArt Text Effect in Photoshop
Photoshop Text Effects
Back in the 50's there was an artistic trend in the United States known as "Op Art". This kind of art uses optical phenomena to produce abstract pictorial images and create a sensation of movement on two-dimensional surfaces. Now that the Op Art is back on trend again, we can see this type of effect used also on texts. Today I will show you a simple way to make it in Photoshop with the ability to later edit the text (or the lines) by using a non destructive method so there is no need to make the whole process again for a different type of text or lines.
Step 1
Open Photoshop and make a new file at any size you want. I will make mine at 1800 x 1200 px using a Black color as the Background.

Step 2
Select the Line Tool (U). Be sure to have in the top toolbar the mode set to Shape, the Weight to 7 px and set any color you want for your lines, in this case I will setup mine to #e1dfbd. Draw a line beyond the artboard area from top to bottom as shown.

Step 3
Press Ctrl+J on your keyboard to duplicate the line and move it to right about 40 px.

Step 4
Repeat this last step exceeding your artboard area as shown.

Step 5
Select all layers except the Background layer and go to Layer > Combine Shapes > Unite Shapes.

Step 6
With the lines layer selected, press Ctrl+T on your keyboard and, while holding the Shift key, rotate the layer 45º as shown. Then hit the Enter key to commit the changes.

Step 7
Go to Layer > Smart Objects > Convert to Smart Object.

Step 8
Make a new file with the same dimensions we used on the lines file, but be sure to have the Background set to White.

Step 9
Select the Horizontal Type Tool (T) and type your text with a black color. In this case I will simply type "MDL" using a bold typeface.

Step 10
With the text layer selected go to Layer > Smart Objects > Convert to Smart Object.

Step 11
Go to Filter > Blur > Gaussian Blur. Apply the following settings and click OK. Save the file anywhere on your computer as "Displacement Map.psd" and close it.
Note: Depending on your text size you may need to change this value a bit. Aim to replicate the amount of Blur you see on the image.

Step 12
Back in the lines file, select the lines layer and go to Filter > Distort > Displace. Apply the following values and click OK.

Step 13
Locate the "Displacement Map.psd" file on your computer and click Open.

Step 14
Go to File > Place. Again, locate the "Displacement Map.psd" file on your computer and click Place. Hit the Enter key on your keyboard to confirm.

Step 15
Lastly, set the blend mode of the displacement map layer to Multiply and bring down the opacity to about 85%.

A Final Note
As we did this effect with a non destructive process, you can easily edit the lines and the text without having to make the whole process again. Simply double click on the smart object thumbnail, make your changes and save it as you normally do when working with smart objects.


Comments