
by Tony Thomas
May 18, 2015
Tony creates pixel-perfect UI kits & icons. His pug, Wednesday, is Medialoot's beloved mascot.

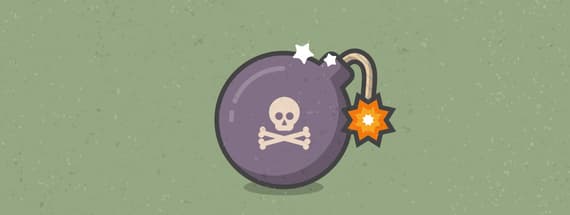
How to Create a Cartoon Bomb Icon with Sketch App
It's the bomb!
This tutorial will teach you the essential techniques required for creating custom icons with Sketch. And in the process you will create a cool, cartoon-style bomb icon.
Step 1
 Launch Sketch and begin by drawing a green rectangle to use as a background layer. Then right click on the layer in the sidebar and select Lock Layer to avoid accidentally selecting it again.
Rectangle:
Launch Sketch and begin by drawing a green rectangle to use as a background layer. Then right click on the layer in the sidebar and select Lock Layer to avoid accidentally selecting it again.
Rectangle:
- Fill: #95A782
- Border: None
- Position: X:0 Y:0
- Size: W:900 H:600
Step 2
 Next draw a purple circle near the center of the background layer, using the Oval tool and holding down the shift key to constrain proportions.
Circle:
Next draw a purple circle near the center of the background layer, using the Oval tool and holding down the shift key to constrain proportions.
Circle:
- Fill: #816F85
- Border: None
- Position: X:168 Y:168
- Size: W:900 H:600
Step 3
 Place a small rounded rectangle near the top of the circle, aligned to the center of the circle horizontally.
Rectangle:
Place a small rounded rectangle near the top of the circle, aligned to the center of the circle horizontally.
Rectangle:
- Fill: #816F85
- Border: None
- Radius: 6
- Position: X:421 Y:204
- Size: W:38 H:30
Step 4
 Select the Rotate tool and move the anchor point for the small rectangle to the center of the circle, then rotate the rectangle 45° clockwise.
Rectangle:
Select the Rotate tool and move the anchor point for the small rectangle to the center of the circle, then rotate the rectangle 45° clockwise.
Rectangle:
- Transform: 315°
Step 5
 Select the circle and rectangle layers and combine them with the Union boolean function
Step 6
 Now add some styles to the merged bomb shape:
Bomb:
Now add some styles to the merged bomb shape:
Bomb:
- Fill: #816F85
- Border: #434343, Outside, 6
- Inner Shadows: Black, Alpha:20, X:-12 Y:-12, Blur:0, Spread:0
Step 7
 Use the Pen tool to draw a short wavy line from the center of rotated rectangle, to approximately half down the circle. Use 3 points in total including the start and end points then remove the fill and add a border:
Fuse:
Use the Pen tool to draw a short wavy line from the center of rotated rectangle, to approximately half down the circle. Use 3 points in total including the start and end points then remove the fill and add a border:
Fuse:
- Fill: None
- Border: #EBCFA8, Center, 8
Step 8
 Go to the Layer > Paths menu and select Vectorize Stroke to convert the border to a fill so that we can add additional styles to the fuse:
Fuse:
Go to the Layer > Paths menu and select Vectorize Stroke to convert the border to a fill so that we can add additional styles to the fuse:
Fuse:
- Fill: #EBCFA8
- Border: #434343, Outside, 6
- Inner Shadows: Black, Alpha:20, X:-4 Y:-4, Blur:0, Spread:0
Step 9
 Add a new pattern fill layer above the solid color fill and select the diagonal lines default pattern (or use your own if you have a better one).
Fuse:
Add a new pattern fill layer above the solid color fill and select the diagonal lines default pattern (or use your own if you have a better one).
Fuse:
- Fill 1: Diagonal lines pattern
- Fill 2: #EBCFA8
Step 10
 Use the Star tool to draw a new shape slightly overlapping the fuse and bomb shapes.
Star:
Use the Star tool to draw a new shape slightly overlapping the fuse and bomb shapes.
Star:
- Fill: #FFFFFF
- Radius: 68%
- Points: 8
Step 11
 Add 3 borders to the star layer to create a spark effect. Reorganize if necessary to get them in the following order from top to bottom:
Star:
Add 3 borders to the star layer to create a spark effect. Reorganize if necessary to get them in the following order from top to bottom:
Star:
- Border 1: #434343, Outside, 6
- Border 2: #F2780D, Inside, 6
- Border 3: #F5A623, Inside, 12
Step 12
 The bomb is currently looking a little bit flat, so let's add some extra lighting. Draw a new circle layer with no fill and a white border, in the center of the round part of the bomb.
Circle:
The bomb is currently looking a little bit flat, so let's add some extra lighting. Draw a new circle layer with no fill and a white border, in the center of the round part of the bomb.
Circle:
- Fill: None
- Border: #FFFFFF Center 6
- Position: X:372 Y:241
- Size: W:134 H:134
Step 13
 Double click the circle layer to enter the path edit mode, and then click the Open Path button to open up the circle.
Step 14
 Delete two of the vector points so that only the top left quarter of the circle remains.
Step 15
 Circle:
Select the Border options and add a dashed stroke, and lower the opacity of the layer to 20%
Circle:
Select the Border options and add a dashed stroke, and lower the opacity of the layer to 20%
- Fill: None
- Border: #FFFFFF Center 6
- Dashed Options: Ends: Round, Dash 80 Gap 15
- Opacity: 20%
Step 16
 Draw a small white star near the top of the bomb shape.
Star:
Draw a small white star near the top of the bomb shape.
Star:
- Fill: #FFFFFF
- Border: None
- Points: 5
- Radius: 50%
- Position: X:450 Y:205
- Size: W:32 H:32
Step 17
 Double click the star shape to enter the path edit mode, select all of the points on the star and set the corner radius to '3' to soften the shape.
Star:
Double click the star shape to enter the path edit mode, select all of the points on the star and set the corner radius to '3' to soften the shape.
Star:
- Corners: 3
Step 18
 Rotate the star 30° clockwise around the default anchor point.
Star:
Rotate the star 30° clockwise around the default anchor point.
Star:
- Rotate: 330°
Step 19
 Duplicate the star, then move it to left, reduce the size slightly and rotate -45° anti-clockwise.
Star:
Duplicate the star, then move it to left, reduce the size slightly and rotate -45° anti-clockwise.
Star:
- Rotate: -15°
- Position: X:489.7 Y:218.6
- Size: W:18.1 H:17.3
Step 20
 To create a shadow, draw a new Oval shape layer below all other layers except for the background:
Shadow:
To create a shadow, draw a new Oval shape layer below all other layers except for the background:
Shadow:
- Fill: Black, Opacity 20%
- Border: None
- Position: X:388 Y:385
- Size: W:104 H:21
Step 21
 The bomb actually looks pretty cool at this stage. But to finish it off, let's draw a friendly skull and crossbones sign onto the bomb to signify danger. Start with a simple circle for the skull head:
Circle:
The bomb actually looks pretty cool at this stage. But to finish it off, let's draw a friendly skull and crossbones sign onto the bomb to signify danger. Start with a simple circle for the skull head:
Circle:
- Fill: #ECD6C3
- Border: None
- Position: X:421 Y:278
- Size: W:40 H:40
Step 22
 Use a small rounded rectangle for the jaw section of the skull:
Rectangle:
Use a small rounded rectangle for the jaw section of the skull:
Rectangle:
- Fill: #ECD6C3
- Border: None
- Radius: 6
- Position: X:429 Y:308
- Size: W:24 H:14
Step 23
 Next up, lets give our skull some eyes. Draw two circles (or just one and duplicate it for the second). The only difference will be the X position values.
Eye 1:
Next up, lets give our skull some eyes. Draw two circles (or just one and duplicate it for the second). The only difference will be the X position values.
Eye 1:
- Fill: #816F85
- Border: None
- Radius: 6
- Position: X:429 Y:298
- Size: W:10 H:10
- Fill: #816F85
- Border: None
- Radius: 6
- Position: X:443 Y:298
- Size: W:10 H:10
Step 24
 For the nose, use the triangle shape tool to draw the basic shape. Then double click the triangle to enter the path edit mode, select all 3 vector points and set the Corners value to 2.
Nose:
For the nose, use the triangle shape tool to draw the basic shape. Then double click the triangle to enter the path edit mode, select all 3 vector points and set the Corners value to 2.
Nose:
- Fill: #816F85
- Border: None
- Corners: 2
- Position: X:438 Y:307
- Size: W:6 H:8
Step 25
 Next up are the crossbones. Start by drawing a basic rectangle:
Rectangle:
Next up are the crossbones. Start by drawing a basic rectangle:
Rectangle:
- Fill: #ECD6C3
- Border: None
- Position: X:412 Y:329
- Size: W:60 H:6
Step 26
 Draw a small circle intersecting with the top left point of the rectangle:
Circle:
Draw a small circle intersecting with the top left point of the rectangle:
Circle:
- Fill: #ECD6C3
- Border: None
- Position: X:407 Y:324
- Size: W:8 H:8
Step 27
 Duplicate the circle layer 3 times, one for each of the rectangles other corners. Then select all 4 circles and the rectangle and combine them with the Union function.
Circle 1:
Duplicate the circle layer 3 times, one for each of the rectangles other corners. Then select all 4 circles and the rectangle and combine them with the Union function.
Circle 1:
- Position: X:407 Y:324
- Position: X:407 Y:331
- Position: X:467 Y:324
- Position: X:407 Y:331
Step 28
 Take the combined bone shape and rotate it 15° clockwise.
Bone:
Take the combined bone shape and rotate it 15° clockwise.
Bone:
- Rotate: 345°
Step 29
 Duplicate the bone shape and flip it horizontally.
Step 30
This is how the bomb should now look: We could happily call this finished now, but I do have one last optional final touch..
Optional: Add speckle textures
This optional extra step involves downloading our premium Vector Speckle Textures resource. Once you have done this, place 2 of your favourite textures from the pack on layers above all of the other artwork:
 Texture 1:
- Fill: White
- Opacity: 20%
- Fill: Black
- Opacity: 10%
Result & Conclusion
Here is the final result, I think you will agree that it looks the bomb! (sorry)
This tutorial has covered a lot of techniques essential for designing custom icons, such as combining simple shapes to create more complex layers and also using layer styles to create visual effects. These techniques are also universally applicable, not just within Sketch.


Comments