

Create a Gorgeous Duotone Effect in Photoshop
I see your dual colors
It’s safe to say that if you haven’t come across a duotone effect by now, you either live under a design rock or don’t have a Spotify account. Either way, that’s OK, but the truth is duotones are as easy to achieve as they are neat looking, so it’s no surprise how prevalent the effect is in all sorts of designs these days.

Achieving duotones yourself can truly be a walk in the park if you know the steps.
If you're in a hurry (or want to show off your on-demand design skills, without actually doing any work) check out our awesome duotone generator: Duotones.co
Let’s Make an Image Using Duotones
For this exercise, I think it will be fun and relevant to make an advertisement for a fake travel app using a duotone effect. Generally speaking, most designs I’ve seen that use duotones involve fairly close up portraits of people in settings with flat, usually white, backgrounds. However, upon a quick navigation through the duotone page on Pinterest, it becomes apparent that it’s possible to go outside of that the box with the effect, and pull off really cool, original ideas.
I’ll keep things fairly straightforward in this tutorial, and leave you to your own imagination when it comes time to employing duotones as a part of a larger design project down the line. Let’s get started.
Step One: Select an Image

Let’s find a good image to duotone-ify. Like I said above, the effect works really well over close ups with flat backgrounds, but that doesn’t absolutely have to be the case. We’ll try something different, for the sake of being different. In keeping in line with our travel app advertisement theme, I’m going to use this free stock image. Go ahead and download the same thing, then load it up in Photoshop.
Step Two: Make a Copy of the Original Layer

We’re going to make the image black and white in just a second, but first, let’s make a copy of the original to work off of, just in case mistakes occur down the line. Go ahead and select the background image layer, then click command/control + J to duplicate the layer (or right click/control + click and select “Duplicate Layer”). Uncheck the background layer, and title your new layer something like “Main Image.”
Step Three: Apply a Black & White Adjustment Layer

In order for the duotone effects to work in the colors of our choosing, we need to turn our base image from color to grayscale. With your main image selected, you can achieve this by either clicking the Black & White icon in the adjustment layers panel, or by selecting Layer -> New Adjustment Layer -> Black & White. Voila!
Step Four: Add a Levels Adjustment Layer

Just like we added a black and white adjustment layer, let’s do the same thing with Levels. Go ahead and click the levels icon in the adjustment layers panel, or navigate to Layer -> New Adjustment Layer -> Levels. Once you do that, you’ll want to adjust the sliders underneath the graph a bit (this will adjust our highlights and shadows). Pull the middle slider to the right a little, then pull the right hand slider to the left some, like so:

It doesn’t have to be perfect, as long as the image looks nice and crisp. When it comes to working with more close up pictures, the idea is to make adjustments until there’s a nice contrast between the background and the subject. In other words, you wouldn’t want a subjects face to wash out into and blend with the background. For now, we don’t have to worry about that.
Step 5: Introduce Color Number 1
To state the obvious, it’s called a duotone effect because it involves applying two colors to the black and white image. We’re finally ready to apply the first one. I’m going to introduce a nice bright orange. The idea here is to focus on applying a tone to affect the brighter highlights of the overall image—hence, using a brighter color.

With your Levels adjustment layer selected, click on the “create new fill or adjustment layer” icon (that little half filled in circle at the bottom of your layers panel). Select “Solid Color.”
A color picker will now pop up. I used #ff5a00. Feel free to pick your own color, but try to keep it on the bright side. Once you make a selection, click OK. Next, you’ll have to change the blend mode from “Normal” to “Multiply” to achieve the desired effect.
Step Six: Introduce Color Number 2

Now that we have a color set for the highlights, let’s focus on the shadows. This time we’re going to choose something on the darker side. Follow most of the same steps as above—choose a new Solid Color adjustment layer, but this time, when the color picker pops up, go with #0f3ca2. You can always change colors later by double clicking in the respective layer.
Now that your blue is set, switch the blend mode from “Normal” to “Lighten.” You’ll notice that it’s a little intense on the blues; not to fear, you can adjust the transparency on the blue color layer. I pulled it down to 65 percent.

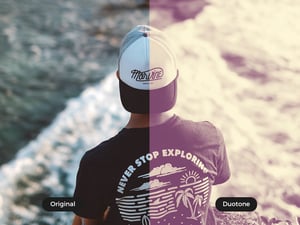
With that, our basic duotone treatment is done. Pretty simple, right? Feel free to play with the colors until it’s just the way you envision things. Remember, your “multiplied” color should always be light, while your “lightened” color should always be dark and have the opacity set down a touch.
That's it!

Duotones are all over the graphic design industry these days, and your ability to use them effectively makes you valuable, relevant and desirable to the many potential clients who will want that effect in their branding. Now that you’ve gotten through this tutorial, get out there and apply duotones to your own photos. Play with colors, and see which ones work best together (not all of them combine well).
Most of all, have fun out there in the world of duotones!
To make matters simpler, we also offer this free duotone command for Photoshop. Navigate to the page for a simple download that’ll have your photos looking great in seconds, or use the above to learn how to apply a duotone effect from scratch.


Comments