How to Get Pixel-Perfect Designs in Adobe Illustrator
Pixels are not what most designers are thinking about when they launch Adobe Illustrator, but there are some pretty awesome things Illustrator can do with them. By default Illustrator is set up to be a resolution independent vector drawing and print layout tool — in short, not for pixels — but in this tutorial we will go over a few techniques which can add pixel-perfect design to it's list of uses.
As regular Medialoot visitors will know, I have previously posted a few articles discussing the advantages of using Fireworks instead of Photoshop for certain design tasks, this tutorial will hopefully do something similar for Illustrator by demonstrating it's widely unknown ability to work well with pixels.
Background

The inspiration for this post came to me very recently whilst working on a premium icon pack called Vector Application Icons, my aim for this set of icons was to create a collection of monochrome icons for web applications and other uses such as toolbar icons in iOS apps. The icons needed to be fully scalable for flexibility, so using vectors was a must, but I also wanted them to look crisp and sharp at tiny sizes (all the way down to 16x16px).
Photoshop could have done this, but its vector drawing abilities are not the most intuitive around, and Fireworks would have worked okay too; in fact, this is what Fireworks was designed for! But honestly, for me neither of them can compare with Illustrator when it comes to super fast, pure vector drawing.
So, with this in mind, I started reading up and testing techniques for working with pixels in Illustrator, and these are the top 3 techniques that I learned and now want to share with you guys.
Technique 1: Setting up a pixel based document
Step 1
Open up Illustrator and create a new document as usual (Ctrl+N)
Step 2
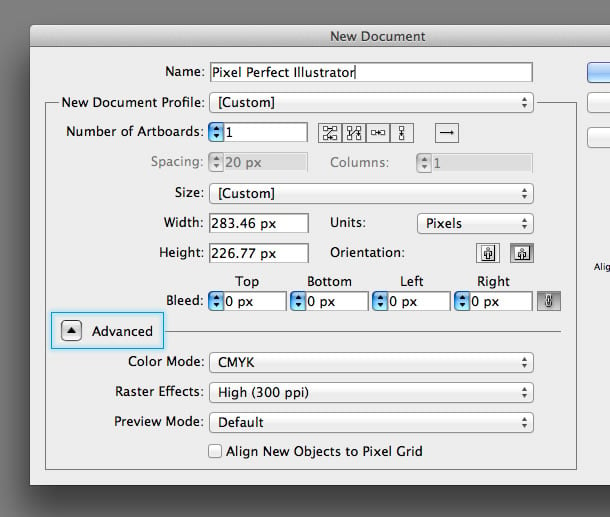
Underneath the Units drop down menu select Pixels as your unit of measurement, any values currently in the Width and Height fields will be converted to pixels. This usually results in a figure with a decimal point, so for example 100mm would become 283.46px, this is no good if we want a pixel perfect document though because there's no such thing as '46% of a pixel', there can only really be 0% or 100%, so let's just change this value manually to an absolute amount, in this example that would be 283px rather than 283.46px.

Step 3
If it is not already expanded, click the little arrow to the left of the Advanced label to display 3 extra fields, these are the secret fields that let you set up a document centered around pixels.

Step 4
Underneath the Color Mode drop down menu select RGB, as you should hopefully know design for screen always uses a RGB (red, green, blue), and design for print should use CMYK (cyan, magenta, yellow, and black).

Step 5
The next field underneath Advanced is Raster Effects, this determines the resolution that the document will render effects such as Drop Shadow, Feather and Glow. Because we are working with pixels for screen output, there is no need for this to be anything higher 72ppi, it will just take longer to render effects.
Step 6
The next field underneath Advanced is Preview Mode, there are 3 options in this drop down menu, one of them is Default, which is the standard behavior in Illustrator, another is Overprint, which previews the document as it will appear when printed, but as you may have guessed by now, the option we are interested in is Pixel.

Where as the default behavior in Illustrator is to display crisp sharp lines no matter how much you zoom into the document, selecting Pixel Preview Mode will display individual pixels if you zoom in beyond 100%. So, instead of perfectly smoothly lines, you will see pixelated images, this might not sound appealing but being able to see the pixels is essential for creating "pixel perfect" designs.
Step 7
Finally, you should see a check box at the bottom of the window that reads "Align New Objects to Pixel Grid". Selecting this option will make all new objects drawn within Illustrator snap to a pixel grid. Bare in mind though that this option only applies for new objects, not objects pasted into the document from elsewhere.
Technique 2: Snap to pixel when transforming objects
I mentioned in the final step of the last technique, that setting Align New Objects to Pixel Grid only works on newly created objects, drawn within the document, for example if you use the Rectangle Tool and draw a rectangle on the canvas it will align the edges of the shape the nearest pixel on the canvas (no half pixels) and set the width and height of the shape to the nearest absolute pixel values (no decimal points).
However if you want to modify your shape later, you run the risk of un-aligning that new shape from the grid, and likewise if you copy and paste a vector shape from another source into your document, it will not adjust the shape automatically to snap to the pixel grid (with good reason).
The solution lies not under a contextual menu, or in the Align tool palette where you may expect it, but within the Transform Tool.
Step 1
First make sure you have the Transform window open (Window>Transform)

Step 2
Select an object, either drawn in Illustrator or pasted from another source.
Step 3
You may notice the checkbox labelled Align to Pixel Grid tick this if it isn't already. If your shape was drawn in Illustrator and is already aligned to the pixel grid, then any transformations you now apply to it with the Transform Tool will not break the alignment.

If your object was pasted from another source and is not aligned to the pixel grid then you will notice as soon as you tick Align to Pixel Grid, the object transforms, and probably becomes much sharper than it was before, the only side effect to this technique is that adjusting objects to fit to pixels will alter the original paths slightly, sometimes giving undesirable effects with smaller shapes.

Technique 3: Convert an existing document to pixels
The techniques so far assume that you are starting a new document and that you will be drawing new objects or pasting the occasional shape from other sources. But what if you have an existing document such as a website design or icon that you want to make pixel perfect without leaving Illustrator? Simple, just follow these few steps to convert existing default Illustrator documents to pixel based Illustrator documents.
Step 1
Firstly, if your document is not currently using pixels as it's default unit of measurement, secondary click on the document rulers (ctrl+r to show rulers) or go to File > Document Setup... (ctrl+alt+p) and change the unit to Pixels.

Step 2
Now, let's turn on the pixel preview, go to View > Pixel Preview, now when we zoom in higher than 100% we can see individual pixels, rather than smooth vector lines and shapes, as mentioned in technique 1 the only way to get pixel perfect designs is to actually see the pixels.

Step 3
To change the Document Raster Effects Settings you can find the settings underneath the Effects menu. Change the Resolution to 72ppi, as we are working with pixels for screen not print, and anything higher is not necessary.

Step 4
Now we've successfully modified our document and set it up for pixels, but our existing content is not yet aligned to our new pixel grid, never fear, we can resolve this with one fell swoop.
Open the Transform (Window>Transform) window if it isn't already and make sure all layers are visible and not locked, then Select All (ctrl+a), and tick the Align to Pixel Grid option in the Transform window.
Before you do this you may want grab some popcorn and watch your document intently while you tick the box. As if by magic, you should see your document instantly get sharper and crisper as it aligns itself to the pixel grid and gets rid of any pesky decimal points in pixel values.
Conclusion
Whilst Illustrator is most suited to vector drawing and print work, it does have the ability to work extremely well with Pixels, and this is a good thing because it closes the gap a little between the enjoyment and flexibility of drawing with vectors and the preciseness and crispness of working with pixels for screen.
Some users may already be familiar with Illustrators' pixel ability, whether it's by selecting the "Web" preset when you create a new document or through experimentation and years of experience, so I'm by no means claiming to have uncovered anything new in the software here, but hopefully with these tips at least some of you can say you've learned about a new side to your old friend Illustrator, that you didn't know it had.


Comments