

by Diego Sanchez
January 09, 2024
Diego prevents carpal tunnel syndrome in designers worldwide by making incredible time-saving Photoshop actions and mock-ups.


How to Make a Soft Caramel Look in Photoshop
Photoshop Photo Effects
Using any of the various apps and filters available today, you can transform the appearance of any picture to create the atmosphere of your choice. But among all the apps available today, the chosen one by designers is undoubtedly Photoshop. So today, I will show you how easily you can take any of your pictures and give it a Soft Caramel look & feel in Photoshop using only the Camera RAW Filter. But before we begin, please, keep in mind that every image is unique, so the settings I will show you here should be taken as a basis for all of your images. Yours may require some different values on each of the settings, but for sure will work on most of them.
Step 1
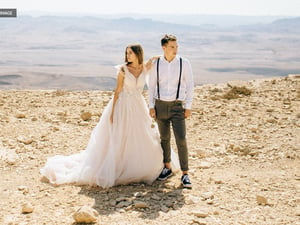
Open your image in Photoshop.

Step 2
Go to Filter > Camera RAW Filter.

Step 3
Expand the "Light" tab and apply the following settings.

Step 4
Now expand the "Color" tab and apply the following settings.

Step 5
Expand the "Effects" tab and apply the following settings.

Step 6
Next, expand the "Curve" tab. Be sure to select the "Parametric Curve" and apply the following values for the Darks and Shadows.

Step 7
Select the "Point Curve". Click anywhere inside the curve to add 2 new control points and apply the following Input/Output values for each point:
- 15-30
- 60-55
- 140-135
- 255-220

Step 8
Now select the "Red Channel" curve. Click anywhere inside the curve to add 2 new control points and apply the following Input/Output values for each point:
- 0-0
- 45-15
- 140-160
- 255-250

Step 9
Now select the "Green Channel" curve. Click anywhere inside the curve to add 2 new control points and apply the following Input/Output values for each point:
- 0-0
- 45-20
- 105-110
- 255-250

Step 10
Now select the "Blue Channel" curve. Click anywhere inside the curve to add 2 new control points and apply the following Input/Output values for each point:
- 0-0
- 45-20
- 140-155
- 255-250

Step 11
Next, expand the "Color Mixer" tab and apply the following values.

Step 12
Expand the "Color Grading" tab. Select the "Shadows" and apply the following values.

Step 13
Now select the "Highlights" and apply the following values.

Step 14
Expand the "Detail" tab, and apply the following values.

Step 15
Lastly, expand the "Calibration" tab, set the following values and click OK in the Camera Raw window.


Comments