
by Jenn Coyle
July 29, 2014
You can find Jenn doodling and blogging, drinking beer, or running around Philly.
Tutorial: How to Design a Kawaii Squid in Illustrator
Today we’re going to learn how to create a kawaii squid in Illustrator and for an added bonus we’re going to "zombify" it. After all, even the most adorable of cephalopods are susceptible to the zombie virus. I am using a PC, so wherever you see me use CTRL if you’re on a Mac you’ll want to use the CMD button instead.

We'll start with the squid’s head. Create a new document in Illustrator, draw two circles (200px and 100px) and align them horizontally and vertically to the centre using the Align palette. Select the smaller of the two circles and then choose Warp and then Shell Upper from the Effect menu. Make sure that the Horizontal option is checked before setting the Bend to 90% and clicking OK. Expand the shape using the Expand Appearance option from the Object menu.

Pull the expanded shape up by roughly 10px, then using the Direct Selection Tool pull its top anchor point upwards by around 80px and the central bottom three anchor points up by 10px. Next we’re going to create the squid's fin. Draw another 100px circle and align it with the top of the head. Using the Effect menu choose Warp, but this time select Shell Lower, set the Horizontal Bend to 65% and click OK before expanding the fin's appearance with the Object menu.
Copy the cone shape, which I believe is called the mantle, and paste it in place (CTRL+C, CTRL+F). Bring the copy to the front of the document (SHIFT+CTRL+]), then using the Scissors Tool clip off its top. Aligning the cut points is made considerably easier if you use the rulers (CTRL+R) to create a horizontal guide on a new layer. Delete out the clipped top and the guide layer, as you won’t need either anymore.
Select the squid’s fin and the original mantle shape and combine them using the Pathfinder’s Unite button. Let’s give our squid some adorable facial features next. Group all of the shapes so far (CTRL+G) and then draw two 20px circles side-by-side, spaced roughly 90px apart. Align the eyes vertically to the centre and horizontally to the bottom of the grouped shapes before pulling them upwards by around 50px.
To create that cute little blush that we all associate with kawaii, copy and paste the eyes in place then pull them down by 15px or so and out the sides by about 10px. Re-order the layers so that the eyes sit above the blush.
Let’s create the mouth next. Draw two more 20px circles with an overlap of 5px and position them in the centre of the squid’s face. With both circles selected click on the Divide button in the Pathfinder palette. Next, using the Direct Selection Tool delete the top anchor points of both circles, continue to delete the excess anchor points until you are left with two semi-circle like shapes side-by-side. Finally, join the two central anchor points by right-clicking as selecting Join from the pop-up menu.
We’re now ready to move onto our squid’s arms. Using the Pen Tool draw a chunky arm that curves slightly outwards, the thickness helps add to the cute and cuddly feel we’re trying to achieve (well, as cute and cuddle as a zombie squid can be). The less anchor points you use the smoother the outcome will be, three should be enough. Once you are satisfied, close the shape’s path by connecting the last anchor point with the first and then copy and paste it in place before reflecting the copy vertically (by right-clicking and then selecting Transform and then Reflect from the pop-up menu) and positioning it on the opposite side of the squid. Select the two arms and the circle forming the squid’s face and combine them using the Pathfinder’s Unite button.

Create the inner arms using the same process, but this time leave the paths open and do not combine the shapes with the body. Position the inner arms so that they just touch, then join the two innermost anchor points. Finally, make sure that the arms are central with the rest of the body using the Align palette.

If you haven’t already done so, give your shapes a white fill as they’re starting to build up. Re-order the layering if necessary. I think it would add a bit of depth if we created two more arms at the back of our squid. Draw a smaller arm with the Pen Tool, closing its path when you’re happy with it. Copy, paste and reflect the arm, as in the previous stages. Position the arms and then send them to the back of the document (SHIFT+CTRL+[). With the arms complete we’re ready to move onto the tentacles.

Create a 15px by 100px rectangle followed by a 40px circle. Align the two shapes horizontally to the centre and vertically to the bottom before pulling the circle downwards by 30px. Using the Direct Selection Tool, pull the circle’s top anchor point up by 5px and bottom anchor point down by 20px then combine them using the Unite button. Thicken the tentacle slightly by using the Arc effect (found in the Effect menu under Warp), set the Horizontal Bend to 5% and click OK. Expand the shape’s appearance by using the Object menu and then apply a second Warp effect, this time setting the Vertical Bend to -20%, before expanding its appearance.

Rotate the tentacle by -20° before copying and pasting it in place. Reflect the copy and position it so that it is spaced roughly 10px to the right of the original. Group the tentacles and send them to the back of the document. Now, align them horizontally to the centre and vertically to the bottom of the squid before pulling them down by around 95px.

The outline of our squid is complete, now we need to add some colour and make him look more like a zombie. I have chosen some sickly looking greens with a brown stroke, but feel free to pick your own colours. Make the arms at the back of the squid a slightly darker shade than the rest of the body as this will help add a sense of perspective. Once you’re happy with the colouring, select the squid’s mantle (the head section without the fins), mouth and inner arms and round off the Cap and the Join of their strokes using the Stroke palette.

Okay, on to the zombification process. Let’s start by making the eyes sunken and tired looking. Select the eyes then from the Object menu choose Path then Offset Path, change the Offset to 5px and click OK. Pull the offsets down and inwards by 1px each and then reorder the layers so that they sit behind the originals. Finally, set the fill of the original eyes to a just off-white colour.
Next let’s add some bite marks, you don’t become a zombie unless you’ve been bitten after all! Draw three 20px circles side-by-side with a 5px overlap, pull the central circle up by about 2px and then combine the shapes using the Pathfinder’s Unite button. Rotate the combined circles by -115° and then position them over one of the squid’s tentacles. With both the tentacle and the circles selected hold down ALT and choose the Pathfinder’s Minus Front button. If you get an error message saying “The filter produced no results. Please select two intersecting paths”, this is because you are not holding down ALT before trying to subtract the shapes. Reorder the layers so that the tentacle is behind the rest of the squid, then expand its appearance using the Object menu.

Repeat the stage above to create the three overlapping combined circles, but this time rotate them by 110°. Position the bite marks over the squid’s mantle and then copy them (CTRL+C). With the bite marks still highlighted select the squid’s mantle, without the fins, and subtract the two shapes using the Minus Front button (you won’t need to hold down ALT this time). Paste the bite marks back in place (CTRL+F) and repeat this process for the section of the squid’s mantle with the fins and then once again for its head. Adjust the position of the layers as necessary.
You will notice that the section of the squid’s mantle without the fins has become a closed path, let’s fix that now. Using the Add Anchor Point Tool (+) add an anchor point to the straight line that’s closing the path and then delete it back out using the Direct Selection Tool.

Ok, our kawaii zombie squid is coming along nicely. Let’s add a little more detail. I think we’ll start by making a bit of his brain visible from the bite in his mantle. Draw five 15px circles side-by-side with an overlap of 5px. Pull the inner two circles up by 2px and the outer two circles down by 4px. Combine the shapes using the Unite button and then remove all of the lower anchor points, using the Direct Selection Tool, with the exception of those belonging to the outer two circles. Join the two open anchor points to close the path of the brain shape before finally giving it a brown stroke and a fleshy pink fill.
Next, rotate the brain by -70° and position it so that its outer edge sits flush against the corner of the bite marks on the squid’s mantle. That definitely makes our squid look more like a zombie!
Select the part of the squid’s mantle that has the fins attached and then from the Tools panel select the Draw Inside option from the Drawing Modes button. Draw circles of varying widths and position them within the mantle until you are satisfied. Set the fill of the circles to have the same colour green as the body of the squid and then from the Transparency palette set the Blending Mode to Multiply and the Opacity to 25%.
If you are using CS4 or below you will not have the Draw Inside option available. Instead, draw your circles and select any that overlap the edge of the squid. With the overlapping circles selected right-click and choose Make Compound Path from the pop-up menu. Copy and paste the mantle in place (CTRL+C, CTRL+F) before bringing it to the front of the document. With the circles and the copy of the mantle selected choose the Intersect option from the Pathfinder palette. You will need to recolour what’s left of the circles.
Now let’s adjust the width of the strokes to give our zombie squid a little more depth. Change the strokes to be 3px, with the exception of the mouth, which we’ll set to 2px. Make sure that all the strokes have rounded caps and corners. Copy and paste the entire squid elsewhere on the artboard and then use the Unite button to combine all of its elements. NB. If you used the Draw Inside method to create the mantle spots earlier you will need to delete any of the overlapping circles before you combine the shapes. From the Object menu select Path then Offset Path, set the Offset to 5px with Round Joins and click OK. Combine the original shape with the offset, set its fill to brown with a transparent stroke and then position it so that it sits behind the squid.
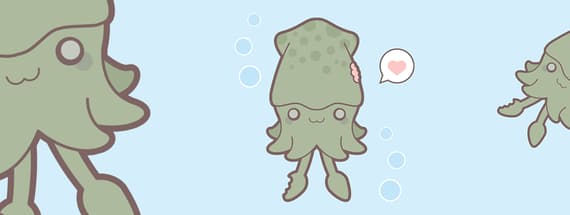
That’s it our kawaii zombie squid is complete! All that’s left to do is add the finishing touches, such as the cute little speech bubble you often see in kawaii artwork and a background, so that we know he’s underwater. To create the speech bubble draw a 80px circle and a 20px square, each with a white fill and a 3px brown stroke. Remove the top-right anchor point of the square and then join the paths so that it becomes a triangle. Pull the bottom-left anchor point down and to the left by 10px and then align it horizontally to the left and vertically to the bottom of the circle. Combine the two shapes with the Pathfinder palette.

You can put whatever you like inside the speech bubble, but I think a heart would match the overall cute kawaii feel. It’s also a very good zombie strategy – look like you need a hug and your dinner will come to you. To create the heart draw a 25px circle, press SHIFT+C to access the Convert Anchor Point Tool and click on the lower anchor point. Using the Direct Selection Tool, pull the lower anchor point down by roughly 20px and the rotate the shape by 30°. Copy and paste the shape in place before reflecting the copy vertically and pulling it to the right by around 15px. Using the Shape Builder Tool hold down ALT and click on the two triangles at the bottom of the heart to remove them. Combine the heart shape using the Unite button. If you don’t have the Shape Builder Tool available use the Pathfinder’s divide button instead.

Give the heart a pink fill colour, position it within the speech bubble and then position that to the right of the zombie squid. To finish off the scene add a light blue background for the sea. A few bubbles with a slightly darker blue fill and white stroke can then be added as a final embellishment. Our kawaii zombie squid is now finished! Isn’t he adorable?
Comments