

Tutorial: Easily Create an Artistic Watercolor Painting in Photoshop
Watercolor effects have long been a popular style among designers. While many of techniques involve building the watercolor strokes from scratch, in this tutorial we'll use existing watercolor textures and some simple image combination to show you how to quickly turn almost any image into an artistic watercolor painting.
Step 1: Choose a primary image
The first step is to find an image that is both striking and easy to work with for the main subject of your design. Already isolated images will be the easiest, solid color backgrounds in the middle, and images that have to be extracted from the background will be the hardest. I chose to go with the below image from BigStockPhoto:
Step 2: Use Photoshop brush presets to easily isolate the subject
Skip this step if your image is already isolated. The dancers I found are on a solid white background, so I used a simple trick to isolate them without needing to outline/select the whole image. Since Photoshop brushes are defined using lumosity (dark colors are the brush and white is transparent) you can create a new brush preset of your subject and "paint" that onto a new layer. This allows you to isolate subjects from white colored backgrounds very easily:
Step 3: Find watercolor textures
To use this technique we'll need watercolor textures for both the background and the primary subject. This is a fairly important step of the process: the images you find here will significantly impact the style of your end result. I decided to go with the following set from Medialoot:25 Handmade Watercolor Textures
 From here we need to pick an image for the background, adjust positioning, opacity, and blend mode:
 The results:

Step 4: Add more background texture
I wasn't completely satisfied with just the above image for the background of this painting, so I used our free seamless rice-paper textures to add a little canvas feel to the image: And the outcome:

Step 5: Find a texture/image for the subject
I used a different texture from the same watercolor resource as the background, but picked one that was a different color and a little darker:
Step 6: Place the isolated subject in white
To do this create a new layer with no fill, then use the brush preset from earlier in the tutorial to paint the subject onto the new layer. Make sure brush opacity is set to 100%.
Combine the texture and the subject using a clipping mask
This is where the magic starts to happen. Make sure your watercolor image is above the main subject in the layer pallette, and then right click on the watercolor layer and select "Create Clipping Mask". And the result:
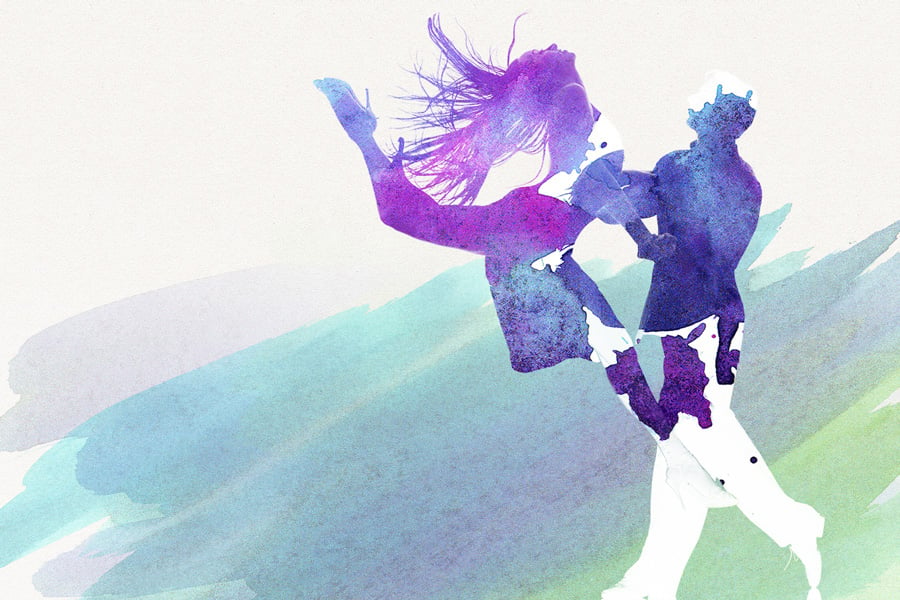 From here I wanted to make the watercoloring a little bit different. You can get creative by using multiple watercolor images and changing their positions above the clipping mask. Here's where I ended up after a little tweaking:

Step 7: Add brush effects/customize the subject
Once you have the clipping mask set you can add as much to the mask (the dancers or main subject) as you want and the watercolor texture will show through. To do this simply paint with a white brush on your main layer: I wanted to tie the dancers into the background a bit so I added a few strokes along the bottom right corner.
Step 8: Close watercolor strokes using an inner shadow
This is a subtle change but I think it adds to the overall impression. You can make the watercolor appear to be a bit more authentic by replicating the "darkened edges" that is present in most painted watercolor. To do this I used an inner-shadow effect to give the edges a slightly darkened look:
Final Results
What do you guys think?
Comments