

by Diego Sanchez
August 08, 2017
Diego prevents carpal tunnel syndrome in designers worldwide by making incredible time-saving Photoshop actions and mock-ups.

How to Vectorize a Vintage Illustration
Vintage to vector
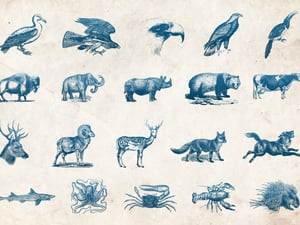
In this tutorial, we will be using our scanner, Photoshop and Illustrator to vectorize an old illustration so we can use it anywhere we wish, like a logo, a badge, an image for our blogs posts, or even as a background for our pictures.
Step 1
Scan your image using at least a 600dpi resolution so we can end up with a really big image, which will be of great help when we clean up the illustration and to get a more precise vectorization. All scanners have different interfaces, but they all share more or less the same settings, so as a general guidance use the Color Mode in Grayscale and a Resolution of at least 600dpi.

Step 2
Open the image in Photoshop, and using the Crop Tool (C) crop the image to the illustration of your interest, which in this case, is the Hawk head.

Step 3
Go to Image > Adjustments > Selective Color. Be sure to have the Absolute Method selected and from the dropdown menu select Whites.

Step 4
With the White color selected, set the Black slider to -100%.

Step 5
Now from the dropdown Colors menu, select Neutral, and set the Black slider to -20% and click Ok.
(Note: you may need to adjust these settings a bit based on your image)

Step 6
Using your favourite method, clean up the small areas that you do not want to vectorize. To keeps things as simple as possible, I will be using a white brush to brush over a few pixels of the Hawk image. Just select the Brush tool (B) and paint with white over the unwanted areas.

Step 7
Once you finish cleaning the image, just go to File > Save As and save you file either as JPG, PNG or TIFF. (in this case I am using the .TIFF type)

Step 8
Open Illustrator and go to File > Open. Locate the file we just saved and click Open.

Step 9
Click once over the image. When you do that, the top bar will change according to the object type (in this case, an Image).

Step 10
Before tracing our image, we need to make some adjustments. If you do not have the Image Trace panel visible, go to Window > Image Trace

Step 11
In the Image Trace Panel set the following values:
Quick tip: you can easily see the original image / trace result by clicking and holding the eye icon in the Image Trace Panel.

Step 12
Once you are happy with the results, click on the Expand button in the top bar.

Step 13
Go to Object > Ungroup. Using the Selection Tool (V) click and drag starting outside the artboard until you reach the image side.

Step 14
Go to Edit > Clear, or simple hit the Delete key on your keyboard. This will delete the background of our image.

Step 15
Locate an area that is a closed path but it is with an empty fill on the image and click once over it (any of the shown blue areas will work for this).

Step 16
With any of these areas selected, go to Select > Same > Fill Color. Go to Edit > Clear, or simple hit the Delete key on your keyboard. This will delete the empty fill areas of our image.

Step 17
Finally, go to Select > All. With the selection active go to Object > Compound Path > Make. Now you can colorize, rotate and scale the paths as you wish.

Final Notes
Here is the before and after of our scanned image.


Comments