

by Tony Thomas
July 20, 2011
Tony creates pixel-perfect UI kits & icons. His pug, Wednesday, is Medialoot's beloved mascot.
How To Create Your Own Grunge Brushes In Photoshop CS5
Love grunge brushes and textures? Ever wanted to make your own Photoshop brush, or just have something in your collection that's unique to you? Then you're in luck because it's surprisingly easy, especially in Photoshop CS5 to build a collection of unique grunge brushes. Follow this tutorial to learn the techniques you need, and in no time you'll be creating your own personal brushes.
download the image here
Step 1: Sample an Area of Your Image
Using the Marque Tool (M) make a selection on the image, choose a part of the image which is sharp, has a lot of detail and you think would make a good grunge brush. Don't worry too much about how well you cut it, just make sure you get all of the main areas you want in there, and over shoot it a bit so that you get a bit of excess to play with too.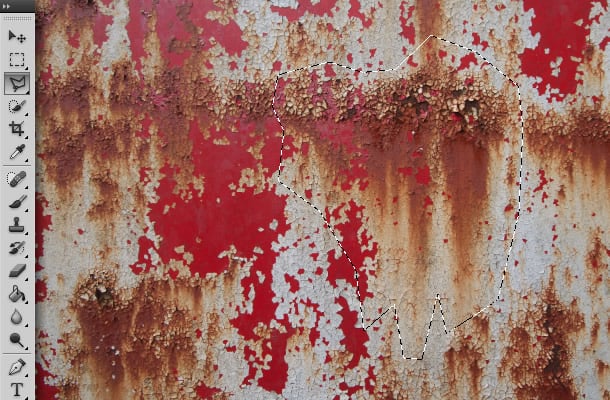
Step 2: Dissect the Area From the Image
Copy the marquee selection (CTRL/CMD + C) and open a new document (CTRL/CMD + N), by default Photoshop should use the dimensions of the clipboard for the new document, these dimensions will do just fine so hit OK Paste (CTRL/CMD + V) the selection into your new document.

Step 3: De-Saturate the Sample
In the Adjustments window (Window > Adjustments) select Hue/Saturation. Drag the Saturation slider down to -100. Or if you are using an older version of Photoshop and the Adjustments window isn't available simply press CTRL/CMD + SHIFT + U to de-saturate the image.
Step 4: Tweak the Levels
In the Adjustments window (Window > Adjustments) select Levels. Or if you are using an older version of Photoshop and the Adjustments window isn't available simply press CTRL/CMD + L to get the standard Levels dialog. Adjust the dark and light points on the histogram to about 45, 1.00, and 170. Or until the lightest areas of the image become pure white and the dark areas are more defined.
Step 5: Refine the Sample Area
Next, find any large solid areas that you know you definitely don't want in the final brush and highlight them with the Marquee (M) or Magic Wand (W) tools. Hit delete/backspace to eliminate the highlighted areas.
Step 6: Dodge the Edges
Now we need to refine the edges of the brush as they will be far too jagged and sudden as they are, rather than using the Eraser as you might expect though, select the Dodge (O) tool, and choose Highlights for the range and set the exposure to 50%. Work your way around the edges (highlighted in the screenshot below) with the Dodge tool, gently removing the lighter areas of the image (Highlights). Where as the Eraser tool would remove everything in it's path, the Dodge tool will cleverly increase the brightness of light, mid-range or dark areas where you use it (in this case light). The more you apply the Dodge tool on the same area, the more it will erase because the once mid-tones and even shadows will eventually become the new highlights in that area.
 Apply the same Dodge technique all around the edges of the sample area.


Step 7: Even Out the Dark/Light Balance
Reduce the exposure of the Dodge tool and level out any areas that are too dark, or vise versa use the Burn tool to darken any areas that are too light. In this case I only used the Dodge tool a little in the middle of the sample area.
Step 8: Erase Non-Essential Areas
Our brush is almost ready now, we just need to delete any stray odds and ends which don't add anything to the brush, use the Eraser (E) tool to simply remove these bits that you don't want from the sample area. The bits you delete should be scattered around the edges usually, disconnected from the main brush area.

Step 9: Define as Brush Preset
The final step is to go to the Edit menu and Define as Brush Preset. It will ask you to give your brush a name, then hit OK and you're done.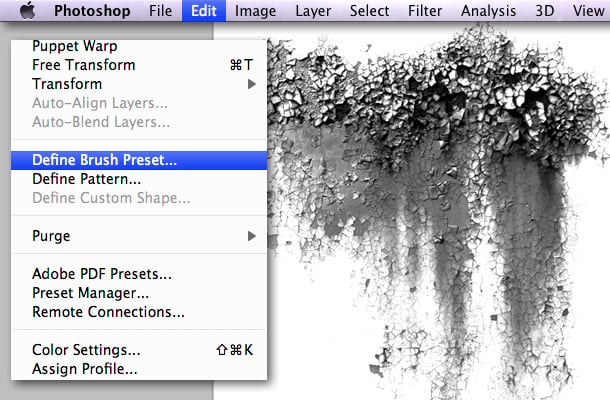
Conclusion
 Here is an example of the brush in use, using 1 instance of the brush only, on an otherwise un-processed grunge texture from the Dark Grunge & Stone Textures set. I hope you enjoyed reading this tutorial and if you followed it to the end, then please, put the brush to better use than I just did!
Thanks for reading!
Here is an example of the brush in use, using 1 instance of the brush only, on an otherwise un-processed grunge texture from the Dark Grunge & Stone Textures set. I hope you enjoyed reading this tutorial and if you followed it to the end, then please, put the brush to better use than I just did!
Thanks for reading!
Comments