
by Tony Thomas
February 04, 2011
Tony creates pixel-perfect UI kits & icons. His pug, Wednesday, is Medialoot's beloved mascot.
How to Create a Sleek Oversized Search Bar in Fireworks
In this tutorial we will explore shape and layer style techniques to create an oversized search bar in Adobe Fireworks.
Step 1 - Set up your document
Launch Fireworks and hit 'ctrl/cmd + n' to open a new document. Enter 800px for the width, 400px for the height and 72 pixels per inch. Set the background color to #333333 and hit 'OK'
Step 2 - Shapes
First use the Rounded Rectangle tool to draw a shape near the center of the document Using the Auto Shape Properties window (Window > Auto Shape Properties) set the width: 640px, the height: 78px and the corner radius: 10px
 This should give you the first shape that we'll be using to create the oversized search bar as illustrated below.
 Repeat this process to create two more rounded rectangles on top of your first shape.
Position the new shapes as illustrated and set the left-hand shape to width: 440px, height: 50px and corner radius: 10px.
Repeat this process to create two more rounded rectangles on top of your first shape.
Position the new shapes as illustrated and set the left-hand shape to width: 440px, height: 50px and corner radius: 10px.
 Set the right-hand shape to width: 156px, height: 50px and corner radius: 10px
Step 3 - Add some text
Now lets add some text to our document using the Text tool (T) Position the text as illustrated below The font used here is Lucida Grande at 18px and the 'Search now' text has been set to bold to draw slightly more attention.
Step 4 - The magnifying glass icon
We will draw a magnifying glass icon using the 'Doughnut' auto shape and 'Rounded Rectangle'. Start with the Doughnut tool Draw a small doughnut shape in the space before the text at 24x24px
Set the Outer Radius to 12 and Inner Radius to 7.
Draw a small doughnut shape in the space before the text at 24x24px
Set the Outer Radius to 12 and Inner Radius to 7.
 Then use the Rounded Rectangle auto shape to draw the magnifying glass handle, set the width: 16px, the height: 5px and the corner radius: 2px.
Then overlay the handle horizontally on the doughnut as illustrated.
Then use the Rounded Rectangle auto shape to draw the magnifying glass handle, set the width: 16px, the height: 5px and the corner radius: 2px.
Then overlay the handle horizontally on the doughnut as illustrated.
 Select both shapes (shift + click) and then 'Union' the two shapes using the 'Path' window (Window > Others > Path).
 This will create your basic magnifying glass shape which you can rotate 45 degrees using the 'Scale' tool (Q)

Step 5 - Add styles
Now for the fun bit, styling it up!Note: all drop shadows and inner shadows in this section use either #000000 for dark shadows or #ffffff for highlights.Starting with the large bottom rectangle apply a linear gradient fill from #515151 to #212121, then using the 'Filters' panel add a new inner shadow with the settings below, next use the 'Photoshop Live Effects' filter to add a stroke. We use the 'Photoshop Live Effects' stroke so that we can arrange the order in which the stroke is applied and also the Photoshop stroke is smoother than the default Fireworks stroke. Finally add a drop shadow with the settings below.

Note: make sure you layer the effects in the right order, you can rearrange the filters by dragging and dropping them.This should give you a result similar to this:
 Now onto the left-hand side rectangle.
Add a linear gradient from #000000 to #212121 and then apply two drop shadows using the settings below.
Now onto the left-hand side rectangle.
Add a linear gradient from #000000 to #212121 and then apply two drop shadows using the settings below.
 Change the fill of the magnifying glass icon and the text on top of this rectangle to white (#ffffff) and you should have something like this:
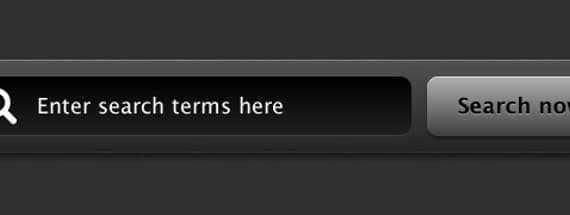
 Moving onto the other rectangle; apply another linear gradient from #A9A9A9 to #363636, and a drop shadow and inner shadow with the settings below
 Now change the fill of the 'Search now' text to #000000 and a apply a drop shadow filter with the effects below for a nice highlight:

Step 6 - That's it
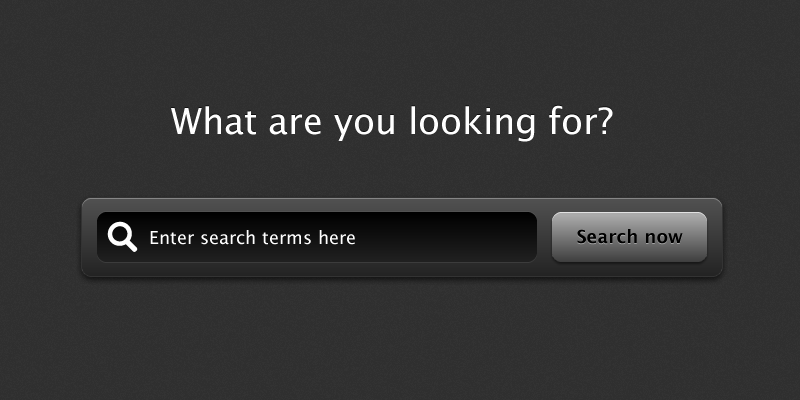
I've added some finishing touches, with subtle background noise and a headline asking "What are you looking for?" Here is the final product:
Comments