
by Tony Thomas
February 11, 2016
Tony creates pixel-perfect UI kits & icons. His pug, Wednesday, is Medialoot's beloved mascot.


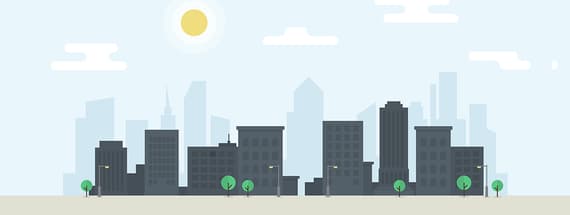
Create a Vector Cityscape Scene in Adobe Illustrator
Draw a complex looking city skyline using basic vector shapes
This detailed tutorial will walk you through the process of creating a vector cityscape in Illustrator step by step, using only basic shapes such as rectangles, circles and lines.
Section 1: Background
Step 1.1
Create a new 1200 x 600 pixel document in Illustrator with RGB color mode.
Step 1.2
As this is a rather complex illustration, it is wise to plan ahead and split the illustration into distinct sections. Create 5 new layers in addition to the default 'Layer 1' and give them appropriate names as shown in the screenshot below:
Step 1.3
On the 'Background' layer draw a new rectangle that fits the entire artboard with a light blue fill.
Step 1.4
Draw another rectangle at the bottom of the artboard, with a biege fill.
Section 2: Clouds
Step 2.1
Lock the 'Background' layer and move to the 'Clouds' layer.
Step 2.2
Draw a new rectangle with a white fill.
Step 2.3
Duplicate the existing rectangle or draw 2 more as shown.

Step 2.4
Select all 3 white rectangles and combine them with the 'Union' Shape Mode.
Step 2.5
Switch to the Direct Selection tool and increase the corner radius to the maximum (10px)
Step 2.6
Repeat the process to create another cloud.


Step 2.7
Repeat the process to create another cloud.


Step 2.8
Repeat the process to create another cloud.


Section 3: Sun
Step 3.1
Lock the 'Clouds' layer and move to the 'Sun' layer.
Step 3.2
Draw a circle shape with a yellow fill using the Ellipse tool whilst holding down the Shift key to constrain proportions.
Step 3.3
Duplicate the circle, switch the fill color to white with 60% transparency and increase the size. Then Send Backward (CMD+[ or CTRL+[).
Step 3.4
Duplicate the circle, change the transparency to 60% and increase the size. Then Send Backward (CMD+[ or CTRL+[).
Section 4: Buildings (Distant)
Step 4.1
Lock the 'Sun' layer and move to the 'Buildings (Distant)' layer.
Step 4.2
Draw 3 new rectangles with a light blue (just slightly darker than the sky). Dimensions and positions are shown in the screenshots below.


Step 4.3
Grab the top right anchor point of the last rectangle and use the arrow keys to nudge it up 10 pixels.
Step 4.4
Draw 6 new rectangles with the same color. Dimensions and positions are shown in the screenshots below.


Step 4.5
Use the Pen tool to delete the top right anchor point on the last rectangle.
Step 4.6
Draw 2 new rectangles with the same color. Dimensions and positions are shown in the screenshots below.

Step 4.7
Grab the top left anchor point of the last rectangle and use the arrow keys to nudge it right 20 pixels.
Step 4.8
Draw 2 rectangles with the same color. Dimensions and positions are shown in the screenshots below.

Step 4.9
Grab the top right anchor point of the last rectangle and use the arrow keys to nudge it down 10 pixels.
Step 4.10
Draw 6 new rectangles with the same color. Dimensions and positions are shown in the screenshots below.


Step 4.11
Use the Pen tool to delete the top right anchor point and drag the remaining top point to the center whilst down the Shift key.
Step 4.12
Draw 2 new rectangles with the same color. Dimensions and positions are shown in the screenshots below.

Step 4.13
Grab the top left anchor point with the Direct Selection tool and use the arrow keys to nudge it down 30 pixels.
Step 4.14
Draw 10 new rectangles with the same color. Dimensions and positions are shown in the screenshots below.


Step 4.15
Grab the top right anchor point with the Direct Selection tool and use the arrow keys to nudge it down 10 pixels.
Section 5: Buildings (Near)
Step 5.1
Lock the 'Buildings (Distant)' layer and move to the 'Buildings (Near)' layer.
Step 5.2
Draw 3 new dark gray rectangles. Dimensions, positions and other attributes are shown in the screenshots below.


Step 5.3
Draw a black rectangle with 10% transparency and duplicate it 5 times with 4 pixels horizontal spacing in between each copy.
Step 5.4
Draw 3 new rectangles. Dimensions, positions and other attributes are shown in the screenshots below.


Step 5.5
Draw a black rectangle with 10% transparency and duplicate it 5 times with 2 pixels horizontal spacing in between each copy.
Step 5.6
Select the row of rectangles and duplicate it 6 times with 4 pixels vertical spacing in between each copy.
Step 5.7
Select the middle 2 rectangles on the bottom row and delete them.
Step 5.8
Draw 5 new rectangles. Dimensions, positions and other attributes are shown in the screenshots below.


Step 5.9
Draw a black rectangle with 10% transparency and duplicate it 4 times with 6 pixels horizontal spacing in between each copy.
Step 5.10
Select the row of rectangles and duplicate it 5 times with 6 pixels vertical spacing in between each copy.
Step 5.11
Draw 3 new rectangles. Dimensions, positions and other attributes are shown in the screenshots below.


Step 5.12
Draw a black rectangle with 10% transparency, and rounded top corners. Then duplicate it 3 times with 8 pixels horizontal spacing in between each copy.
Step 5.13
Select the row of rectangles and duplicate it 3 times with 10 pixels vertical spacing in between each copy.
Step 5.14
Draw 6 new rectangles. Dimensions, positions and other attributes are shown in the screenshots below.


Step 5.15
Draw a black rectangle with 10% transparency and duplicate it 3 times with 8 pixels horizontal spacing in between each copy.
Step 5.16
Select the row of rectangles and duplicate it 6 times with 6 pixels vertical spacing in between each copy.
Step 5.17
Select the middle 2 rectangles on the bottom row and delete them.
Step 5.18
Draw 13 new rectangles. Dimensions, positions and other attributes are shown in the screenshots below.


Step 5.19
Draw a black rectangle with 10% transparency and duplicate it 4 times with 4 pixels horizontal spacing in between each copy.
Step 5.20
Draw a black rectangle with 10% transparency and duplicate it 5 times with 4 pixels horizontal spacing in between each copy.
Step 5.21
Draw 3 new rectangles. Dimensions, positions and other attributes are shown in the screenshots below.


Step 5.22
Draw a black rectangle with 10% transparency, and rounded top corners. Then duplicate it 2 times with 8 pixels horizontal spacing in between each copy.
Step 5.23
Select the row of rectangles and duplicate it 3 times with 10 pixels vertical spacing in between each copy.
Step 5.24
Draw a new rectangle. Dimensions, positions and other attributes are shown in the screenshots below.
Step 5.25
Draw a black rectangle with 10% transparency and duplicate it 2 times with 6 pixels horizontal spacing in between each copy.
Step 5.26
Select the row of rectangles and duplicate it 4 times with 6 pixels vertical spacing in between each copy.
Section 6: Lamps/Trees
Step 6.1
Lock the 'Buildings (Near)' layer and move to the 'Lamps/Trees' layer.
Step 6.2
Draw a circle shape with a green fill using the Ellipse tool whilst holding down the Shift key to constrain proportions.
Step 6.3
Duplicate the circle in place and change the fill to black. Draw a rough rectangle shape that intersects the center of the circle, and use the Subtract Shape Mode to delete the left half of the circle.
Step 6.4
Change the transparency to 10% for a shadow effect.
Step 6.5
Draw a new Line segment with a dark brown 2 pixel stroke as shown below.
Step 6.6
Draw a new diagonal Line segment that meets the first line.
Step 6.7
Draw a new Ellipse shape with a black fill and 10% transparency, then Send to Back (CMD+SHIFT+[ or CTRL+SHIFT+[) to place it behind the tree.
Step 6.8
Group the tree shapes, duplicate the group 5 times and spread them along the cityscape. Also to add some variety use Flip Horizontal and resize a couple of the trees.
Step 6.9
Draw a new medium gray rectangle with rounded top corners as show in the screenshot below.
Step 6.10
Draw a new Line segment with a 2 pixel medium gray stroke as show in the screenshot below.
Step 6.11
Draw another line segment which meets the first line.
Step 6.12
Draw a new rectangle shape with rounded bottom corners and a yellow color fill as shown in the screenshot below.
Step 6.13
Draw a new Ellipse shape with a black fill and 10% transparency, then Send to Back (CMD+SHIFT+[ or CTRL+SHIFT+[) to place it behind the lamp post.
Step 6.14
Group the lamp post shapes, duplicate the group 3 times and spread them along the cityscape. Also to add some variety use Flip Horizontal on a couple of the lamp posts.
Result & Conclusion
Phew! If you made it this far, congratulations! I hope you've enjoyed following along with this tutorial and creating your own vector cityscape. It's definitely one my most detailed tutorials to date and I had a lot of fun putting this together. Thanks for reading, and lastly here is the final result: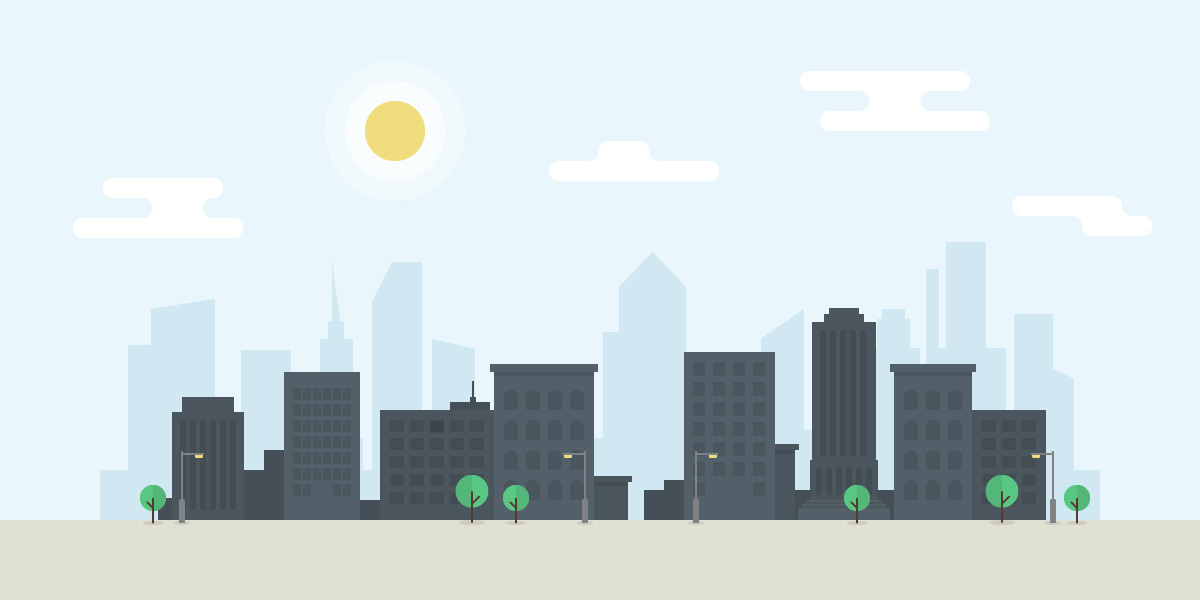 (click to view full size)


Comments