

by Tony Thomas
April 12, 2011
Tony creates pixel-perfect UI kits & icons. His pug, Wednesday, is Medialoot's beloved mascot.
Tutorial: How To Design a Realistic Takeout Coffee Icon
In this tutorial we're going to show you how to design an icon from our popular freebie, the Incredibly Detailed Drinks Icon Pack. We'll walk you through the process of creating the takeout coffee cup from start to finish, exploring a wide variety of techniques in Photoshop that can be applied to almost any type of design and drawing.
Adobe Photoshop software package, and was created using version CS5, however I think CS3+ can perform most if not all of the same tasks.Preview the Final Icon
Here's a sneak preview of the final product of this tutorial, this is how the icon should turn out: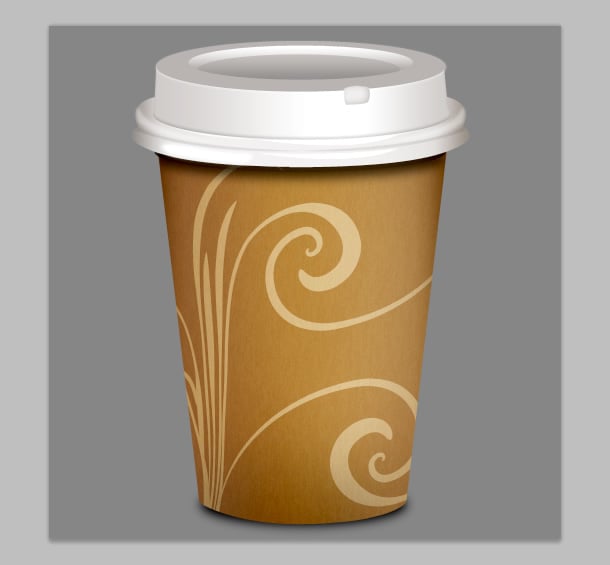 Let's begin with the tutorial:
Setting up the Document
Start by creating the document, this is going to be a pretty high res icon so set the width and height to 512px, even if you use the final image slightly smaller it's best to start off bigger for a crisper result, unless you plan to reduce the size by over 50% this is usually a good rule to stick to. Also set the background to transparent but feel free to use a mid grey solid colour temporarily through the project if you feel the checkerboard effect is interfering with the design. Set the foreground colour to #6e3b14 and draw a rectangle (U) shape layer in the centre but towards the bottom of the document at about 295x395px. this will be the building block of our cup.


Drawing the Cup
Now let's draw some guides to help us keep the cup in proportion. Start by simply dragging new guides in to touch the edges of the shape you just drew, from here create 2 new guides around 20px above and below the top line, and repeat for the bottom line. Finally draw a new guide about 45px in from each of the vertical guides. your result should be something like this. Using the direct selection tool (A) grab the bottom corners of your rectangle shape layer and nudge (arrow keys) them to meet the inside guides you drew, this will make your rectangle appear to expand towards the top.
 We will now be using Photoshop's boolean tools, so make sure you have the shape layer still selected (thin grey lines will be visible) and using the toolbar at the top of the window select Shape Layer, Oval, Subtract from shape layer.
 Now draw an oval using these options within the top guides, the result will be an area subtracted from the original rectangle rather than a new shape layer.
 Repeat the last step at the bottom of the rectangle with one difference, select the Add to shape layer as opposed to subtract or create new.

 At this point we should have the basic shape that will form the coffee cup.
Note: if at point during this you feel like getting a coffee, for motivation feel free ;).
At this point we should have the basic shape that will form the coffee cup.
Note: if at point during this you feel like getting a coffee, for motivation feel free ;).
Adding Texture to the Cup
Back to the design, at the moment it's the right shape but looks nothing like a dimensional cup, this can be solved with a simple gradient a bit of shading. First the gradient, double click the rectangle's layer in the layer palette (Window > Layers) or right click and select Blending Options.... Select Gradient Overlay and create a gradient like the one demonstrated below. The top row of stops in order are:
Opacity: 100 Location: 0, Opacity: 0 Location: 50, Opacity: 100 Location: 100
The bottom row of stops are:
Color: #190e03, Location: 0, Color: #ffffff, Location: 50, Color: #190e03, Location: 100
Having a white stop in the centre of the two dark brown stops creates a simultaneous shadow and highlight using just one gradient.
Create a new layer (CMD/CTRL+SHIFT+N) and select the brush tool (B), with a foreground color of #000000 draw a basic 300px soft circle (default brushes) at the bottom of your shape, approximately half on it and half off. Then right click the new layer you just created select Create Clipping Mask.
The top row of stops in order are:
Opacity: 100 Location: 0, Opacity: 0 Location: 50, Opacity: 100 Location: 100
The bottom row of stops are:
Color: #190e03, Location: 0, Color: #ffffff, Location: 50, Color: #190e03, Location: 100
Having a white stop in the centre of the two dark brown stops creates a simultaneous shadow and highlight using just one gradient.
Create a new layer (CMD/CTRL+SHIFT+N) and select the brush tool (B), with a foreground color of #000000 draw a basic 300px soft circle (default brushes) at the bottom of your shape, approximately half on it and half off. Then right click the new layer you just created select Create Clipping Mask.
 Create another new layer, also with a clipping mask and using the brush tool, set the foreground colour to #ffffff and draw a highlight down the centre of the shape as demonstrated. This will look quite ghastly at first but if you set the layers blending options to Soft Light and Opacity to 30% it will tone down the effect a look more realistic.
 Once again, create another new layer that is clipped to the original shape, this time fill the whole layer white (#ffffff) with the Paint Bucket (G) tool, and from the menu bar Filter > Convert for Smart Filters, this will convert the current layer to a smart object and allow non-destructive application of filters (ie. you can modify and remove them later if you change your mind!).
 next Filter > Render > Fibres... and set the variance to 64 and strength to 3.
Optional: you can also apply a subtle noise filter on top of the fibres to your preference
next Filter > Render > Fibres... and set the variance to 64 and strength to 3.
Optional: you can also apply a subtle noise filter on top of the fibres to your preference
 On the fibres layer set the blending options to Soft Light and opacity to 6%
 Our cup is now ready! next step is the lid.
The Lid of the Cup
Using the guides we created early on draw another ellipse shape layer directly above your cup, fill it will any light grey colour as we will be applying a gradient above it, using the same boolean techniques we covered earlier add a rectangle to the shape layer at about 45px height starting from half way down ellipse as demonstrated below. Apply an Inner Shadow to the new shape layer you just drew with the following settings:
- Blend Mode: Normal
- Color: #000000
- Opacity: 19%
- Angle: -90
- Distance: 2
- Choke: 0
- Size: 3
 And a Gradient Overlay with the bottom row of stops going from #c2bebb to #ffffff and back to #c2bebb with the middle #ffffff stop at 65%, blend mode: Normal and opacity: 100%.

 Draw another ellipse above the new shape (again, the guides will assist you in this if you start from where the very top and very left lines intersect)
 Use the Inner Shadow layer style to create a nice subtle highlight below the new shape layer you just drew with the following settings:
- Blend Mode: Normal
- Color: #ffffff
- Opacity: 50%
- Angle: -90
- Distance: 1
- Choke: 0
- Size: 3
 Duplicate the last layer you created, a quick easy way to do this is to hold ALT and hit one of the arrow keys, a duplicate will be created and offset one pixel in the direction you pressed.
For the next step you will need to use a bit of your natural depth perception and use the transform tool (CMD/CTRL+T) to first decrease the size of the shape proportionally (hold SHIFT key and drag anchors) and then squash the shape vertically until it looks like it is actually sitting on top of the lid of the cup.
Use the image below as a reference for what you're trying to achieve, applying the gradient overlay first may help with your perception if you're a very visual person so the settings for that are pretty simple:
Stop 1: #827a74, Stop 2: #fbfbfb, angle 90
Duplicate the last layer you created, a quick easy way to do this is to hold ALT and hit one of the arrow keys, a duplicate will be created and offset one pixel in the direction you pressed.
For the next step you will need to use a bit of your natural depth perception and use the transform tool (CMD/CTRL+T) to first decrease the size of the shape proportionally (hold SHIFT key and drag anchors) and then squash the shape vertically until it looks like it is actually sitting on top of the lid of the cup.
Use the image below as a reference for what you're trying to achieve, applying the gradient overlay first may help with your perception if you're a very visual person so the settings for that are pretty simple:
Stop 1: #827a74, Stop 2: #fbfbfb, angle 90
 Duplicate this layer and nudge it down 10px (SHIFT+Down Arrow Key).
Now we want to clip the duplicated layer to the original layer, but rather than duplicating the layer for a second time to create a clipping mask we will use boolean operations to trim this new layer down to size.
Select the path of the duplicated shape layer and with the ellipse tool (U) make sure Shape layers and Intersect shape area are selected and draw a new ellipse slightly smaller and inside the original shape, overlapping at the bottom as illustrated below.
Duplicate this layer and nudge it down 10px (SHIFT+Down Arrow Key).
Now we want to clip the duplicated layer to the original layer, but rather than duplicating the layer for a second time to create a clipping mask we will use boolean operations to trim this new layer down to size.
Select the path of the duplicated shape layer and with the ellipse tool (U) make sure Shape layers and Intersect shape area are selected and draw a new ellipse slightly smaller and inside the original shape, overlapping at the bottom as illustrated below.
 On the new layer set the colour of the shape to #b8b4b1 and apply a gradient overlay at a 90 angle going from #000000 to #000000 but with the first stop on the top row at 60% opacity and the second stop at 0%.
 The next step requires a bit of Pen free-styling, remember to utilise real photos of your subject matter for guidance when drawing shapes like this, nobody can remember exactly what every shape in the world looks like so don't feel like it's cheating!
Choose the Pen tool ( P ) and draw a shape similar to one below, fill it with #e8e6e4.
The next step requires a bit of Pen free-styling, remember to utilise real photos of your subject matter for guidance when drawing shapes like this, nobody can remember exactly what every shape in the world looks like so don't feel like it's cheating!
Choose the Pen tool ( P ) and draw a shape similar to one below, fill it with #e8e6e4.
 Give the new shape an inner shadow with the following settings:
- Blend Mode: Normal
- Color: #000000
- Opacity: 21%
- Angle: -31
- Distance: 2
- Choke: 0
- Size: 7
 And an Outer Glow:
- Blend Mode: Screen
- Color: #ffffff
- Opacity: 60%
- Spread: 0
- Size: 2
 Again with the Pen free-styling draw a shape similar to that show below.
 Using the Direct Selection (A) tool select all of the shape and copy and paste a duplicate into the same shape layer, with the duplicated path selected Edit > Transform > Flip Horizontal and nudge it to the right until it is symmetrical with the original
 Apply a Gradient Overlay to the layer from #190e03, 0 to #ffffff, 50 and back to #190e03, 100 and create a new stop on the top layer in the centre at 0% opacity. Set the gradients overall angle to 0.


Manual Shading on the Lid
The lid is almost done now, we just need to draw a few manual highlights and shadows for that extra realistic feel. Start with two shape layers drawn with the Pen tool (as seen below) in the centre of the outer ring of the lid we just drew, fill both of the new shapes with #ffffff and opacity 100%. Draw two more shapes using the same technique on the left hand side of the lid, fill them with #ffffff.

 Convert each shape for Smart Filters Filer > Convert for Smart Filters and on the top shape apply a Filter > Gaussian Blur at 1.3 strength and on the bottom shape a Gaussian Blur at 5 strength.
 Next use the Pen tool again and draw a shadow between the two highlights, fill it with #000000.
Set the opacity of the three new shapes as follows:
Next use the Pen tool again and draw a shadow between the two highlights, fill it with #000000.
Set the opacity of the three new shapes as follows:
- Top Highlight: 35%
- Shadow: 9%
- Bottom Highlight: 100%
 Group all three layers (CMD/CTRL+G) and duplicate the group, then flip it Edit > Transform > Flip Horizontal and nudge it across to the righthand side of the lid.
 You can delete the duplicated lower highlight (with the strong blur and 100% opacity) as it doesn't look quite right on both sides.

Creating the Shadows
Now we need some shadows, they will be cast by the cup body and the lid, we'll work down from the lid first, below the lid draw a new Ellipse shape layer filled with #000000, duplicate the layer and apply a Gaussian Blur (no need for smart filters) at 5% and nudge it down about 5px. Use the Polygonal Lasso Tool (L) to trim the edges of the blurred shadow, draw a shape using the body of the cup as a guide and then right click the selection and Select Inverse to invert the selection to everything outside of the shape, hit DEL to erase.
 Group both of the new shadow layers and set the opacity of the group to 70%
 Once again, use the Ellipse Tool to draw a shape layer at the bottom of the document on a layer below all the others, use the guides CMD/CTRL+; to help you get it in the right place.
 Apply a Gaussian Blur of 5% strength, and nudge it down a few pixels until it looks like a realistic shadow below the cup.

Final Steps
Next for some final touches, if you want to get your own design on the cup go back to the shape we drew right at the start and place your artwork into the clipping mask that we created near the beginning of the tutorial. I have used this excellent pack of vector swirls by Mason Hipp. Final and optional step, above all existing layers create a new adjustment layer Layer > New Adjustment Layer > Levels and tweak the image to get the lighting just right.
 And here we have it, the final product!
I really hope you've enjoyed following this tutorial and that you learned some new techniques during the process, please let us know how you liked it and if you have any issues! Thank you so much for reading!
And here we have it, the final product!
I really hope you've enjoyed following this tutorial and that you learned some new techniques during the process, please let us know how you liked it and if you have any issues! Thank you so much for reading!
Comments