

by Jenn Coyle
August 11, 2014
You can find Jenn doodling and blogging, drinking beer, or running around Philly.
Quick Tip: How to Work With Vector Icons in GIMP
Here at Medialoot we strive to save time for designers, developers and entrepreneurs. But we also understand that not everyone is using Adobe, so we also want to help you save money. In this tutorial, I'll walk you through how to work with our Vector Icons in GIMP, a free design program used by many.
vector icon sets with an SVG file type and download GIMP.Step 1: Open the resource in Gimp and locate the icon you wish to use
Download the Medialoot SVG icon resource and unzip it on your desktop. Then, open GIMP and create a new document with a transparent background. I'm creating the document at 500x500px since that's the size I want my final project to be. Now we're going to import the SVG paths. In the Layers Dialog, click on the Paths tab, then click on the Configure This Tab arrow on the right. Hover over Paths Menu, then click on “Import Path...”. Locate the Medialoot SVG file that you extracted in the beginning and open it.

 Within the Layers/Paths dialog box, find the icon you wish to use by clicking the box to the left of each path until you find it. The various paths will show up and hide when you click on the eye icon.

Step 2: Resize and fill your icon
Once you've found the icon you wish to use in the Paths panel, you can now resize the icon. First we'll move the path to the center of the document. Do this by clicking on the desired path in the Layers dialog and then choose the Move tool (keyboard shortcut is M). Before you try to move the path, make sure to choose the move Path and Move the Active Path in the Tool Options Panel. Then click and drag the icon to the center of your document.
Now you can resize the icon path. First click on the Scale Tool (SHIFT + T) and in the Tool Options Panel, choose to Transform the Path. Also choose to Keep Aspect so the icon doesn't get stretched, or click on the lock icon to lock the aspect ratio.
Then click and drag the icon to the center of your document.
Now you can resize the icon path. First click on the Scale Tool (SHIFT + T) and in the Tool Options Panel, choose to Transform the Path. Also choose to Keep Aspect so the icon doesn't get stretched, or click on the lock icon to lock the aspect ratio.
 In the window, resize the icon by clicking and dragging out at the diagonals until it's at the desired size. Then click the Scale button.
Finally, we'll fill the icon. First choose your desired color in the Color Palette. Then select the Path. You can do this by clicking the Path to Selection icon on the Layers dialog or by going to Select --> From Path (SHIFT+V)
In the window, resize the icon by clicking and dragging out at the diagonals until it's at the desired size. Then click the Scale button.
Finally, we'll fill the icon. First choose your desired color in the Color Palette. Then select the Path. You can do this by clicking the Path to Selection icon on the Layers dialog or by going to Select --> From Path (SHIFT+V)
 Now, fill the icon with the shortcut CTRL/CMD + ,
 Finally you can deselect the path with the shortcut CTRL/CMD + SHIFT + A.
Step 3: Export The Icon
Export the icon by going to File → Export or by typing CTRL/CMD + E. Name your File and choose its saved destination. Expand the Select File Type (by extension) and scroll down until you see PNG (or whatever file type you are looking for).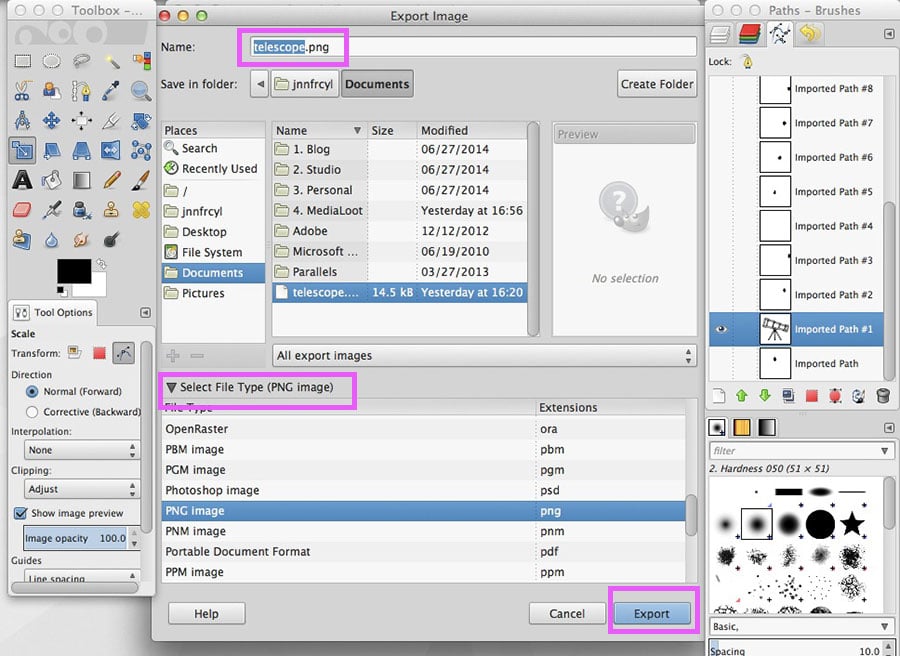 Click Export and then click Export again. You're all done!
The Video Tutorial: How to Resize and Export Vector Icons (SVG) in GIMP
There you have it! You can now manipulate and export SVG's in GIMP. Want to know how to do something else in GIMP? Comment below.
Comments