
by Tony Thomas
January 03, 2014
Tony creates pixel-perfect UI kits & icons. His pug, Wednesday, is Medialoot's beloved mascot.
How to Design an iOS 7 inspired iPhone App Screen
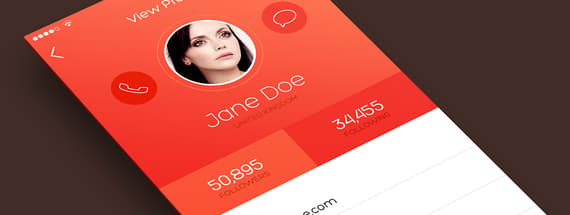
In this tutorial we will be walking through the steps involved to create a thin and flat, iOS 7 inspired design concept for a user profile app screen. By using these simple techniques you too can create stunning, minimal app interfaces. A preview of the final result can be seen below:
What We Will Be Creating

Step 1
Begin by launching Photoshop and creating a new document. In this tutorial I am using Photoshop CC, older versions may look a little different but should be able to achieve the exact same results.
Step 2
When designing custom interfaces for apps, it is always important to bear in mind Apple's user interface guidelines. Not doing so may result in your app looking unprofessional or completely out of place. Create some new guides to mark out the status bar and title bar areas.
Step 3
Draw a solid rectangle using the rectangle shape tool
Step 4
Creating a simple diagonal linear gradient can make an otherwise plain background appear dynamic and exciting.
Step 5
Borrow the top status bar from this free UI kit. The status bar is not actually editable on iOS (other than the colour) so leave it as it is once in place.
Step 6
For the title I have used the beautiful Hero font.
Step 7
To draw the back arrow, start with a thin rectangle .
Step 8
Rotate the rectangle 45 degrees (holding down the shift key to constrain) .
Step 9
Duplicate the rectangle shape and flip it vertically.
Step 10
Place the two rectangle together to form an arrow shape.
Step 11
Similar process for the plus icon, draw a thin rectangle.
Step 12
Duplicate the rectangle shape and rotate it 90 degrees. Or simply draw a new rectangle.
Step 13
The top section of your screen should now look something like this:
Step 14
Draw a circle as shown below by using the Oval tool and holding down the shift key.
Step 15
Now for a little trick which will allow you to get the appearance of two stroke styles on the same object in Photoshop, with the outer stroke also being offset from the shape! (It is not actually important which colour you use for the stroke in this first step and we are setting the Opacity to 0).
Step 16
Inner Glow:
Step 17
Outer Glow:
Step 18
Optionally, you can place an avatar photograph in the document and create a clipping mask using the circle we just made.
Step 19
Add some text for the name of the user:
Step 20
And their location or profession etc. in smaller type below the name:
Step 21
Draw two smaller circles, one on either side of the user avatar. Note: they have slightly different background colour values
Step 22
Place an icon inside each of the circles to complete the buttons. I am using icons from this set.
Step 23
Draw two equally sized rectangles immediately below the orange background. Use a slightly lighter and slightly darker shade of the same orange background colour. This subtle touch create a nice visual effect.
Step 24
Add the text for followers and following stats:
Step 25
For the section below we want to create a minimal list (or "Table View") of contact information.
Step 26
Draw a simple 1 pixel light grey line from the right hand side of the document to the left, leaving about 40 pixels blank on the left.
Step 27
Duplicate the last section a few times and update the text as appropriate.
Result
Comments