
by Tony Thomas
December 08, 2011
Tony creates pixel-perfect UI kits & icons. His pug, Wednesday, is Medialoot's beloved mascot.
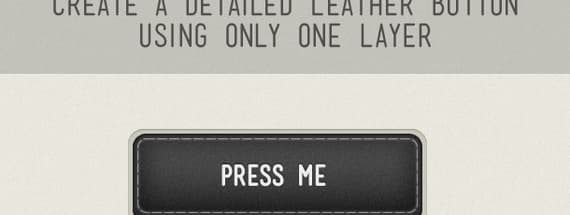
Fireworks Tip: Create a Detailed Leather Button Using Only One Layer
In this tutorial we will show you how it's possible to create a detailed, fully scalable web button, using just one layer in Fireworks. This was originally an experiment with styles and Live Filters (Layer Styles), to see what is achievable. The benefits of this method, over layering objects on top of one-another, is that by saving the styles as a preset, they can instantly be applied to any other object in your document without the need to re-draw. Saving designers time, stress, and money!
Requirements
This tutorial is made using Adobe Fireworks CS5 (Some functionality used in this article may not be available in older versions). Photoshop Live Filters are used, so you will also need to have Photoshop installed on your system to take advantage of those. You will also need to download this seamless leather pattern.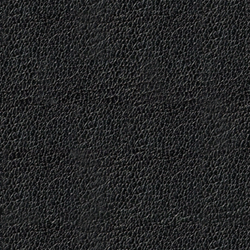
Step 1: New Document
Create a new document in Fireworks and either set a canvas color or draw a rectangle to fill the whole document for the background layer. Here are the settings that I used for the background:
Step 2: Rectangle
Draw a new rectangle on the canvas (this is our "one layer").
Step 3: Round Corners
Set the Roundness of the corners to about 10px.
Step 4: Gradient
Set the fill type to Linear Gradient and use the settings below for your gradient.
Step 5: Leather Pattern
For the Texture, select Other at the bottom of the list, and locate the leather pattern on your computer.
Step 6: Leather Pattern
Once you have located the leather pattern it should look like this.
Step 7: Dashed Border
Apply a stroke around the rectangle with a Basic Dash.
Step 8: Stroke
 In the Filters panel, select Photoshop Live Effects and apply a stroke around the rectangle as shown below.
Step 9: Inner Glow
Apply an Inner Glow with the settings shown below.
Step 10: Inner Glow
Apply an Inner Glow with the settings shown below.
Step 11: Inner Glow
Apply an Inner Glow with the settings shown below.
Step 12: Drop Shadow
Apply a Drop Shadow with the settings shown below.
Step 13: Drop Shadow
Apply a Drop Shadow with the settings shown below.
Step 14: Add Noise
Apply the Add Noise.. filter with the settings shown below.
Step 15: Glow
Apply a Glow with the settings shown below.
Step 16: Inner Shadow
Apply an Inner Shadow with the settings shown below.
Step 17: Drop Shadow
Apply a Drop Shadow with the settings shown below.
Step 18: Finishing Touches
Obviously this is the bit where we can add extra layers to finish the button off, like a nice "Press Me" label
Comments