

by Tony Thomas
June 27, 2017
Tony creates pixel-perfect UI kits & icons. His pug, Wednesday, is Medialoot's beloved mascot.


How to Mockup Any Photo Inside a Frame with Photoshop
Superimpose a photo within a photo. Photo inception?
This quick tutorial will walk you through the steps to mockup any photo within a photo of a frame. This technique uses basic clipping masks, layer styles and adjustment layers to achieve the effect.
What You'll Need
- Photoshop CS6+
- A stock photo of a frame.
- Another photo of anything.
If you want to follow along with this tutorial we are using two excellent stock photos from stocksnap.io you can download them here and here.
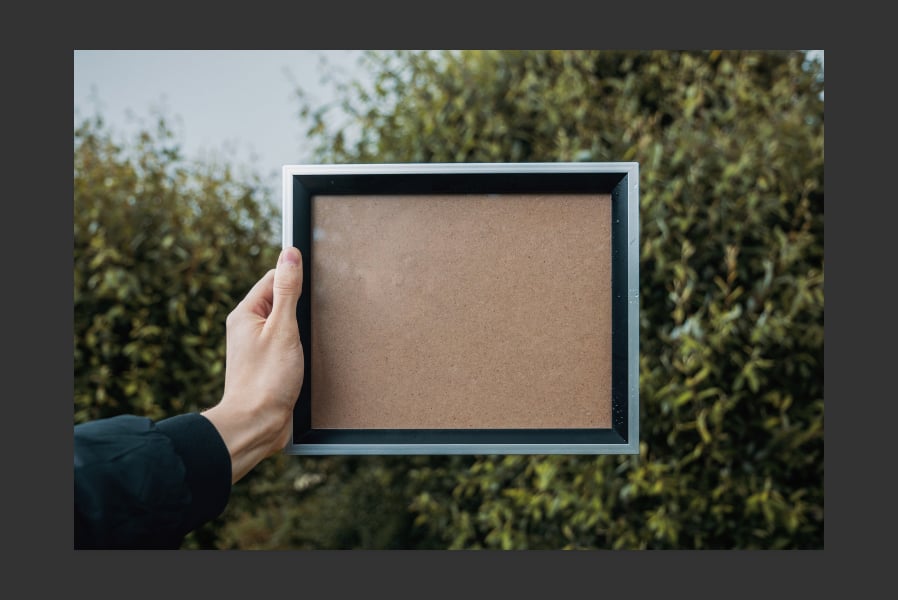
Step 1
Open the photo of a frame with Photoshop.
Step 2
Select the Pen Tool and in the top bar choose Shape from the dropdown. Then carefully draw a shape around the inside edge of the frame. Most frames are rectangle like this one, but this technique will also work with other shape frames.

Step 3
Place the other photo into the document above the shape we just drew. Adjust the photo using the handles so that it roughly covers the area inside of the frame. Then confirm placement.

Step 4
Make sure the photo layer is above the shape layer and right click on it, then choose Create Clipping Mask.
Step 5
Double click on the shape layer to open the Layer Style panel, choose Inner Shadow and enter Opacity 100%, Distance 4, Choke 0 and Size 12.

Step 6
This should make the frame appear to be above the photo, and look more realistic. Adjust the Inner Shadow if necessary.

Step 7
Select the Background layer, then hold down Alt key and click the shape layer to make a selection.

Step 8
Copy the selection (CMD+C) and paste (CMD+V) on a new layer above all the other layers.

Step 9
Desaturate the layer by using Image > Adjustments > Desturate.

Step 10
Go to Image > Adjustments > Levels... and adjust the shadow output so that only some small specs of white remain visible against the black background.

Step 11
Set the Blending Mode of the top layer to Screen and Opacity 50%. This effect is very subtle but it makes the result look more realistic.

Step 12
Now this last part is completely optional, but we are also going to change the color of the frame to make it Gold. Select the Pen Tool again and this time choose Path from the dropdown. Carefully draw around the silver part of the frame.

Step 13
Select the path and create a new Hue/Saturation Adjustment Layer. In the Properties panel click Colorize and enter Hue 34, Saturation 20 and Lightness 0.

Step 14
Click the icon at the top of the Properties panel to switch to Masks and enter 1.0 px Feather. This will blur the edges of the mask slightly.

Step 15
Select the path again and create a new Levels Adjustment Layer this time. Enter 12, 1.06 and 216 for the output values.

Step 16
Switch over to the Masks section of the Properties panel again and enter 1.0 px Feather.

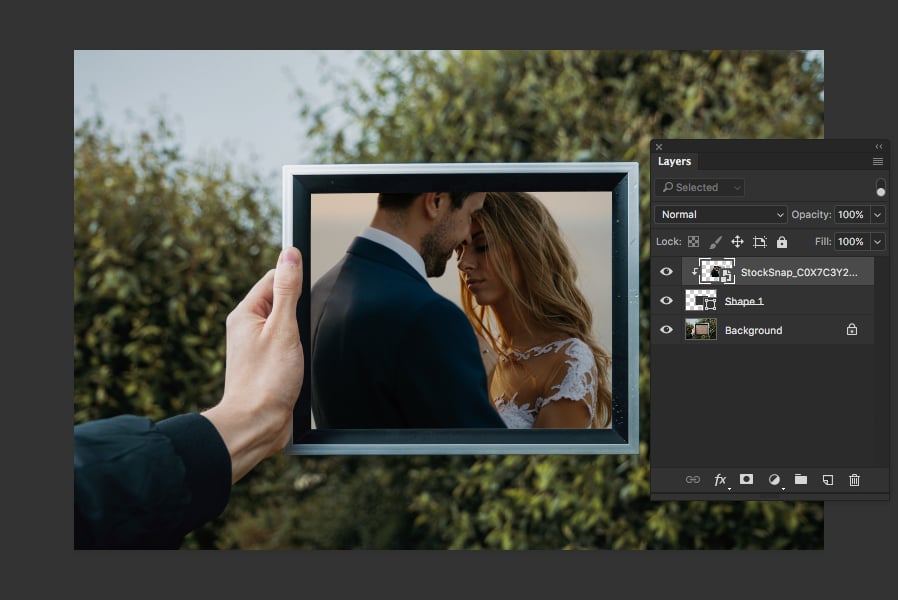
Result & Conclusion
Here is the final result. We have superimposed a photo within a photo and even changed the color of the frame to suit our specific needs. The purpose of this tutorial was to teach you a fool-proof technique for adding photos to frames, with a few tweaks this can be used on almost any photo frame and photo.


Comments