
by Diego Sanchez
February 06, 2019
Diego prevents carpal tunnel syndrome in designers worldwide by making incredible time-saving Photoshop actions and mock-ups.


How to Easily Enhance a Sunset Photo in Photoshop
Photoshop Post-Processing Techniques
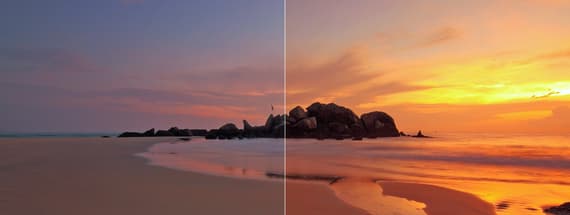
Sunsets are one of the most photographed vistas in all of nature — those golden hour hues are striking to the naked eye. But when we take a look at the printed picture (or on our phone / computer screen) it just never looks quite right. You never seem to capture the breadth and overwhelming glory of those golden colors. Finally, a fix. Here's a quick and easy way to bring back those warm golden sunset colors in Photoshop.
But before we begin, and if you want to follow this tutorial exactly as described, please download the following image from Pexels.
Step 1
Open the sunset picture in Photoshop.

Step 2
Go to Layer > New Adjustment Layer > Gradient Map. Name this layer as “Colors” and click OK.

Step 3
In the Properties panel of the Gradient Map, click on the gradient thumbnail.

Step 4
In the Gradient Editor window double-click on the left color.

Step 5
In the Color Picker window set the color to #F50E09 and click OK.

Step 6
In the Gradient Editor window double-click on the right color.

Step 7
In the Color Picker window set the color to #F5DC14 and click OK.

Step 8
Click OK in the Gradient Editor window.

Step 9
In the Layers Panel, set the Blending Mode of the “Colors” layer to Overlay and decrease the opacity to 20%.

Step 10
Go to Layer > New Adjustment Layer > Curves. Name this layer as “Curves” and click OK.

Step 11
In the Curves Properties panel, select “Medium Contrast (RGB)” from the dropdown.

Step 12
In the Layers Panel, decrease the layer opacity to 30%.

Step 13
Go to Layer > New Adjustment Layer > Levels. Name this layer as “Levels” and click OK.

Step 14
In the Levels properties panel, set the Shadow Input Level to 10 and the Highlight Input Level to 240.

Step 15
Finally in the Layers Panel, decrease the Levels layer opacity to 30%.


Comments