

by Tony Thomas
August 22, 2017
Tony creates pixel-perfect UI kits & icons. His pug, Wednesday, is Medialoot's beloved mascot.
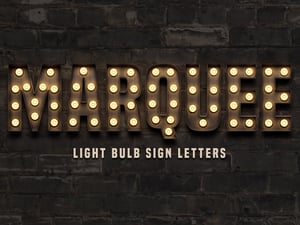

How to Create a Marquee Light Bulb Sign with Photoshop
Use Photoshop 3D tools to make your own broadway lightbulb sign
This tutorial will teach you how to combine 3D features in Photoshop with 2D elements to create a stunningly realistic lightbulb sign. Inspired by glitzy broadway show signs, learn how to spell out your name in lights!
Download
If you want to save some time, we have a full set of high resolution marquee light bulb sign letters and numbers ready to use and available to download here.

Step 1
Launch Adobe Photoshop and create a new 3000 x 2000 pixel RGB document.

Step 2
Download this free texture and place it into your document, it should fit the canvas size nicely.

Step 3
To darken the texture, create a new black color fill layer and set the opacity to 60%.

Step 4
Use the Type tool to enter the first letter of your word (we are actually using the second letter "A" in this example of "MARQUEE" because it happens to be a better letter work with for a tutorial). You need to a use a particularly bold font for this effect to work correctly, I strongly recommend downloading and using the free font Built Titling.

Step 5
Open the 3D panel and choose 3D Extrusion then click Create, or just to 3D > New 3D Extrusion from Selected Layer.

Step 6
Switch to the 3D Workspace if asked, or just make sure you have the 3D and Properties panels visible. Choose the 'A' layer in the 3D panel and in Properties panel click on the Cap tab and enter 15% width and set the angle to the max which is 85%.

Step 7
In the 3D panel select the Infinite Light 1 layer and use the on screen handle to straighten out the light source and set the depth of shadow you want. Then set the Shadow Softness to 100%.

Step 8
In the 3D panel choose the Front Inflation Material layer and in the Properties panel, click the folder icon next to Diffuse and choose Load Texture..

Step 9
Download and select this custom metal texture that I made for this effect.

Step 10
Click on the folder icon again and choose Edit UV Properties.. then set the Scale to U/X 100% and U/Y 300%, Tile to U/X 1 and U/Y 0.33 then both Offset values to 0%.

Step 11
Switch to the Front Bevel Material and choose the Metal Steel preset from the dropdown list. Increase the Reflection slider to 40%. This will make the edges of the letter reflect the main surface texture (But not too much).

Step 12
Head back to the main A layer in the 3D panel and in the Properties panel set the Extrusion Depth to 0.1px. We set it to 0.1 instead of 0 because Photoshop sometimes has rendering bugs when using absolute 0.

Step 13
Now to add some color to the letter, create a new Hue/Saturation adjustment layer with 24, 50, -10 values and create a Clipping Mask with the 3D layer.

Step 14
Create Levels adjustment layer, also clipped to the 3D layer, set the values to 16, 0.82, 255.

Step 15
Our first letter is now ready, the only thing left to do is render the 3D layer. But before we do that, group the layers which make up the A letter and create a copy so that we can use it for the other letters.

Step 16
Use the Rectangle select tool to draw a selection around the letter then right click and choose Render 3D or click the button at the bottom of the 3D panel. Using a selection will speed up the rendering process.

Step 17
It may take a while to fully render the letter depending on your computer and Photoshop settings, you can either wait it out or press the Esc key when you are happy enough with the result to end the rendering process early. When you are happy, right click the layer and choose Rasterize 3D to convert the letter to a bitmap layer.

Step 18
Make another copy of the unrendered letter and rename the group to the next letter you want to create. Select the A layer in the 3D panel and click Edit Source in the Properties panel

Step 19
Change the letter to the next letter you want to create, then save and close the Smart Object.

Step 20
For some reason, this might reset the Bevel angle, if it does head back to the Cap tab in the Properties panel and set the Angle to 85 again.

Step 21
Make a selection around the new letter and render it.

Step 22
Again, when you are happy with the render choose Rasterize 3D to convert it to a bitmap layer.

Step 23
Repeat steps 18-22 for the next letter.

Step 24
Repeat steps 18-22 for the next letter. As you can see the Q letter has a descender which messes up the lighting when you try to render it, in order to fix this we need to adjust the Y coordinate so that the bottom of the letter sits in line with the other letters.

Step 25
When you do this fix the letter Q renders just fine.

Step 26
Repeat steps 18-22 for the next letter.

Step 27
Repeat steps 18-22 for the next letter.

Step 28
When all of the letters have been rendered you can arrange them on the canvas to spell out your word.

Step 29
Download this isolated lightbulb image that I have created for this effect. If you want to make your own, I simply took a photo of a light bulb from my home and used an Elliptical Marquee selection to isolate it from the background.

Step 30
Resize and position the lightbulb to fit inside the first letter of your word.

Step 31
Double click on the bulb layer to open the Layer Styles window, and give the bulb a #FFE699 Color Overlay effect set to Color Dodge and 30%. This is to make the bulb appear brighter.

Step 32
Next, give the bulb an #E0BF4C Outer Glow set to Color Doge, Opacity 100% and Size 80px.

Step 33
And finally for the bulb, it also needs a bit of shadow. Add a Drop Shadow using Black (#000000) set to Linear Burn and Distance 10px, Spread 5%, Size 20px.

Step 34
The bulb looks a little more realistic now, we still need to add some extra glow, but it is easier to do that after we have all of the bulbs ready.

Step 35
Duplicate the bulb layer and layout each copy on the letter. Try to keep roughly equal distance between each bulb.
Tip: you can use Distribute vertical centers to help keep equal vertical distance between bulbs. Holding down the Shift key when dragging copies of bulbs keeps them in a straight line too.

Step 36
Now for the extra glow, group all of the bulbs for this letter together and inside that group add a new empty layer. Set the Blending Mode to Soft Light and use a soft round 175px brush to add some extra #FFC88D glow around the bulbs. Notice in the example below how I have positioned the brush over the bulb off-center to get some light reflecting on the bevel.

Step 37
Select the Bulb group layer and hold CMD/CTRL whilst clicking once on the base letter layer to make a selection, then click on the Add layer mask button at the bottom of the layers panel. This will create a mask to stop the bulb's light from overflowing the letter.

Step 38
Repeat steps 35-37 for the remaining letters. When you are done, group all of the letters together.

Step 39
Duplicate the word group, and convert the bottom copy into a Smart Object. Then go to Filter > Blur > Gaussian Blur and enter 35 Pixels.

Step 40
On the blurred layer, set the Fill Opacity to 0%.

Step 41
And give the layer a Black (#000000) Color Overlay, Opacity 100%. This will create a shadow behind your word.

Result & Conclusion
And here is the final result. If you are new to using the 3D tools in Photoshop, I hope that this tutorial has been a fun way to familiarise yourself with them. I think that the important thing to take away is that 3D and 2D elements can actually be seamless combined together to create a stunning result, you don't necessarily need to choose one or the other.

Download
If you want to save some time, we have a full set of high resolution marquee light bulb sign letters and numbers ready to use and available to download here.


Comments