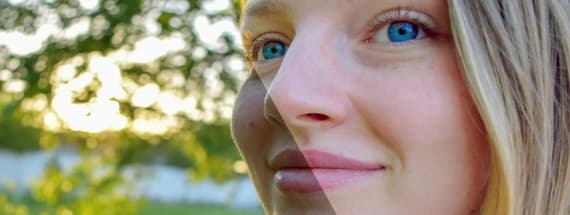
How to Brighten Portraits in Photoshop
Make Faces Really Pop
It might not happen too often, but if find yourself with no access to Lightroom or the Camera RAW Filter in Photoshop, you can still brighten your portraits in Photoshop with a very simple technique. In this tutorial, you'll learn how to focus on a specific area of your image, as well as adjust all the values once you finish if you are not too happy with the end result.
If you want to follow this tutorial as described, and have a better idea of how to control the values used in the different adjustment layers, you can use the same image we're using: download it from Pixabay: Download
Step 1
Open you image in Photoshop.

Step 2
With the background layer active, go to Layer > Duplicate Layer. Name this layer as ‘Brighten’ and click OK.

Step 3
With the ‘Brighten’ layer active, go to Layer > Smart Objects > Convert to Smart Object.

Step 4
Go to Image > Adjustments > Shadows/Highlights.

Step 5
In the ‘Shadows/Highlights’ panel, adjust the Amount, Tonal Width and Radius according to your image. Focus your attention to the area you want to brighten for the correct values. In this case, an Amount of 55%, a Tonal Width of 75% and a Radius of 745px will work just fine. Also, if you want, you can increase a bit the Color Correction value to enhance the color a bit more. Once you finish, click OK.

Step 6
Hold the Control key in your keyboard, and click over the Layer Mask icon in the Layers Panel to add a full mask to our ‘Brighten’ layer.

Step 7
Click over the Layer Mask to make it active and with a soft white brush paint over the area you want to brighten to reveal the adjustments we just did. In this case, I will reveal the entire girl face and clothes.

Step 8
Go to Layer > New Adjustment Layer > Curves. Set the name of this layer to ‘Curves’ and click OK.

Step 9
With the Curves layer selected go to Layer > Create Clipping Mask.

Step 10
Click once over the curve in order to add a new control point, and set the Input value of this point to 110 and the Output to 145. Note that you may need to change a bit these values according to your image.

Step 11
With the ‘Curves’ layer selected go to Layer > Layer Style > Blending Options.

Step 12
Hold the Alt key on your keyboard, and drag the right half of the black color from the Underlying Layer slider to around 125. Be sure to have the ‘Blend If’ option set to Gray and click OK. Again, note that you may need to change a bit this value according to your image.

Step 13
Go to Layer > New Adjustment Layer > Hue/Saturation. Set the name of this layer to ‘Hue/Saturation’ and click OK.

Step 14
With the ‘Hue/Saturation’ layer selected go to Layer > Create Clipping Mask.

Step 15
In the Master Channel of the Hue/Saturation Properties Panel, increase a bit the Saturation according to your image. In this case a +10 value will work just fine.

Step 16
Go to Layer > New Adjustment Layer > Selective Color. Set the name of this layer to ‘Selective Color’ and click OK.

Step 17
Again, with the ‘Selective Color’ layer selected go to Layer > Create Clipping Mask.

Step 18
Select the Reds from the Colors dropdown menu and apply the following values. Again, note that you may need to change just a little bit this value according to your image, simply aim to achieve a good skin tone while softening the shadows using the Black values.

Some Final Words
As we have been working on our image as a Smart Object to change the Shadows and Highlights and adjustment layers to make our portrait a bit more brighten, we can easily go back and change the values to our liking without having to make the whole process again.


Comments