

by Jenn Coyle
September 09, 2014
You can find Jenn doodling and blogging, drinking beer, or running around Philly.


Absolute Beginner’s Guide to Creating a WordPress Meta Box
WordPress is arguably the leading content management system (CMS) in the world today. It powers over 60 million websites globally. WordPress is one of many content management systems that allow you to update your site through a simple Web interface instead of editing and uploading HTML files to a server.
One of the core feature provided by WordPress in extending its functionality is the Meta Box. These meta boxes enable one to easily add additional data to post and page content.
Examples of Meta boxes in WordPress includes:
- The Category meta Box for categorizing posts.

- The Tag meta box for setting tags for post.

- The feature image meta box for setting feature image for a post.

Aside the above default meta boxes, WordPress provides a Meta box API that allows plugin and theme developers to add a custom piece of data to a post or page in WordPress - what's better is that it can fit directly into most of the default pages inside WP, so you can easily place it inside the Post-Editor for easy use by non-technical users.
In this tutorial, we will learn how meta boxes are developed as we build one that provides other non-technical users of a WordPress powered site the ability to add a custom message / notification before a post or page content.
Such a feature could come in handy when for example - after publishing an article, you wish to notify readers that the information in a given post is now obsolete.
WordPress Meta Box Development
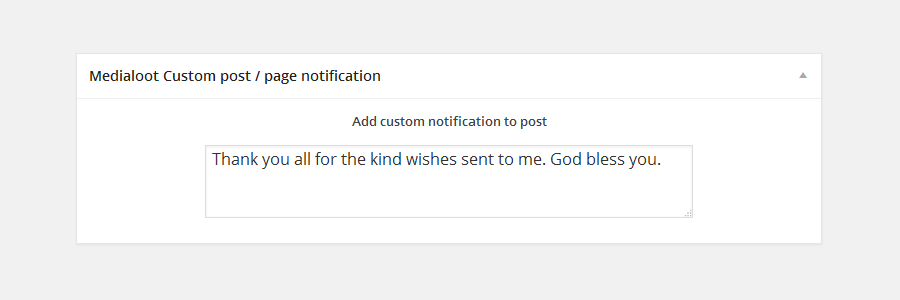
Below is a screen-shot of the Meta Box to be developed at the end of this tutorial.
Without further fussing, let's get started developing the Meta box.
Since we are making the meta box out of a WordPress plugin, the plugin header (information about the plugin for use by WordPress internal) would be the first thing to go into the plugin file.
<?php

/*
Plugin Name: Medialoot Custom Post Notification
Plugin URI: http://medialoot.com
Description: Add custom message to each WordPress post
Version: 1.0
Author: Agbonghama Collins
Author URI: http://w3guy.com
*/
?>
We need to decide where the meta box should appear.
In our plugin, the meta box will be added in the post and page screen.
To achieve this, a PHP function is created containing a variable that stores an array of where to show the meta box and a foreach loop that loop through the array and add the meta box to the given screen using the add_meta_box function.
/**
 * Adds a box to the main column on the Post and Page edit screens.
 */
function medialoot_add_meta_box() {

	$screens = array( 'post', 'page' );

	foreach ( $screens as $screen ) {

		add_meta_box(
			'medialoot_metabox_id',
			__( 'Medialoot Custom post / page notification', 'medialoot_plugin' ),
			'medialoot_metabox_callback',
			$screen
		);
	}
}
The add_meta_box() function add meta boxes to the administrative interface.
Below are the function argument passed to it and what they do.
- medialoot_metabox_id: the HTML ID attribute of the box.
- Medialoot Custom post / page notification: title displayed at the top of the meta box.
- medialoot_metabox_callback: function that actually renders the meta box
- $screen: the array variable containing where the meta box will be displayed
We need to hook the medialoot_add_meta_box() function to the add_meta_boxes Action to register the meta box otherwise, it won't be recognizable by WordPress.
add_action( 'add_meta_boxes', 'medialoot_add_meta_box' );
The medialoot_metabox_callback function below renders Meta Box content.
function medialoot_metabox_callback( $post ) {

	// Add an nonce field so we can check for it later.
	wp_nonce_field( 'medialoot_meta_box', 'medialoot_meta_box_nonce' );

	/*
	 * Use get_post_meta() to retrieve an existing value
	 * from the database and use the value for the form.
	 */
	$custom_notification = get_post_meta( $post->ID, '_medialoot_custom_notification', true );

	echo '<label for="myplugin_new_field">';
	echo '</label> ';
	// Display the form, using the current value.
        echo '<div style="margin: 10px 100px; text-align: center">';
        echo '<label for="custom_message">';
        echo '<strong><p>Add custom notification to post</p></strong>';
        echo '</label>';
        echo '<textarea rows="3" cols="50" name="medialoot_custom_notification">';
        echo esc_attr($custom_notification);
        echo '</textarea>';
        echo '</div>';
    }
Let me explain what the code in function medialoot_metabox_callback above does.
A security nonce field is added so we can check for it later during verification before the data inserted into the form fields are save to the database.
Retrieve and store the meta-data values in a variable only if it exists. This is done in order to populate the fields with its values when it present in the database.
The HTML form consisting of a text-area for capturing the title and description tag data respectively is echoed / printed.
Saving the Meta Box Data
A meta box isn't fully functional until it can save its data to the database.
The name of the function to handle the saving of data will be medialoot_save_meta_box_data.
Its code is as follows.
function medialoot_save_meta_box_data( $post_id ) {

	/*
	 * We need to verify this came from our screen and with proper authorization,
	 * because the save_post action can be triggered at other times.
	 */

	// Check if our nonce is set.
	if ( ! isset( $_POST['medialoot_meta_box_nonce'] ) ) {
		return;
	}

	// Verify that the nonce is valid.
	if ( ! wp_verify_nonce( $_POST['medialoot_meta_box_nonce'], 'medialoot_meta_box' ) ) {
		return;
	}

	// If this is an autosave, our form has not been submitted, so we don't want to do anything.
	if ( defined( 'DOING_AUTOSAVE' ) && DOING_AUTOSAVE ) {
		return;
	}

	// Check the user's permissions.
	if ( isset( $_POST['post_type'] ) && 'page' == $_POST['post_type'] ) {

		if ( ! current_user_can( 'edit_page', $post_id ) ) {
			return;
		}

	} else {

		if ( ! current_user_can( 'edit_post', $post_id ) ) {
			return;
		}
	}

	/* OK, it's safe for us to save the data now. */

	// Make sure that it is set.
	if ( ! isset( $_POST['medialoot_custom_notification'] ) ) {
		return;
	}

	// Sanitize user input.
	$custom_notification_data = sanitize_text_field( $_POST['medialoot_custom_notification'] );

	// Update the meta field in the database.
	update_post_meta( $post_id, '_medialoot_custom_notification', $custom_notification_data );
}
The code above first verify that this came from our screen and with proper authorization, because save_post can be triggered at other times.
Verification that the nonce previously set in medialoot_metabox_callback is valid is also done.
The submitted meta-box data gets sanitized using WordPress sanitize_text_field function which convert HTML to its entity, strip all tags, remove line breaks, tabs and extra white space, strip octets.
The meta-box data is updated to the database using the update_post_meta function.
We still need to hook the save_post action to the save_post action to save the meta-box data to WordPress database when the post or page is updated.
add_action( 'save_post', 'medialoot_save_meta_box_data' );
At this juncture, we are done coding the meta-box and also added the ability for the meta-box data to be saved to the database.
Using the Meta Box Saved Data
Remember the aim of this meta-box is for adding a custom notification at the top or before a post/page content.To achieve our goal, we need to programmatically retrieve and add the meta-box data at the top of the post or page.
The custom_notification function below does this by:
function custom_notification($content) {
        global $post;
        //retrieve the metadata values if they exist
        $custom_notification_data = get_post_meta(
                        $post -> ID,
                        '_medialoot_custom_notification',
                        true
        );
        if (!empty($custom_notification_data)) {
            $custom_notification = "
                        <div style='background-color: #FFEBE8;
                        border-color: #C00;
                        padding: 2px;
                        margin:2px;
                        font-weight:bold;
                        text-align:center'>
            ";
            $custom_notification .= $custom_notification_data;
            $custom_notification .= "</div>";
            $content = $custom_notification . $content;
        }

        return $content;
    }
- Detect the post ID gotten from the
$postglobal object. - The meta data is then retrieved from the database and saved to the
$custom_notification_datavariable. - Next is the Notification data wrap by an HTML div tag.
To display the custom notification before the actual post or page content, our custom_notification function need to be hooked to the the_content WordPress filter which filter the content of the post after it has been retrieved from the database and before it is printed to the screen.
add_action('the_content', 'custom_notification');
Viola! we have successfully completed our custom post notification meta-box plugin.
Using the Meta Box
Install and activate the plugin to your WordPress powered website. you can grab the plugin file here.
Go to the post or page edit screen, you should see the Meta Box displayed.
Add a custom notification text to the meta box, and save / update the post or page.
Preview the post or page and you should see the notification text displayed at the top of the content as depicted in the image below.

Summary
That's it! You should have a fully working meta box.
By now, I am quite certain you know what WordPress Meta boxes are, how they work and how you can create one for your WordPress powered site.
Have any questions or suggestion for improvement, I will be glad to hear them in the comments.


Comments