

by Nathan Brown
July 14, 2015
Nathan Brown is an artist/designer from Austin Texas. He specializes in web design, poster design, and album cover art -- and has a particular affinity for grunge and retro design styles.


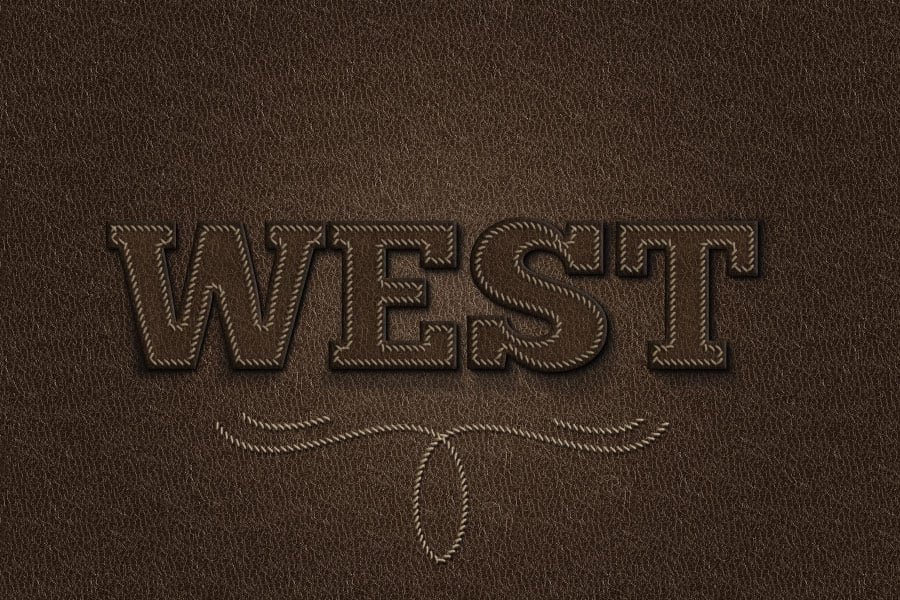
Create an Easy Stitched Leather Type Effect in Photoshop
Leather Crafting on a digital field
In this tutorial I'm going to demonstrate how fast and easy it is to create a realistic looking stitched leather effect in Photoshop. Let's dive right in and see how it's done.
Step 1 - Leather Textures and Type
First up, we'll need a good leather texture. I pulled mine from the excellent Distressed Leather Textures right here at MediaLoot. I chose number 9 from the collection.
Since we're working with leather I wanted to choose a thick, bold font that has a touch of western flare. Chunk Five fit the bill nicely.
I created a new document (1800x1200), and positioned the text in the center using a size large enough to see the stitching detail that we'll be applying in later steps.

Step 2 - Applying Layer Effects and Shadows
We need to create a pattern from our leather that we can apply to the text. To do so, create a square selection from the center of our leather texture. The size isn't important. Copy (Ctrl/Cmd+V), create a new document (Ctrl/Cmd+N) and paste (Ctrl/Cmd+V) the leather square into the new document.

Now click Edit | Define Pattern and click okay to add the pattern to your pattern collection. Back over on our working document, double click the text layer to open the Layer Style window. Select Pattern Overlay on the left, and choose the newly created leather pattern from the Pattern drop down. Make the opacity around 65%

Now let's run through settings for the rest of the layer styles for our type.


Now, to add some additional shadows, I Ctrl/Cmd+Clicked the text layer's thumbnail on the layers panel to create a selection. I created a new layer and moved it below the text layer. I filled it with black and applied a Gaussian Blur. Then I reduced the opacity to 75%.

Now click Edit | Transform | Warp and adjust the shadow so that it extends out beyond the edge of the type in various places.

Repeat this process to create another shadow layer. This time warp it's edges a little further, and reduce it's opacity to 30%.

Step 3 - Applying Stitching to Our Type
For the stitching I found an incredibly well made brush set by user boyingopaw at deviantArt. (http://boyingopaw.deviantart.com/art/stitch-81849757) I'm using the 9th brush in the set, but any of them should work well. First up, Ctrl/Cmd+Click the layer icon for the text layer again to make a selection of the type. Now click Select | Modify | Contract and enter 15.

Now, with the Marquee Tool (M) selected, right click, or (Ctrl/Cmd+Click) on Mac, anywhere on the document and choose "Make Work Path", and enter 1 for the tolerance.

Now create a new layer. Click the Brush Tool (B), and make sure that the stitch brush you want to use for the stitching is selected on the brush drop down. You may need to reduce the size of the brush down to around 20. Now select the Pen Tool ( P ) and right click, or (Ctrl/Cmd+Click) on Mac, anywhere on the document again and choose "Stroke Path". Choose "Brush" for the tool, and click okay.

Apply the following layer styles to the stitching layer.

Step 4 - Additional Embellishments
For the embellishments, I went over to illustrator and drew a path with the pen tool. To make this path symmetrical, I only drew half of it. I then copied the shape and flipped it. Then I joined the paths at the end of the bend.

I copied and pasted the path over to Photoshop. When pasting from Illustrator you will see this dialog box. For our purposes here, choose "Path". Once the path is pasted in, use the Pen Tool to right click and stroke the path with the stitch brush like we did before. Make sure you create a new layer for the stroke to be placed on.
Apply the same layer styles as we did on the type stitching.
Duplicate the layer and rotate it for the top embellishment.

For the stars, I added the following layer styles to make them look pressed into the leather.


Step 5 - Finalizing with Light and Shadows
On a new layer, use a large, soft white, brush and click once in the middle of the document to create a light source. Set this layer's blend mode to Overlay.

On another new layer below the light source layer, use a large soft black brush and paint around the edges to create some dark shadows. Set this layer's blend mode to Overlay as well. Reduce the opacity to around 50%.

Finally, add a Gradient Map adjustment layer using the preset purple to orange. Set the layer's blend mode to Overlay and reduce it's opacity to 30%.

I hope you picked up some new techniques from this tutorial. Please feel free to share your results using the comment fields below.


Comments