

by Nathan Brown
August 25, 2015
Nathan Brown is an artist/designer from Austin Texas. He specializes in web design, poster design, and album cover art -- and has a particular affinity for grunge and retro design styles.


Create an Easy Faded Vintage Photo Effect in Photoshop
A simple and easy vintage wash technique
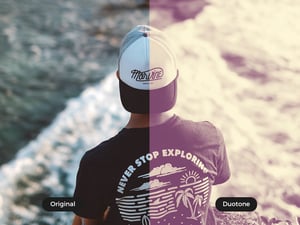
Vintage photo effects have incredible appeal. You can take a, seemingly ordinary, well exposed photo, and add a touch of faded vintage lighting and suddenly the image is transformed. In this tutorial I'll walk you through my process to achieve a faded vintage look in Photoshop. It's surprisingly easy and very quick to implement. Let's take a look at how it's done.

I chose this image from Unsplash. I felt like this photo would lend well to a faded vintage appearance. Open this one or one of your own in Photoshop.

First up, let's apply a little shadow around the edges of the image. Create a new layer and fill it with 50% gray by clicking Edit | Fill and choosing 50% gray for use. Now set this layer's blend mode to Overlay.

Now apply a Gradient Overlay layer style using the above settings.This applies a slight vignette around the edges of the photo.

Next, add a Gradient Map adjustment layer using the one of the preset gradients (purple to orange). Set this adjustment layers blend mode to Overlay and reduce the opacity to around 65%.

I added a Levels adjustment layer to fade the image. This step is basically a dance between reducing the contrast to fade the photo but keeping enough of it to not completely wash out the details. Adjust the sliders on your image similar to what I have, but watch your image making sure you don't over do it.

Add a Hue/Saturation adjustment layer and reduce the saturation to around -60. This keeps some of the color but reduces the image to an almost black and white appearance.

Now we'll add a Color Balance adjustment layer. This is my favorite step as you can adjust the warmth and final tone of the image. Start with the Shadows, and punch up the Red and Yellow tones similar to what I have.


Adjust the midtones and highlights similar to what I have above. Continue increasing the red and yellow tones.

As a last step we'll add a touch of grunge. You can download the texture I'm using here. Copy and paste this texture to a layer above all others in your document. Change its blend mode to "Screen" so that only the white portions show through.
I hope you found this tutorial easy and useful. I'd love to see your vintage photos! Feel free to share in the comment fields. Below are some more photos that I applied the same vintage wash techniques to.


Comments